Pages

Friday, 28 February 2014

Popping Petals CQC230

Hello!

I got quite a lot done yesterday so today I've got another card challenge for you - today its for Colour Q. And again its another really lovely colour combo - but different from colours I usually use.

Tonight I'm going to meet little Arthur! He's my bestie's new babe and also lil bro to my gorgeous godson, Euan! They are such a lovely family and I can't wait to hang with them all this evening, eat pizza and of course have LOTS of cuddles! 


As I was thinking about this combo I decided how striking this combo would be to use black as the main base colour and add pops of colour! 


Stamp Set: Petite Petals, Lots of Thanks, Gorgeous Grunge
Ink: Coastal Cabana, Crumb Cake, Versa Mark
Cardstock: Coastal Cabana, Crumb Cake, Summer Starfruit
Punch: Bird Builder, Petite Petals, Itty Bitty
Embellishments: Pearls
Other: White Embossing Powder

Okay, I am just loving this. I've never been a black girl. I do like colour but I wouldn't say I like dramatic pops of colour like this. However, recently this has really grown on me - I am just loving colour pops against the black! 

After fiddling around with the flowers for a little while on the black card base I decided that it needed something else to ground it so I dug out the gorgeous grunge set and embossed the splatters in white! It was just the perfect background. The flowers' petals are bent up for a bit more dimension. The branch from the bird builder punch made the perfect leaves for the flowers - I just snipped off the three/four leaves and discarded the extra leaves and branch. 


When it came to the sentiment, I really thought I wanted to emboss a sentiment but I was feeling really happy with my card and I was actually feeling pretty nervous about screwing up my card. For that reason I decided to emboss my sentiment on a separate piece of cardstock and then add it over to. Using the tone on tone look it doesn't detract so much as using another colour would have and allowed me to add just a tiny pop of colour with a couple leaves and mini flower! 

What do you think to this card? Are you liking the black and colour "pop" look? 

Happy Stampin',

Thursday, 27 February 2014

Elegant Friend

Hi there!

How is it Thursday already?! I really don't know where this week has gone! I've been hard at work today doing some tidying in my craft room and making some pretties too! Today I've got a challenge entry for the Paper Players.


Now this sketch is so lovely and simple - and I began this thinking I'd do a seriously simple card with a few strips of DSP and an embellishment or two. I'm not sure it ended up quite the way I'd intended but its cute! 


Stamp Set: Beautifully Baroque, Label Love
Ink: Coastal Cabana, Crushed Curry
Cardstock: Coastal Cabana, Whisper White
DSP:  Eastern Elegance
Punch: Scallop Border, Artisan Label
Embellishments: Brights Button, Brights Candy Dots, Whisper White Baker's Twine

Pretty simple really, I stamped off the baroque stamp for a lighter shade in the background and added little strips of co-ordinating pattern paper over the top. 


I hand cut the label really close to the stamped image and then layered it on the Cabana cardstock for a little border. the sentiment was stamped in the cabana also and cut out with a dimensional underneath for some height. 


Finishing touches were candy dots and a button - I didn't have these in Crushed Curry and Coastal Cabana but I used the closest I did have - Bermuda Bay and Daffodil Deilght. I don't think it looks too off colour wise! The little baker's twine bow just helped soften the button. 

I'm really loving this colour combination - what do you think? Now, I'm back to my craft room to play some more!

Happy Stampin'

Wednesday, 26 February 2014

Pistachio Flowers

Hey there! 

Man its been a manic day - invigillating, helping out Auntie, Bible study with the ladies and of course more sewing. I'm disappointed that I haven't managed to get into my craft room today. I have some cards I'm desperate to make but alas it just didn't happen today. I am planning on spending most of tomorrow in there - it needs another SERIOUS tidy and of course there will be crafting too! 

Here's another card I made a little while ago and was saving up for one of these spells where I haven't been able to get any crafting done! 


Stamp Set: Flower Shop, Express Yourself
Ink: Pistachio Pudding, Early Espresso
Cardstock: Very Vanilla, Pistachio Pudding
Punch: Pansy
Embellishments: Pearls

I used the 2 way glue pen to mask a strip off on the card and then used a sponge and some yummy Pistachio Pudding ink down it. I then just stamped some flowers and added a punched one too for a bit of depth. 


Pearls are the finishing little touch - yes I added quite a few to the centre here but with a card this simple I felt I could be a little bit more extravagant with my pearls. Besides, they're only 3p each! 


A simple flower and a bit of quick colouring added with a blender pen finishes off the inside.

Hope you enojyed this and I promise I will try to share something fun and new tomorrow! 

Happy Stampin',

Love-ly Birthday

Hello there! 

Its been another busy day sewing and so on around here and blogging slipped my mind again. 

I had an epic 11 hours sleep last night! (I was in bed before 9pm!!) So in general today has been a good day. My friend, Sam, popped over for a coffee too which was lovely. Only thing that's tinged today with annoyance was a phone call back from the camera shop - they've looked at the lens and it needs a new motor....expensive!!! Argh!

Anyway, I have a pretty little card from January's card club for you today. Its very similar to a card I shared a few weeks ago. 


Stamp Set: Language of Love, Express Yourself
Ink: Crisp Cantaloupe, Pool Party
Cardstock: Whisper White, Crisp Cantaloupe, Real Red, Pool Party, Silver Glimmer
Punch: Small Heart, Owl Builder, Decorative Label
Other: White Gel Pen

So this is a dead simple card but I just wanted to share that now Valentine's Day is over, you shouldn't shove this stamp set to the back of your shelves to gather dust until next year...this set doesn't just have to be for Valentine's or love cards...don't you think it makes a cute little birthday card too? Any so cheery!  


Love the little pops of bright red against the cool pastels. 

Hope you enjoyed this super quick card today. Now I have to get to bed - super packed day tomorrow - invigillating, cleaning and cooking at Auntie Lil's and Bible study....plus most likely more sewing and some card making too! 

Happy Stampin', 

Monday, 24 February 2014

Fishin' Around....sorta

Hello! 

Wow its been pretty busy today! I had Envelope Punch Board Class here this morning followed by a goodly amount of sewing and some card making! As a result I forgot to get a blog post out so sorry that today's is a little later than usual...but I'm here now. 

Today I have an adorable little project I made a while ago but haven't gotten around to sharing it with you yet. The card was based on the super cute a la carte stamp Fishin' Around


And here's my version.....


Stamp Set: Pennant Parade
Ink: Tangerine Tango, Baked Brown Sugar, Pear Pizzazz, Basic Black
Cardstock: Pool Party, Whisper White, Crushed Curry, Crumb Cake, Pear Pizzazz, Window Sheet
Big Shot: Circle Framelits
Punch: Owl Builder, Small Heart, Bird Builder, 3/4" Circle
Embellishments: Dazzling Diamonds

Aren't the fish just darling?! So to make the shaped card I just made sure my card base was folded and slightly too short on the top and bottom to cut a complete circle. the white is torn to give the impression of water. The crumb cake at the base is also torn to look like sand. Everything was popped up on dimensionals in layers so I could add some window sheet over the top which really gives the impression of a fish bowl. The dimensionals really add a lot of dimension to this card which I just love. 


Just a little photos to show some of the dimension! The window sheet is adhered with glue dots along the top and then cleverly hidden with a strip of Pool Party that looks like the rim of the bowl!


I made sure that the sand layers and the white top was very slightly smaller than the Pool Party card base so it looks like an actual fish bowl. 

The branch from the bird builder punch works great for some weeds and the tiny sentiment from Pennant Parade worked perfectly on the little flag! 
Dazzling Diamonds just takes these little fishies to the next level! Oh and there's glitter on the bubbles too!

Hope you enjoyed this cute little make. 

Happy Stampin',

Sunday, 23 February 2014

Simple Sunday - Watercolor Note

Hello!

What a lovely day yesterday was, we had a pretty chilled day - I did some designing for a little something I'm making and sewing at the moment. I'll be sure to show it when its done and gifted! Stuart and I had brunch - english muffins, eggs and bacon - yummy! Which was followed by a walk around the park and our first ice-cream of the year! The ice-cream van was there and it was just too tempting - so we shared one. I also got my camera to the repair shop, the guy doesn't know exactly what's gone wrong but its something to do with the lens - fingers crossed its not too difficult and costly to fix. I'm currently using my little pocket camera for my card photos and whiles its okay, it just isn't the same as my digital SLR. What did you do with your Saturday?

Anyway, here's a nice and simple card today. 


Stamp Set: Happy Watercolor, Lots of Thanks
Ink: Black Stazon, Tangerine Tango, Gumball Green
Cardstock: Watercolor Wonder Notecards

These beautiful notecards come with a watercoloured effect complete with a watercolor paper texture too (they even have the thickness you'd associate with watercolour paper)! They look great and are so lovely to use. All yo need is a sentiment and a little image or punch and voila you're done! 


Here I stamped the orchid flower from the Happy Watercolor set and using just a couple of ink pads and a blender pen, coloured in the flowers. Added a sentiment and I'm done. 

These watercolour notecards are great to have on had for a quick card or an emergency card - stamp and go! Plus this is only one layer so perfect for posting with no additional costs... oh and they come complete with envelopes too!!! These are £11.95 for 20 which works out at 59p each - such a great deal and such a good quality! If you'd like some, you can order them on my online shop or if you're local to me, you can shoot me an email at amanda_burditt@hotmail.co.uk and place your order. I have an order going in sometime next week and would be happy to tag anything on! 

Happy Stampin',

Saturday, 22 February 2014

Cosy & Floral CQC229

Hi there!

Isn't it just a gorgeous morning? The sky is blue and all appears happy in my little bit of the world! You getting up to anything fun this weekend? I have to take my camera in for fixing (yes something else has gone wrong...oh the joy of technology). 

I've got a ColourQ challenge today. I've gotta admit I wasn't initially taken with the combo but the more I looked at it and pondered on it, the more I realised how much I liked it. Plus its quite different to the colours I'd naturally reach for. 


I was pleased to get to use my Peach Parfait ink again - I loved that shade of orange and really sad its not current anymore but I've hung on to my ink pad and pen....plus I've still got some cardstock kicking around. I actually really wanted to make a card with Peach Parfait as the cardbase but it just didn't look right in the end. I don't have Apricot Appeal so substituted for Crisp Cantaloupe which turned out to work pretty well with the other colours.

I also found a new challenge site called The Card Concept - the twist to this challenge is you have to categorise your card's style. Mine is Simple & Layered. Card Concept has a theme this week which is floral which seems to fit in perfectly with this card.


And here's my simple, layered, floral creation.


Stamp Set: Kind & Cosy
Ink: Peach Parfait, Crisp Cantaloupe, Always Artichoke, Summer Starfruit
Cardstock: Whisper White, Always Artichoke
Punch: Decorative Label

So I've kept this card quite clean and simple, it was a bit of a struggle to leave all that white space as is but I just had to tell myself, no, it looks good, anything else would be overkill! I used the Stampin' Write markers to colour the cute floral stamp in all those yummy colours and made my own faux pattern paper border along the bottom. The little strip of card is just covering a little bit of not so good stamping - hooray for cover-ups!

I stamped the flowers in artichoke on the card base for a little texture as it was looking very flat and boring without it.


Again I used the markers for colouring in the sentiment and took the time to colour in all the flowers in "you" - I think it just makes the sentiment that extra bit more fun and adds a pop of colour. To add a little lift to the decorative label punch I punch the top and bottom portions of the decorative label on artichoke and layered it just that little bit for a little border - love getting more uses out of punches!!


Finally, the inside was really dark so I added some white card for easier writing and just a little stamping to make it as pretty as the outside! 

Do you like this colour combo? Let me know what you think!

Happy Stampin',

Friday, 21 February 2014

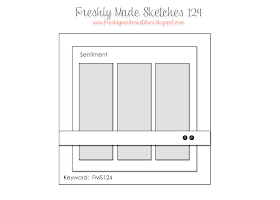
Kaleidoscope Guy FMS124

Hi!

I'm back today with a Freshly Made Sketch. I actually struggled with this sketch for quite a while - sometimes when you've got too much choice its difficult just going of something with confidence!


Stamp Set: Hello Lovely, Happy Day
Ink: Crushed Curry, Tempting Turquoise, Old Olive, Versamark
Cardstock: Basic Black, Tempting Turquoise
DSP: Kaleidoscope
Embellishments: Brights Candy Dots
Other: White Embossing Powder, White Gel Pen, Zig Zag Paper Trimmer Blade

I'm actually really liking this card....now. It took quite a while - I must've repositioned those striped pieces of DSP about 10 times! I got them in the wrong order so the stripes didn't line up - they were pretty well stuck down  so removing them was not an easy task. Eventually they got there though. I purposely chose a paper that looked so fun and dramatic but also really quite scary to use - its very in your face! The white lines around the edge is a great way of making a faux layer and is such a simple way of just adding a little something to the card! 


I debated about what to add on top of this background - I knew I wanted a strong pop of colour. I finally pulled out a stamp set I got at convention and just haven't played around with much. I also decided to keep the sentiment monochrome so it would blend with the background and not distract from the colourful elements. The candy dots seemed to finish it off nicely adding little dots of colour around the card to balance it. 

I'm super happy with the end result - it would make a very funky masculine card! I always need those!!

Hope you enjoyed this. Do you play along in challenges? If so, which? 

Happy Stampin',

Thursday, 20 February 2014

Starry Baby

Hello folks! 

Today's little project is for this week's Paper Player's challenge.


At the moment it seems that everyone around me is having babies! My bestie, Kathryn, just had a sweet little babe last week. I am very excited that my little godson now has a gorgeous little baby brother! I know he'll make a great big brother!! Oh, and I just cannot wait to meet the latest addition, baby Arthur! Isn't it just the sweetest name?! Here's a fun little starry card to welcome him in the world!


Stamp Set: Banner Blast (SAB), Sweet Essentials
Ink: Wisteria Wonder, Pool Party, Pear Pizzazz
Cardstock: Wisteria Wonder, Pool Party, Pear Pizzazz, Whisper White, Silver Glimmer Paper
Punch: Merry Minis, Banner

I just LOVE al the stars and banners on this card! The stars stamped in different intensities of tone on tone ink really add a lot of depth to the background. The little star punches just really add that little something extra to the background. 


I just love the banners at different lengths and overlapped. Again it adds a lot of depth to the card. The staggered length of the banners also works to draw the eye across the card too. I liked the little touch of Wisteria here even though its not a traditional boy colour I think it really cuts through al the green and blue just adding a little pop here and there. 

I hope you enjoyed this sweet little new baby card. 

Happy Stampin',

Wednesday, 19 February 2014

Sketched Watercolor

Hiya!

How is your week going? Mine is so, so. Not getting as much accomplished as I'd hoped for, oh well. Some weeks are just like that thought, right? 

Jobs are slowly getting done around here though... I did get my sewing machine into the shop. Its still under warranty so hopefully that means it'll be a free service which I'm hoping that will sort the problems I'm having, if not, my sewing machine guy should be able to work it out. Going to take around 2 weeks though! Boo! :(

One thing I am very excited about is a return of the Great British Sewing Bee!! Anyone else on my side of the pond watching it? Got a favourite yet? I'm undecided although I think Heather seems quite sweet! 


Stamp Set: Simply Sketched
Ink: Black Stazon, Island Indigo, Gumball Green, Raspberry Ripple, Soft Sky, Baked Brown Sugar
Cardstock: Soft Suede, Baked Brown Sugar, Gumball Green, Very Vanilla, Watercolor Paper
Big Shot: Woodgrain TIEF
Embellishments: Naturals Buttons, Linen Thread

This little stamp sets is a hostess set available in the current Annual Catalogue. Its so cute and perfect for a spot of watercoloring! Here I stamped the little bird stamp and then made a mask out of some printer paper and a bit of temporary adhesive. with the mask in place I then stamped all the leaves and berries around it, transforming a sweet little stamp into a pretty little scene. 

I used the super handy aqua painters which have a well that holds water - totally love them! 


I decided to do a bit of a torn edge - its a bit different and rustic which seems to match in with the card well. The background is woodgrain embossed pattern just for a bit of interest. 

I decided that something else was missing so after a bit of contemplation I added some linen thread and a gorgeous little naturals button which seemed to finish it off perfectly!

Thanks for stopping by,

Happy Stampin',

Tuesday, 18 February 2014

Elegant 30

Hello! 

Just a super quick post today, Stuart is on holiday from school (yay!) and as a result we are trying to get a bunch of jobs done around the house, there's a fence to repair and I need to get my sewing machine to the repair shop. I'm not really sure what the matter with my machine is at the moment but it REALLY doesn't like me!!! Hopefully my lovely sewing machine man can get it all sorted for me! (And hope it won't cost too much either!!)

I thought it was about time that I showed you a card that my cousin asked me to make for her a few months ago. Its a pretty fun and elegant 30th birthday card! 


Stamp Set: Express Yourself
Ink: Elegant Eggplant
Cardstock: Elegant Eggplant, Elegant Eggplant Core'dinations, Pistachio Pudding, Silver Glimmer Paper, Vellum
Big Shot: Beautiful Wings Embosslit, Typeset Alphabet, Labels Framelits, Beautifully Baroque TIEF
Embellishments: Rhinestones, Pistachio Pudding Ruffle Ribbon

I just love the core'dinations card - isn't it just beautiful embossed and sanded? The embossing folder wasn't tall enough to do the entire card front so I did as much as I could and just worked it into the design with a bit of the ruffle ribbon. 


The 30 and butterflies just add a bit of sparkle and really stand out in the pistachio and glimmer paper against all that deep, rich eggplant colour. 

What's your thoughts on this colour combo? Its a bit different, right? 

Have a great Tuesday!

Happy Stampin',

Monday, 17 February 2014

Inky Fingers Challenge 7

Hi!

Today is a another Inky Fingers Challenge, its the third week in the month which is also know as stamp set challenge! 

We've got a beautiful stamp set for you to play and create with this week, Flower Shop!


Stamp Set: Flower Shop, Gorgeous Grunge, Happy Day
Ink: Marina Mist, Wisteria Wonder, Pear Pizzazz, Pistachio Pudding, VersaMark
Cardstock: Marina Mist, Wisteria Wonder, Pear Pizzazz, Pistachio Pudding
Punch: Pansy, Bird Builder
Embellishments: Pearls, Tea Lace Paper Doilies, Baker's Twine
Other: White Embossing Powder, Blender Pens

So the flowers are embossed in white on coloured cardstock, for a little more dimension I coloured the flower in with blender pens. It worked really well! 

I had pretty much everything on the card and it was just looking a bit flat, thankfully I hadn't actually stuck everything down yet so it all came off and I added some splatters in the background with the Gorgeous Grunge set. I had toyed with stamping some tone on tone flowers all over the background but I was afraid it'd be too much and I really didn't want to detract from the main focal point. 


The leaves are actually the wing from the bird builder punch. To help them fit in with the flowers I sponged around the edge.


I went a little crazy, stamping, embossing and colouring in some flowers inside the card too! 

I hope you'll hop on over to the Inky Fingers blog to check out what the other talented design team members have made for you and then get creative. Make a card yourself and upload it. I would love to see your creations!

Happy Stampin',

Sunday, 16 February 2014

Simple Sunday Watercolor

Hi there! 

Wow, it was a late one yesterday! Stuart and I went to London yesterday, and not ALL went to plan. We had planned to do our own thing in the daytime - he'd go to the Science Museum and see a Hidden Universe IMAX film and all the "cool" sciencey things while I hopped next door to see the Wildlife Photographer of the Year exhibition at the Natural History Museum.

So we parted ways, I ended up standing in a queue to get in in the rain for a good half hour, finally got in just in time for my ticket time, got a bit lost but eventually found the exhib and entered. I'd see about 5 or 6 of the 100 photos on show and then a announcement came over the speakers "Attention, attention please. This is an emergency evacuation, please exit through the nearest fire escape." Oh great! I happened to be standing next to the escape so we all filed out, just in time for it to begin raining AGAIN! I was cold, wet, hungry (Stuart had my lunch in his bag!!), alone and totally confused about what was going on. Stood around waiting for half an hour and finally gave up when it started POURING with rain and headed for the Science Museum....I went back mid afternoon but they were sold out so couldn't readmit me and weren't very helpful with trying to give me a refund - apparently it has to be requested online because I bought the ticket on their website(!?!?!).

For dinner I'd been dying to try out a place called Wahaca which does Mexican food - I've heard its good and its run by one of my favourite Master Chef winners! Could we find the place!?! Nope! We has to settle for Pizza Express instead....oh well.

 In the evening we went to see Cirque du Soleil at the Royal Albert Hall. It was AMAZING!! Apart from a 45 minute break in the show half way through the second half due to a technical problem. They such a good job at picking up where they'd left off and everything, plus, some of the tricks they were doing suspended from ropes etc...I don't blame them for stopping due to lighting issues! I'd totally go see them again! Hopefully next time without the technical breaks though! 

Anyway, onto today's Simple Sunday is such a super easy, clean and simple card! Its using the Happy Watercolor stamp set (see below). This set is March's card club set. If today has whet your appetite and you'd like to make 5 gorgeous card using this set for £8 (or get the club for free when you place a £25 order on the night) then contact me to book your seat! 


Stamp Set: Happy Watercolor
Ink: Black Stazon, Crisp Cantaloupe, Crushed Curry, Calypso Coral
Cardstock: Whisper White

This is an easy one layer card - great for whipping up super quick when you need an emergency card or perfect for posting as its completely flat!

This stamp set has these beautiful gradient stamps in it that look just like watercolour - this gives the look of watercolour with none of the hassle of watercolouring! 


Really liking this out of the lines effect on the flower here! 

Hope you enjoyed this clean and simple card. Come back tomorrow for another Inky Fingers Challenge!!

Have a beautiful Sunday!