Pages

Monday, 31 March 2014

My Digital Monday - Cake & Ice Cream

Hi there! 

Its the beginning of another week, last full week working at school doing my current job. It'll be Easter holidays after this week is over and then the girl I'm covering for will be back after the break. I'm actually really going to miss it, its challenging and I know I really don't see the best side of the school but I'm enjoying it!

Today I've got a digital card for you today using the Colour Q colour challenge for the week. They just looked really yummy and just like ice-cream colours.


My Digital Files -
Ink/Cardstock: Apricot Appeal, Coastal Cabana, Basic Grey, Calypso Coral, Whisper White
DSP: Howlstooth & Scaringbone
Stamp Set: Sweet Scoops, Cake & Ice Cream
Punch: Curly Label, Cupcake, Scallop Edge

I thought I'd run with the idea of ice-cream and cake and do a light and bright birthday card! I'd had the Sweet Scoop MDS stamp set on my wishlist for a little while so I thought I'd treat myself to it as it would be perfect for the card...I knew I would be using this set again so £2.95 seemed like a right bargain! 

I stretched out the colours I had by changing the opacity  which gave me lighter shades of the same colour. I also lowered the opacity on the polka dot DSP as it was a bit in your face. 

There's a handy "matt" button on the MDS punches that will allow you to add a matt to the punched shape, I just added a really thin one in 100% intensity grey just for a bold clean line around the punch. Lovely, right? 


I thought I'd just do a pretty little inside for the card also.

Hope you enjoyed another MDS creation. I love being able to sit on the sofa, watching tv with my laptop and create a little something with MDS.

Happy Stampin',

Sunday, 30 March 2014

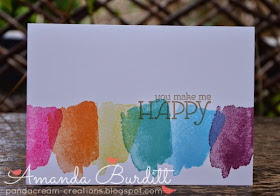
Simple Sunday - Watercolour Rainbow

Hi! 

I've go another quick and simple Sunday card for you.


Stamp Set: Happy Watercolor
Ink:Melon Mambo, Pumpkin Pie, Daffodil Delight, Bermuda Bay, Tempting Turquoise, Rich Razzleberry, Baked Brown Sugar
Cardstock: Whisper White

This is one of the cards that we made at March's card club! A pretty and simple one layer beauty! I am totally in love with rainbow colours at the moment. They just add a real pop of colour and just look SO happy and cheerful! 

 Best to start with the middle colours and work out to make sure you get all the colours on there, I think they look best overlapped a little, this also means that you can fit more colours onto the card! 


A nice happy sentiment in a neutral brown was all it needed. 

It's Mother's Day here in the UK today so I have my parents, Stuart's parents and his brother Rich over for dinner today - best get cracking on with the roast! 

Have a wonderful day,

Happy Stampin', 

Saturday, 29 March 2014

Bubbly Celebrations

Hi! 

So the following blog post was supposed to go out yesterday but by the time I remembered I needed to photograph the card it was too dark, and I'd missed the deadline for adding my card to the Paper Players blog so I just thought as I was so tired I'd have the day off blogging and just get it out today with a decent photo...so sorry for my tardiness, enjoy!

Thank goodness its Friday! Its been a long week and I'm feeling pretty worn out. Yesterday I was not feeling very well at all - the joys of working in Student Services surrounded by kids saying they don't feel very well or telling me they've been throwing up the day before.... wonderful!!

So as a result of not feeling very well I didn't really get much done yesterday when I got home from school and playing Miriam at church for the Bible expo. I did really want to play along with the Paper Players Challenge so I just did something very simple. It was a sketch this week. 


I know that the shapes can be everything and what kept springing to mind was replace the shapes with a spray of flowers but I do a LOT of floral cards and wanted to challenge myself a bit so actually forced myself to keep the circles theme. I thought it could make quite a nice bold masculine card! 


Stamp Set: Remembering Your Birthday
Ink: Basic Grey
Cardstock: Bermuda Bay, Whisper White 
DSP: Kaleidoscope
Big Shot: Circles Framelits
Embellishments: Brights Candy Dots

I think this card turned out quite nicely. I toyed around wit the idea of rotating the sketch to landscape but eventually decided to just keep it portrait. I did think it'd have a bit more of a wow factor by being elongated. 


The sentiment is stamped on a strip which I then cut with the framelits so it'd fit over the centre section of the largest circle. I like that it toned down the big punch of colour and it was also a different way to add a sentiment to the card rather than the banner which I was tempted to do but are quite common these days! 

I added a couple smaller circles that weren't in the sketch just to balance the card out and stretch the circles out across the area more. Candy dots are a nice fin little extra touch.

  
Oh, this got the husband's sign of approval for a "manly" card! 

Happy Stampin',

Thursday, 27 March 2014

Rainbow Birthday

Hi there! 

I have a card I've made for The Card Concept today. The challenge this time is to create a birthday card. Now this seemed like a pretty simple challenge so I thought it'd be fun to try a new technique I found on you tube.


I loved the bright colours in the picture so I thought I'd use that as a little bit more inspiration! 


Stamp Set: See Ya Later (SAB)
Ink: Versa Mark, Rich Razzleberry, Pacific Point, Bermuda Bay, Old Olive, Daffodil Delight, Pumpkin Pie, Real Red
Cardstock: Very Vanilla, Watercolor Paper
Other: Embossing Powder, Water, White Gel Pen

I stamped and embossed the sentiment first on the watercolor paper and then sponged on the ink like a fun rainbow all over the watercolor paper. Next, splatter water over the paper and allow to react with the paper for a little bit. It created this gorgeous splotchy effect. I used the heat tool to just dry the paper when I thought it'd reacted enough. After all this I then placed scrappy paper over the top and ironed off the embossing powder. The photos really don't go this technique justice, it just looks great, clean and matt watercolor paper like the embossing powder was never there.


The final touch is just a little dashed line around the edge with a white gel pen. 

Now Card Concept likes us to define our cards by a certain style. I'm really tossing up between Clean & Simple or Clean & Graphic. I think it fits quite well in both categories. Its such a simple card, totally flat and post friendly but really contains a massive WOW factor!! I'm in love, I hope you are too?

If you like this card and love the sentiment, don't forget you only have until March 31st (next Monday) to place your £45 orders and get free Sale-A-Bration products! This stamp set See Ya Later is one of them!!

Thanks for stopping by, 

Catch you again tomorrow,

Happy Stampin',

Wednesday, 26 March 2014

Spring Get Well

Hello! 

Its a long and busy week this week, not much time for crafting and blogging I'm afraid. I'm super busy at school each day, plus helping Aunty Lil and my parents' church has a Bible exhibition on this week with live actors of which I happen to be one. I'm not much of an actor but anything to help them out and the local school kids attending seem to be really enjoying it too which is nice to see! 

Oh and to just add a little more interest to my week, I've got a bit of an eye infection. I went to see my friend Emma at the pharmacy and she was able to give me some eye drops so I'm hoping this will work. 

I have another get well card I made a little while ago for a friend having an op.

Stamp Set: Petite Petals, Thoughts and Prayers
Ink: Pear Pizzazz, Crisp Cantaloupe, So Saffron
Cardstock: Crisp Cantalouope, So Saffron, Pear Pizzazz, Pistachio Pudding
Embellishments: Pearls
Punch: Bird Builder, Itty Bitty, Petite Petals

This is pretty similar to previous cards I've shown you. I used the scoring stylus and the foam sheet to give the flowers some body. 

I'm just loving the Pistachio Pudding and Pear Pizzazz together, I think they really play off each other so well.  The dashed line is just a nice simple detail around the outside edge of the card. 


The itty bitty flowers are stamped with the Petite Petals flower and just the middle punched out. I really like doing this as it just seems to blend and tie the card together that extra little bit. 

Lots of little leaves finish it off with some pearls for a finishing touch.


Inside is just another bit of a sentimen and a few more flowers. I used the stylus to add some shape bit left the pearls off so that it didn't bulk up the inside of the card. 

Happy Stampin',


Tuesday, 25 March 2014

Peppa Pig

Hey! 

I haven't done much punch art lately but I found the perfect opportunity last week. Stuart's cousin, Georgia, was 3! She just loves Peppa Pig! I thought I'd just include a picture of Peppa for any of you who have no idea who she is. Has Peppa made her way over State-side? 

Peppa Pig

Isn't she cute? She looked pretty simple to make but the head was going to be the most tricky! 


Stamp Set: Express Yourself, Petal Parade (SAB)
Ink: Pear Pizzazz, Strawberry Slush, Basic Grey 
Cardstock: Whisper White, Crisp Cantaloupe, Primrose Petals, Basic Black, Marina Mist, So Saffron, Pool Party, Pear Pizzazz
Big Shot: Ovals Framelits, Typeset Alphabet
Punch: 1 3/8" Circle, Modern Label, 1" Circle, Owl Builder, Itty Bitty, 1 3/4" Scallop Circle

So, the head, I eventually decided the best way to do it would be to make a template with the 1 3/8" circle punch and the modern label. I then drew around it and added a curve under to make the correct shape that I could hand cut out. I didn't have a circle punch of the correct size for her nose so I freehanded mine but I think the 1/2" circle would work a treat. 


 Peppa's eyes and nostrels are made with the ever so handy owl builder - notice the owl punch was also used for the balloons! I also used the owl punch for a mask that I lightly sponged the cheek in. Her ears and feet are actually from the 4 petal flower with two petals snipped off. 

The legs and arms are thin strips - couldn't be easier! Same for the tail, I just twirled it around a thin stick to curl it! I love her cute tail! 


Inside I wanted to add Georgia's age - I think its a cute touch on a kid's card! 

Hope you enjoyed my version of Peppa! 

Happy Stampin',

Monday, 24 March 2014

Cherry Cupcake

Hello! 

Again, a second post today, its just a really quick post with a card made with this week's Freshly Made Sketch


I started this card on Wednesday, but it didn't get finished until today. I had a vague idea of what I wanted to do but was just struggling with the perfect sentiment. In the end I couldn't find the sentiment I wanted and didn't have time to make up my own so I changed my idea slightly to get this finished in time.


Stamp Set: Create a Cupcake
Ink: Pistachio Pudding, Crumb Cake, Raspberry Ripple
Cardstock: Crumb Cake, Whisper White, Raspberry Ripple, Gumball Green
Punch: 1 3/4" Circle, Cupcake Builder
Embellishments: Whisper White Baker's Twine, Cherry Cobbler Seam Binding

I thought it'd be cute to do a patterned background with lots of little cherries. I originally wanted to make a big cherry for the topper in place of the cupcake but that didn't work out in the end. It was quite time consuming but I like it better than the cherry stamp. 


I layered up some ribbon and baker's twine and then a cupcake on top of that. Cute huh? Okay, hope you enjoyed this, hopefully I'll be more organised on challenges this next week! 

Happy Stampin',

My Digital Monday - Happy Life!

Hi! 

Its Monday again! I have a full week, so it should be interesting at the very least! 

So, Monday is the My Digital Monday slot. This week I made a pretty simple scrapbook page. This is actually just a random scrap book page. Its an old photo of Stuart and I from about 6 years ago! We look so young!! 

I wanted to make a spring time page - this is a bit of a different spring look. Instead of peppering it with plenty of colour and using lots of fresh white I thought I'd use a black base. This way all the white and ice-cream colour embellishments would really pop off the dramatic background. 

Also another reason for choosing black is just for the challenge! Generally black is a colour I don't use, its bold and can be quite intimidating. I'm trying to conquer my fear and just try something new! What do you think? Are there colours you're scared of?


My Digital Files - 
Stamp Set: Blossoms Abound
Punch: Get It Done Tag, Square
Embellishments: Paper Doily, Sweet Sorbet, Blossoms Abound


All the flowers and the cute bunting and banner are embellishments - they are pre coloured so all I needed to do was add them where I liked. 

The two sentiments I used were stamps from the coordinating stamp set to the embellishments so they fit together perfectly style wise. 

I added drop shadows behind all of the embellishments and layers so it gives all the elements a little lift - takes 2 seconds but really improves the look at work. 

Happy Stampin',

Sunday, 23 March 2014

Simple Sunday - Fresh Meadow

Hello! 

I'm having a very nice relaxed weekend! Its gonig to be a busy full on week so I'm just trying to enjoy some calm before! Now, I've got a simple spring time card for you today.  


Stamp Set: Morning Meadow
Ink: Strawberry Slush, Pear Pizzazz
Cardstock: Whisper White
DSP: Gingham Garden
Punch: Pansy, 1 3/4" Circle
Embellishments: Candy Dots

Tip for getting the circle centred, punch out a circle from some scrappy paper and add a little bit of adhesive - it doesn't have to be much, just enough to hold it in place. Position the circle where you want it, tack it in place and then you can punch with certainty that you're not going to mess up your designer paper. 


I'm really enjoying the clean, fresh springtime feel this card is exuding. The Morning Meadow hostess set has several sentiments in it so you could easily make this card in a few colour variations and even different sentiments too! 

I chose to use some candy dots because I didn't want chunky sparkles on my card. Its just the perfect little accent and is much more post friendly too! 

Thanks for stopping by,

Happy Stampin',

Saturday, 22 March 2014

Quick Boy's

Hello there! 

I just have a super quick post today. I'd intended on getting some new things made today but errands and vegging out on the couch won over! There's always this evening! 

This is a quick card I made for one of Stuart's cousins, Harry, last month. His birthday kind of crept up on me and then I forgot and needed something fun and quick.


Stamp Set: Gorgeous Grunge, Remembering Your Birthday
Ink: Tempting Turquoise, Bermuda Bay, Old Olive
Cardstock: Whisper White, Old Olive
Big Shot: Typeset Alphabet
Punch: 1 3/4" Circle

I just did a quick stamp, stamp, stamp with the splatter from Gorgeous Grunge and then added Harry's age and a sentiment. It couldn't be simpler! He loved it too.

Happy Stampin',

Friday, 21 March 2014

Birthday Cupcake

Hello! 

So first day of new temporary job was yesterday. Absolutely loved it. Feeling pretty shattered - so much to take in and learn. I even conquered my fear of phones to call some parents to chase up some kids' absences!  

Just wanted to remind you there's only a week more days left of Sale-A-Bration! If you want to get some (or even MORE) of the gorgeous SAB goodies, you don't have long left to put your order in! If you live local to me you can place an order through me - I'll be putting an order in on 31st so email or call with your order and I'll be sure to add it. Alternatively if you live a little further afield, you can order online from my shop


Stamp Set: Create a Cupcake, See Ya Later (SAB), Remembering Your Birthday
Ink: Crisp Cantaloupe, Pistachio Pudding, Rich Razzleberry, Baked Brown Sugar
Cardstock: Crumb Cake, Very Vanilla
Punch: Cupcake Builder
Ribbon: Pistachio Pudding Ruffle
Embellishments: Pearls

I cracked out another set that's been gathering too much dust of late - Create a Cupcake! Such a sweet, yummy set! I used the stamp-a-ma-jig to get the cupcakes perfectly aligned in the background. 


Love how different the cupcakes in the background look to the popped up one by just stamping them on different coloured card! 

If you don't like fussy, intricate cutting the punch is a total gem! I did add the flower which I hand cut but you could add a candle or cherry that comes on the punch instead! 


Just a little quick stamping inside to pretty up things a little more! 

Not sure where I got the idea of this colour combo, but it kinda works. The razzleberry really stands out amongst those pastels and neutrals. What do you think? Like the combo?

No I'm off to do some baking, tidying, a little crafting and then hit the hay! Thankful for a better night last night, I didn't sleep well Thursday, it was really disturbed and I seemed to have nightmare dreams about being chased....oh dear!  

Happy Stampin',

Thursday, 20 March 2014

Sixty!

 Hi there! 

So today is my first day of my new temporary job. I'll let you know how it goes later!

I've got a card my friend Ally asked me to make a little while ago. It was for her Auntie that was turning 60. I didn't have much direction apart from she wanted a big 60 on it. 


Stamp Set: Teeny Tiny Wishes
Ink: Island Indigo
Cardstock: Pool Party, Island Indigo
Punch: Decorative Label
Big Shot: Typeset Alphabet, Decorative Dots TIEF (SAB)
Ribbon: Island Indigo Chevron, Baker's Twine
Embellishments: Tea Lace Doily, Pearls

I thought it'd be fun to crack out some of the core'dinations cardstock for the background. Embossed and sanded with the decorative dots makes a really pretty confetti pattern. Because this card was longer than the average card I had to emboss as much as I could then rotate the paper 180 and emboss the rest. With the dots being a bit random there wasn't actually too much of a join mark, however this was covered up with the ribbon and doily anyway!


I just used a tiny piece of the doily, that's all it really needed! 

So unfortunately the chevron ribbon was a bit too big and chunky for the card so I did a new little trick I learnt recently - I cut down the centre of the ribbon. To stop the ribbon from fraying I ran a lighter down the size to just melt the ribbon that little bit. Its a fab way to get more use out of what is a pretty chunky ribbon. Don't you just love it? To cut down on more bulk, I just tied the ribbon with a bit of baker's twine instead of a bow or knot. 

After adding the 60 and a sentiment the final touch was a good sprinkling of pearls! 

Until next time, 

Happy Stampin',

Wednesday, 19 March 2014

Summer Silhouettes

Hello there!

Woah, bit of an interesting day! I got offered a job! So its just a temporary job for a couple weeks working in the student services department at the school that I've been invigillating at. Its not much but I'm quite excited to try something new! It'll be a tiring few weeks though juggling this new job, Auntie Lil, Stampin' Up stuff plus I'm playing the role of Miriam in the church's Bible exhibition for local school kids next week! 

Do you have stamp sets that you got thinking you'd love them and use them ALL the time but rarely pick up? I sure do! One of those sets for me is Summer Silhouettes. I thought it was a really pretty set and I just loved the leaves in it, I've often gotten it out to use but just haven't made it work in the card. Anyway I decided I was determined to make some cards using this set, I'd gone on google image search to collect a few ideas - try and get myself out of the mental block I seem to be having with the set. I came across a really simple and sweet card by Julia and knew I HAD to CASE it. You can see her card here. The colours were just fabulous!


Stamp Set: Summer Silhouettes, Happy Day
Ink: Pistachio Pudding, Pear Pizzazz, Coastal Cabana, Bermuda Bay
Cardstock: Whisper White, Coastal Cabana

I kept the card quite similar to the one I was CASEing. I really loved the look of this homemade pattern paper (DSP) and really wanted that to be the focal point of the card. Its really quite a simple little card that you could make using some DSP.


This piece was one whole piece that I stamped and then cut afterwards so the flowers match up. Quick tip for knowing where you should stamp the sentiment, place the the "DSP" pieces loose on the card base where you'd like them then use a pencil to lightly draw a line where the gap between the two pieces of "DSP" will be. You can then remove your "DSP" and stamp between the two pencil lines. Rub them out and add your DSP with some dimensionals for a bit of added lift.

Happy Stampin',

Tuesday, 18 March 2014

Strawberry Petals

Hi! 

How did it get to the end of Tuesday already?! I spent the afternoon sewing (lots of lovely fabric to use that I bought at the Knitting & Stitching Show last week!!). Anyhow, I did get a little time to do some paper crafting too. 

Things are taking a little longer to get done as my foot is really causing me havoc which means less crafting time - going to try and get to the doctor this week. Its very painful and all that walking in London really didn't help matters, not to mention Stuart sat on it getting into bed last night. Ouch!!

I had a brilliant time yesterday with Kat and the boys. We tested out a new place just down the road for me and it was very lovely - huge slices of cake and lots of tea plus a fun play area for the kids. I got loads of cuddles! Yay!! Arthur is just the sweetest thing and very snuggly and even Euan seem full of hug yesterday! I'll never say no to a hug. 


Not the most pictuesque photo in the world - I look tired, Arthur is mid yawn and Euan has a mouthful of mini cheddars!! But I thought you might like to see a little photo of these cuties!


I was clearing out a bag I had taken to Vicky's a while ago for our last crafty play date and found some flowers I'd made in preparation for making into a car when I got home. I actually decided to scrap my original idea of putting the large pansy flower on the same card as the petite petals and ended up making two clean and simple cards!  


Stamp Set: Flower Shop, Petite Petals, Express Yourself
Ink: Strawberry Slush, Summer Starfruit, Gumball Green
Cardstock: Strawberry Slush, Summer Starfruit, Gumball Green, Very Vanilla
Punch: Pansy, Petite Petals, Boho Blossoms, Bird Builder
Embellishments: Large Rhinestones

This is pretty straight forward really, There's two layers on the pansy flower and the petite petals for some extra dimension and body. I decided to add one of the punches from the boho blossoms punch because I thought it could use a little more of something in the centre. It was also stamped with the Petite Petals stamp so it blended in well with the other layers - its those little touches that really make a card look extra polished! Dontcha think? More "fluff" was added to the boho punch by snipping between each petal. 


I like the idea of having a few of these cards ready made up for emergencies - when you've got the stamps and punches out, they don't take long to put together. However, leave the sentiment off until you need a card then you can quickly add whatever sentiment you need! 


Stamp Set: Petite Petals, Express Yourself
Ink: Strawberry Slush, Summer Starfruit, Gumball Green
Cardstock: Strawberry Slush, Summer Starfruit, Gumball Green, Very Vanilla
Punch: Petite Petals, Itty Bitty, Bird Builder
Embellishments: Rhinestones

Again, pretty much the same as the previous card but with smaller flowers all in a row. The itty bitty punch has the Petite Petals stamped on them so they have that extra texture. 


I'm really enjoying the vanilla on these cards. I began to reach for white and then thought hey, you use white on pretty much everything at the moment, so I tried out vanilla here and it worked a treat! 

Hope you enjoyed these little numbers today. Sorry my post got up so very late in the day! 

Happy Stampin',