Wednesday 30 April 2014

Mosaic 21

Hello! 

The weekly balance has tipped, we are now on the downhill towards the weekend! Only 2 more days of school until a nice long weekend! Woohoo! Today's been a battle, we were very busy, short staffed and to top it off my head has been feeling very fuzzy, like the beginning of a migraine! I didn't sleep well last night either so I'm going to get a really early good sleep tonight! 

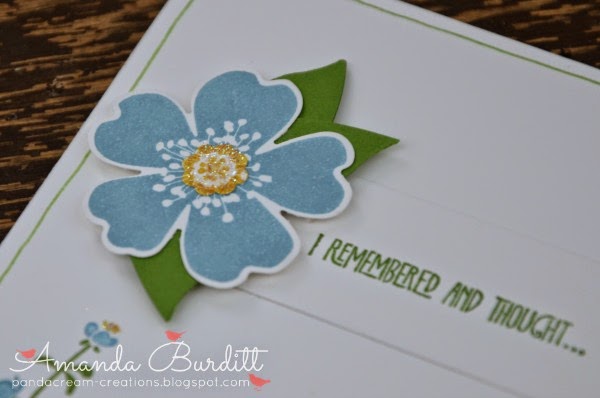
Today I have the other 21st birthday card I made for Bekah's birthday last week! You can see the first one I made here, as that one was really soft and elegant so I wanted something quite different, I think this hits the brief!


Stamp Set: Mosaic Madness, Remembering Your Birthday
Ink: Rich Razzleberry, Bermuda Bay
Cardstock: Baked Brown Sugar, Bermuda Bay, Rich Razzleberry, Very Vanilla
DSP: Natural Composition
Punch: Itty Bitty, Decorative Label
Big Shot: Typeset Alphabet
Embellishments: Rhinestones, Crystal Effects

I pulled out one of my most favourite pattern papers of the moment - Naturals Composition. I just love the neutral colour that seems to work beautifully with any other colour. Its also got gorgeous glossy embossed designs which are just crying out to be inked up. Here I used 2 colours - bermuda bay and rich razzleberry to create this ombre type effect. By applying both colours to the centre section it really helps the 2 colours to blend together! 

I started with the 21 on the decorative label punch on the card and then worked in the other elements around it. 


I love the mosaic pattern in the paper and immediately thought that the Mosaic Madness set would pair perfectly as some scattered elements. I also decided to add a few of the 4 petal itty bitty punches to fill in the gaps, and the shape worked well with the mosaic stamps and paper too!

I wanted this card to be quite fun and jazzy so I went a little crazy with lots of little rhinestones in the centre of the mosaics and also a few just scattered on the background mosaics. Love that look, plus it just gives the card that extra special touch! 

One final special touch I added to the front of the card was to add crystal effects to the 21 - it just makes the letters look more special and blends with the glossy embossed background paper too! I think its little touches like this that really help make a card! 


The patterned paper ended up being a little larger than I thought I was going to want so I trimmed off about 5mm, I was going to throw it as it really wasn't much good for anything then thought it'd be a nice little embellishment for the inside. I added a sentiment and that was the inside sorted! 

Bekah totally loved this card and so did I! If I was turning 21 again I would be totally over the moon to get this card! Its so my style! 

Happy Stampin',

Tuesday 29 April 2014

Mosaic Flower

 Hello! 

Wow is it really only Tuesday?! I am absolutely shattered! I suppose part of it is still not feeling 100% and work all day but still, can't believe its only Tuesday! I flaked out yesterday but I wanted to share a card we made at card club this past month with the Mosaic Madness stamp set. I will be sure to share some more over the next few weeks as I just realised I have a huge bunch of projects made with this gorgeous set but haven't really shared any with you yet! What a pity!


Stamp Set: Mosaic Madness, Express Yourself
Ink: Strawberry Slush, Crushed Curry, Gumball Green
Cardstock: Strawberry Slush, Crushed Curry, Gumball Green, Pistachio Pudding
Punch: Mosaic
Embellishments: Pearls

When I was searching for ideas of different ways to use the Mosaic Madness set I came across the idea of using it as a flower. Doesn't it just look fab?! 

I really like the bright punchy colours of the flower against the muted background - really makes the flower stand out!

I was also trying to keep in mind to use the border stamps in the set and thought it'd work nicely as a little pattern and texture for the background. I used the stamping off technique to get some different shades. Also by staggering the length of the borders across the page it helps to add a little movement and flow to the card. 


And of course there's just a few pearls for a finishing touch! 

I've got some training sessions tomorrow so I need to shower and get to bed so I'm awake enough for it. Hope you enjoyed this super speedy post. I'm hoping to have some more time and energy to get into the craft room tomorrow and get making some more pretties. 

Happy Stampin',

Sunday 27 April 2014

Simple Sunday - Watercolor Butterflies

Hello there! 

Another day and I'm feeling a little better still! My stack of super simple and easy cards is getting a little thin, I'd intended on stocking up on new designs this week but that didn't happen for obvious reasons! Anyway, here's a simple-ish card. 


Stamp Set: Flower Shop, Remembering Your Birthday
Ink: Early Espresso
Cardstock: Watercolor Wonder Notecards
DSP: Watercolor Wonder
Punch: Pansy, Itty Bitty Butterfly
Embellishments: Candy Dots

Did you know that you can make the pansy punch into a butterfly by cutting out one petal. Isn't it fun?

I'm loving the watercolor notecards and pattern paper - they have such beautiful watercolour looks and patterns but with none of the fuss! 


I added a few smaller butterflues and some candy dots to finish off the card. 

I'm planning to be back to work tomorrow - hoping for a better and healthier week this week! 

Happy Stampin',

Saturday 26 April 2014

Bright Vases

Hi!

The weather is supposed to be pretty rubbish today but its surprisingly nice out! I'm even feeling a bit better, I'm wearing something other than pj's which is defnately a step in the right direction! We've been out grocery shopping and I've done some housework. Feeling a little tired now so I think its time for a little rest so I thought it was the perfect time to sit and write a little blog post.

So, I am having so much fun playing with the Vivid Vases stamp at the moment! I love how it creates beautiful and simple cards! 


Stamp Set: Vivid Vases
Ink: Black Stazon, Pumpkin Pie, Strawberry Slush, Daffodil Delight, Wisteria Wonder, Gumball Green, Pool Party
Cardstock: Pool Party, Whisper White
DSP: I Am Me
Embellishments: Brights Candy Dots

Just like the vases notecard I shared with you on Sunday, I used blender pens to colour in the flowers and vases. Aren't the bright colourful flowers just so cheerful? 

I stamped the whole stamp again on the pattern paper and then layered for white card over to cover up the vases - if you're feeling lazy and can't be bothered to mask of the stamp, this works just as well! 


I decided to use a technique I haven't done in ages called paper piecing. Its so simple and fun! Just ink up and stamp the vases on the pattern paper then cut around the vases, layer over the stamped vases on the white cardstock. The pattern paper looks like water in the vases so to add a little more interest and variation in height I cut down some of the patterned papers for the different water levels. I think it's really quite effective!

I wanted to add some embellishments but I didn't think rhinestones or pearls would be appropriate. As I was enjoying the bright colours of the flowers I thought I'd pick up on the colours with the candy dots. I just added three in a little strip down the of the card. Simple and understated, but I just love the extra little pop of colour!  

Happy Stampin',

Friday 25 April 2014

Sanded Watercolor Wonder

Hello! 

Its Friday! I having another sick day. Still feeling pretty awful! I took some sleeping tablets last night and managed to sleep the whole night through, at least I don't feel quite so shattered and sleep deprived as I have been but still feeling pretty horrid. Anyway, I have a card I made on Monday to share with you today.

I'm loving the core'dinations paper that SU has in the current Annual Catalugue. I think it looks so fun embossed and sanded for a lighter shade beneath. Obviously you could emboss and sand any papers but the beauty of the core'dinations is the different colour under the surface. If you haven't played with core'dinations yet I'd totally recommend giving it a try! 

Now, the thought occurred to me that the watercolour notecards might look quite pretty embossed and sanded, yes its only white under the surface but I had a feeling it'd soften the intense colour and create a pretty effect! 


Stamp Set: Label Love, Pennant Parade
Ink: Baked Brown Sugar
Cardstock: Whisper White, Gumball Green, Crushed Curry, Pear Pizzazz, Baked Brown Sugar, Vellum, Watercolor Wonder Notecards
Punch: Itty Bitty, Boho Blossoms, Bird Builder, Artisan Label, 1" Circle
Big Shot: Beautifully Baroque
Embellishments: Gold Sequin Trim

I'm super impressed how this has turned out, the card was very pretty but I did feel the colour was super intense so this just added a beautiful soft texture and finish to the notelet. 


I wasn't entirely sure what I wanted to add to this background but I knew whatever I did add I didn't want anything that would take away from the beauty of the background. I finally opted for the artisan label which has a pretty shape but isn't too big either.


I decorated it with flowers and cracked out the gold sequin trim which I've been meaning to use for ages! I used the sequins in a scattered fashion as I would have with rhinestones or pearls. The beauty of the sequins is they're a lot more post friendly! 

Hope you enjoyed this today! 

Happy Stampin',

Thursday 24 April 2014

Floral Spray

Hey! 

So, I'm not at school today - just too unwell! Ugh! I was up half the night and just feel totally rough. I've managed to sleep most of the morning but now I've been up an hour or so I'm starting to feel pretty awful again. Gonna have another sleep after I've written this blog post for you!

Despite these last couple days being sick, I think I'm finally getting back into the groove of participating in challenge blogs! The last few weeks I've been a bit flakey and I've missed it. Today's share is the Colour Q challenge. It's a totally beautiful colour combo! 


Love, love, love purple and yellow together. ITs not a colour combo I use often but it just looks so bright, cheerful and fresh! It reminds me of crocuses! 


Stamp Set: Express Yourself, Hardwood
Ink: Elegant Eggplant, Crumb Cake
Cardstock: Crumb Cake, Whisper White, Elegant Eggplant, Daffodil Delight, Pear Pizzazz
Big Shot: Little Leaves, Blossom Party, Floral Frames Framelits
Punch: Boho Blossoms, Itty Bitty
Embellishments: Candy Dots, Vintage Faceted Buttons, Whisper White Baker's Twine

I wanted the elegant eggplant and daffodil delight to have a real colour hit on this card so I thought it'd be nice to do a big blossom with some little white and yellow flowers scattered around. For this big blossom I used the blossom party die for the outer layers and floral frames for the yellow centre. I used the bone folder to split the card into 2 layers. I love the light fluffy texture it gives the paper. To give all the layers I scrunched the layers for that little variation in different sizes. For the centre two layers I actually cut the petals up into individual pieces and adhered as it kept the flower a little neater and flatter. 


I hadn't used the vintage faceted buttons in ages and thought it'd be the perfect touch here. It'd add that sparkle and wow to the card without taking away the punch of colour. 

I realise that I used a lot of candy dots here but they work so well for the centres of the little blossoms. Candy dots are certainly one of my favourite  embellishments of the moment! 

The hardwood background adds the needed texture and seems to fit so well with flowers - like a wood panel fence.

Okay, I need to get off for a sleep. Have a great day! 

Catch you again tomorrow! 

Happy Stampin',

Wednesday 23 April 2014

Gingham Washi

Hello!

So, back to work today! I was kind of looking forward to going back but I came down with a rotten cold overnight. I went to bed with a sore throat and had a very disturbed, restless night...this morning I really didn't want to go to work. Anyway, I've somehow made it through the day and back home...I'm curled up on the sofa, shivering, feeling very rough and totally gross. Praying I'll feel better by tomorrow morning.

Today I've got a CAS card for this week's Paper Players' challenge! The challenge this week is to use washi tape. Now, I've got a little confession, I love washi tape - its super cute and fun, I've seen some totally gorgeous cards made using it but for some reason I really struggle to use it. Anyway, I think I've found a little design I'm happy with! 


Stamp Set: Kind & Cosy
Ink: Island Indigo, Daffodil Delight, Melon Mambo, Pear Pizzazz
Cardstock: Whisper White
Punch: Itty Bitty
Embellishments: Gingham Garden Washi, Rhinestones

So this is a really simple card, but all those rhinetones really add a sparkly wow factor! Random strips of washi tape were applied to the background - they're just torn off the roll. 

I used the brush tip of the stampin' write markers to carefully colour in the sentiment - I really like the floral "you" coloured in all the different colours! I think it just makes it look that bit more special.


I had indended to leave the card there but I looked at it a few times and it just didn't look finished. I decided it needed a some more colour and a bit more washi tape. The tape was laid and punched from a scrap piece of white. The flowers were dotted around and I added rhinestones. 

Again, I thought I was finished but I wondered what'd it'd be like with a few white flowers dotted in the background, I punched a few and laid them out and decided that was the exact touch the card needed. 

I'm really pleased with this card, I hope you like it too! 

I hope you have a lovely day! 

Happy Stampin',

Tuesday 22 April 2014

Butterfly 21

Hey there!

It was Stuart's cousin Andrew's girlfriend's 21st at the weekend, a whole big group of us all went out for a meal to celebrate last night - it was good fun and many laughs were had! Anyway, my MIL had asked if I could make a special card for them to give Bekah so I got busy designing a couple pretty 21st cards - obviously I needed to make one for us to give her too! I gave her both so she could choose, here's the one she picked. 


Stamp Set: Express Yourself
Ink: Pool Party
Cardstock: Soft Sky, Silver Glimmer Paper
DSP: Venetian Romance
Big Shot: Beautifully Baroque, Typeset Alphabet, Ovals Framelits
Punch: Elegant Butterfly, Bitty Butterfly
Embellishments: Subtles Buttons, Pearls, Whisper White Baker's Twine

I started making a card with a window similar to this petite petals blossom one. I just wasn't liking how it was working so seeing as I hadn't stuck anything down yet I cut off the card front with the window in it, embossed it, sponged it to help bring out some of that gorgeous texture and mounted it on another card base! The sponging REALLY lifted the card!


 Then I could add the glittery 21, sentiment and lots of pretty butterflies. 

21 is a pretty special birthday in the UK so I went a bit nuts with all the pearls and added lots of scattered pearls to the background too!


I wanted to do something a little different with the large butterfly rather than a pearl so I thought a button and baker's twine would be a cute little addition. 


I'm just loving all the soft colours here. I haven't really played too much with the new colour Soft Sky. I wasn't really sure about it, its quite pale and similar to Pool Party. But I've grown to love it after having a bit of a play with it. If you haven't played with it yet/much I'd really recommend giving it a go! I think you'll like it!

I'm back to work tomorrow so I'm enjoying my last day of holidays - I've been to coffee morning at church, looked at some new phones, had lunch with Emma and now I'm going to have a relaxing afternoon of stamping! 

Happy Stampin',

Monday 21 April 2014

Project Life

Hello again! 

Just a quick note to let y'all know about an exciting new product line Stampin' Up! are introducing called Project Life! 


If you keep up to date with all the happenings in the Stampin' Up! world you may have already heard the chatter about Project Life. If you're a avid scrapbooker, you may have already heard of Becky Higgins, you may have even dabbled in Project Life already. For those of you who have no idea what it is, who Becky is and why everyone is so excited about it, here's a sort little video to introduce it you you!


I've got to admit that I hadn't heard of Project Life until this annoucement but I'm excited to try it out! It looks pretty and fun and so so super easy! If you're a busy person, or a mum and just simply don't have time to flounce around with lots of tools and papers to make elaborate scrapbook pages, this is totally the product line or you! 

The brilliant thing about Stampin' Up partnering up with Becky Higgins is the colour co-ordination and quality of products that SU is so well known for! This means you can mix and match with existing products you might also have too! 

The Project Life product line will be available from July 1st in the new Annual Catalogue! 

Happy Stampin',

My Digital Monday - Park Playdate

Hi! 

Did you have a nice Easter? I had a lovely day! After church we went to my parents' for a delish lunch. My brother was home from uni for the weekend too so it was nice to see him too! Mom even got us Easter eggs and with a little begging hid them for us. Oh I am such a kid sometimes! 

In the evening we had a special Easter service at church followed by a very yummy supper! We got invited back to Steve and Deb's for a cuppa afterwards and didn't get home til past 1am! Boy was I beat! 

So, its Monday again, and I have another digital project to share with you! This week I've made a scrapbook page using a little snap I took at the park with Kat and the boys last week. Euan had so much fun playing on all the swings and slides...his favourite was this steering wheel! It was tough to drag him away! 


MDS Digital Files
Cardstock: Crumb Cake, So Saffron, Poppy Parade
DSP: Sweet Details
Punch: Owl Builder, Square, Scallop Trim

Don't those smiles just melt your heart?! Too cute for words! 

On facebook I am part of a group for a MDS Virtual Crop and the hosts have crop nights every so often. There are challenges to participate in, its good fun. Unfortunately last week's was the night of the wedding, I was beat and just couldn't stay up. I noticed that one of the challenge techniques was alignment. I had to have a go! 

Here's a helpful little video on how to align objects with MDS. Its very simple to use and makes aligning objects a cinch.


I kept the layout pretty simple with some little DSP tiles and a few hearts. I love picking up colours from the photos in elements on the page. There were lots of blues, greens and yellow in the paper so I wanted something punchy for the title and a few other scattered elements - the red worked perfectly and really brought out the red steering wheel in the photo! 

I'd please how this turned out and it really didn't take too long either! 

Hope you're have an amazing Monday! 

I'm going to make the most of my last couple days before going back to work on Wednesday! We're out for a 21st birthday meal tonight and besides from that, I have some serious crafting to crack on with! Exciting! 

Happy Stampin',

Sunday 20 April 2014

Simple Sunday - Vases


Hi! 

Happy Easter folks! I hope you are having a beautiful Easter day! 

I've got a cute little note card for today's Simple Sunday! Its using a new stamp I recently treated myself to, Vivid Vases. This has been on my wishlist from the first moment I saw it so I'm surprised its taken me this long to get it! I've seen some really beautiful things made with this a la carte stamp so I'm looking forward to playing with it some more in the coming weeks!


Stamp Set: Vivid Vases
Ink: Black Stazon, Crushed Curry, Tangerine Tango, Strawberry Slush, Gumball Green, Pool Party
Cardstock: Whisper White

I used the blender pen to colour in these vases. When you're colouring its really important to remember to use a waterproof black in for the outline - there's nothing worse than spending all that time colouring and then having a muddy black bleed! I also love that the blender pens give a nice watercolour look. 


Usually when I use the blender pens I pick up a little colour on the lid of the ink pad but did you know that you can use blender pens with the stampin' write markers too? To use the markers with the blender pens just scribble on a clear block and then use the blender pen as usual. 

Hope you're having a great Easter!

Happy Stampin',

Saturday 19 April 2014

Spring Blossom

Hello! 

We are enjoying another day of beautiful blue skies and sun! Its still quite chilly but I love seeing the sun - doesn't it just make the world a better place?!

Today's card is using the Freshly Made sketch. Its pretty simple but after a little bit of deliberation I just knew what I wanted to make! 


I've been enjoying all the blossom on the trees these past few weeks! It hasn't been too windy around here so the blossom has really stuck around which is just lovely! I love driving or walking along and seeing fluffy pink and white trees. They look like big balls of candy floss! So I thought I'd do a little spray of blossom....


Stamp Set: Gently Falling, Petite Petals, Happy Day
Ink: Pear Pizzazz, Always Artichoke, Blushing Bride, Primrose Petals, So Saffron, Crushed Curry
Punch: Petite Petals, Itty Bitty
Embellishments: Pearls

I wanted to create a very clean and fresh card So decided to stamp the leaves and flowers on white rather than coloured cardstock. I find that coloured card can look a little heavy and the colour can be more intense so to soften the colours I simply stamped them on the white. 


I know the Gently Falling set is designed for Autumn but I think it makes gorgeous leaves in Spring and Summer too! If I can get more use out of a stamp set, I'm pleased! 

I thought that as the leaves had 2 layers of stamping it would be a good idea for the blossoms to also have the same. I 'd noticed that there were two stamps in the Petite Petals set that were very similar to the Gently Falling so it seemed the perfect match. I love the co-ordination you get between different stamp sets with Stampin' Up! 


I felt that the centres needed some yellow and some pearls too just for a bit of an elegant pop! I also Love the little smattering of pearls across the card too! 

Have a beautiful day! 

Happy Stampin',

Friday 18 April 2014

Translucent Butterflies

Hey there! 

Its Good Friday, what a great day to remember as our Saviour died on a cross for us, but what is even better is Easter day, when we can celebrate that he is risen! Happy day!

So today I've got this week's Paper Players challenge for you, and this week its on time! Woohoo! 


I'm not sure why but I was a little daunted by this colour challenge. All three colours are very powerful one, so I've spent all week thinking about how to make these work.


Stamp Set: Papillon Potpourri, Teeny Tiny Wishes
Ink: Always Artichoke, Calypso Coral, Coastal Cabana
Cardstock: Window Sheet, Vellum
Punch: Bitty Butterfly

When I set out to make this card it wasn't intended to be a transparent card. I wanted to make a swam of butterflies that had a beautiful translucency to them. I stamped the butterflies on the vellum which also helped to soften the intense colour palette but when I placed them on a white card base they just got lost! I was really quite disappointed but then thought about trying out a transparent card. Worked perfectly! 


Don't you just love all those butterflies?! I think they look fab.


The bold artichoke and coral butterflies really pop amongst a sea of coastal cabana butterflies.

I'm quite pleased with how this has turned out! Cards with transparencies to them intrigue me. This is something I've dabbled with before but I'd love to try playing around with window sheet some more! Have you worked with window sheets much? How do you like to use it? 

Happy Stampin',

Thursday 17 April 2014

Forget-Me-Not!

Hello! 

Wow its been a busy few days! Tim and Sarah's wedding was on Tuesday - the weather was absolutely gorgeous. It was such a beautiful wedding, the bride's dress was gorgeous, the flowers were so pretty...they just looked so so blissfully happy. Love it! 

I've spent yesterday and today catching up on housework and having a fun day with Kathryn and the boys! We went to the park, fed the ducks, saw lots of adorable ducklings (I was so tempted to slip a couple into my handbag!), had a picnic on the grass, did some running and played in the playground. Its such fun being a kid! 

Now its the end of the day and I am finally getting around to looking at my blog again. 


Stamp Set: Morning Meadow, Remembering Your Birthday
Ink: Marina Mist, Crushed Curry, Gumball Green
Cardstock: Whisper White, Gumball Green
Big Shot: Chalk Talk Framelits
Punch: Bird Builder, Pansy, Itty Bitty
Embellishments: Dazzling Diamonds

This is a really simple little card. I thought that the flowers looked like forget-me-nots. I love these flowers a lot and always look forward to seeing them flower each year. They're not out yet, but soon! 
I also thought that forget-me-nots would be a cute idea for the a belated birthday card! 


Marina Mist seemed like the perfect colour for the forget-me-nots and the bright yellow centres! I didn't want to cover up the yellow centres with anything like rhinestones or pearls so I thought the best way to add a little sparkle would be to use the 2 way glue pen and the dazzling diamonds glitter.

Don't the bird wings just make the most fab leaves?!


And of course a little quick stamping inside the card finished it off perfectly! 

I'll be back tomorrow with something else to share! 

Happy Stampin',