Friday, 2 May 2014

So Kind Celebration

Hi! 

Friday - woohoo! Looking forward to a lie in tomorrow! Tonight Stuart and I are going to see one of our favourite comedians, Jon Richardson! I'm super excited, he's a very funny guy! 

But before we go, I have a card for the Paper Player's challenge. This week has been a sketch challenge. I've looked at it a few times and I've been desperately wanting to make something for it but what with a busy week and feeling shattered and still under the weather it didn't happen until last night. 


Stamp Set: Sweet Essentials
Ink: Always Artichoke
Cardstock: Calypso Coral, Crisp Cantaloupe, Always Artichoke, Crumb Cake
DSP: Celebrations Basic Kit, Coral Celebrations Add-On Kit
Punch: Fancy Flower, Boho Blossom
Embellishments: Gold Sequin Trim
Other: White Gel Pen

I've been wanting to use some of the celebrations add-on  pieces to make some cards, finally I got the chance. There's some super cute patterns in the set plus tags and lots more. I used the tag with the pretty white patterned border. I tied that in to the rest of the card with the white gel pen to do a border around the strip of DSP and also to decorate the leaves. I really love the patterns on the leaves - this really lifts the dark artichoke green and adds a fun pattern. 


The flowers are alternate cantaloupe and coral for that subtle difference in colour which you can really see when the petals are all fluffed up. 
The centre I added a gold blossom and for some added texture by piling up sequins. I also added scattered sequins to fill the gaps and draw the eye through the card. 


I love how this has turned out and look forward to making more pretties with this add-on kit. At £8.95 its a real bargain for all the awesome pieces you get in it! 

Happy Stampin',

Wednesday, 30 April 2014

Mosaic 21

Hello! 

The weekly balance has tipped, we are now on the downhill towards the weekend! Only 2 more days of school until a nice long weekend! Woohoo! Today's been a battle, we were very busy, short staffed and to top it off my head has been feeling very fuzzy, like the beginning of a migraine! I didn't sleep well last night either so I'm going to get a really early good sleep tonight! 

Today I have the other 21st birthday card I made for Bekah's birthday last week! You can see the first one I made here, as that one was really soft and elegant so I wanted something quite different, I think this hits the brief!


Stamp Set: Mosaic Madness, Remembering Your Birthday
Ink: Rich Razzleberry, Bermuda Bay
Cardstock: Baked Brown Sugar, Bermuda Bay, Rich Razzleberry, Very Vanilla
DSP: Natural Composition
Punch: Itty Bitty, Decorative Label
Big Shot: Typeset Alphabet
Embellishments: Rhinestones, Crystal Effects

I pulled out one of my most favourite pattern papers of the moment - Naturals Composition. I just love the neutral colour that seems to work beautifully with any other colour. Its also got gorgeous glossy embossed designs which are just crying out to be inked up. Here I used 2 colours - bermuda bay and rich razzleberry to create this ombre type effect. By applying both colours to the centre section it really helps the 2 colours to blend together! 

I started with the 21 on the decorative label punch on the card and then worked in the other elements around it. 


I love the mosaic pattern in the paper and immediately thought that the Mosaic Madness set would pair perfectly as some scattered elements. I also decided to add a few of the 4 petal itty bitty punches to fill in the gaps, and the shape worked well with the mosaic stamps and paper too!

I wanted this card to be quite fun and jazzy so I went a little crazy with lots of little rhinestones in the centre of the mosaics and also a few just scattered on the background mosaics. Love that look, plus it just gives the card that extra special touch! 

One final special touch I added to the front of the card was to add crystal effects to the 21 - it just makes the letters look more special and blends with the glossy embossed background paper too! I think its little touches like this that really help make a card! 


The patterned paper ended up being a little larger than I thought I was going to want so I trimmed off about 5mm, I was going to throw it as it really wasn't much good for anything then thought it'd be a nice little embellishment for the inside. I added a sentiment and that was the inside sorted! 

Bekah totally loved this card and so did I! If I was turning 21 again I would be totally over the moon to get this card! Its so my style! 

Happy Stampin',

Tuesday, 29 April 2014

Mosaic Flower

 Hello! 

Wow is it really only Tuesday?! I am absolutely shattered! I suppose part of it is still not feeling 100% and work all day but still, can't believe its only Tuesday! I flaked out yesterday but I wanted to share a card we made at card club this past month with the Mosaic Madness stamp set. I will be sure to share some more over the next few weeks as I just realised I have a huge bunch of projects made with this gorgeous set but haven't really shared any with you yet! What a pity!


Stamp Set: Mosaic Madness, Express Yourself
Ink: Strawberry Slush, Crushed Curry, Gumball Green
Cardstock: Strawberry Slush, Crushed Curry, Gumball Green, Pistachio Pudding
Punch: Mosaic
Embellishments: Pearls

When I was searching for ideas of different ways to use the Mosaic Madness set I came across the idea of using it as a flower. Doesn't it just look fab?! 

I really like the bright punchy colours of the flower against the muted background - really makes the flower stand out!

I was also trying to keep in mind to use the border stamps in the set and thought it'd work nicely as a little pattern and texture for the background. I used the stamping off technique to get some different shades. Also by staggering the length of the borders across the page it helps to add a little movement and flow to the card. 


And of course there's just a few pearls for a finishing touch! 

I've got some training sessions tomorrow so I need to shower and get to bed so I'm awake enough for it. Hope you enjoyed this super speedy post. I'm hoping to have some more time and energy to get into the craft room tomorrow and get making some more pretties. 

Happy Stampin',

Sunday, 27 April 2014

Simple Sunday - Watercolor Butterflies

Hello there! 

Another day and I'm feeling a little better still! My stack of super simple and easy cards is getting a little thin, I'd intended on stocking up on new designs this week but that didn't happen for obvious reasons! Anyway, here's a simple-ish card. 


Stamp Set: Flower Shop, Remembering Your Birthday
Ink: Early Espresso
Cardstock: Watercolor Wonder Notecards
DSP: Watercolor Wonder
Punch: Pansy, Itty Bitty Butterfly
Embellishments: Candy Dots

Did you know that you can make the pansy punch into a butterfly by cutting out one petal. Isn't it fun?

I'm loving the watercolor notecards and pattern paper - they have such beautiful watercolour looks and patterns but with none of the fuss! 


I added a few smaller butterflues and some candy dots to finish off the card. 

I'm planning to be back to work tomorrow - hoping for a better and healthier week this week! 

Happy Stampin',

Saturday, 26 April 2014

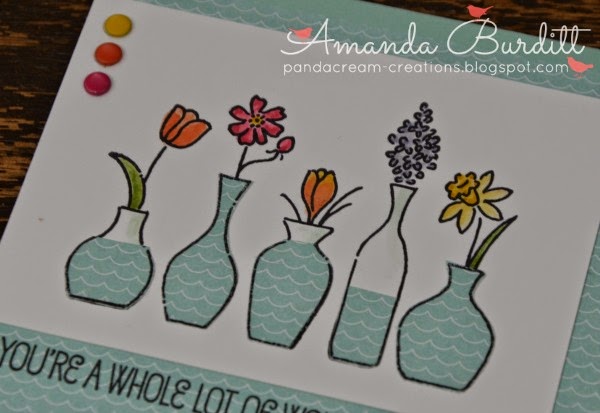
Bright Vases

Hi!

The weather is supposed to be pretty rubbish today but its surprisingly nice out! I'm even feeling a bit better, I'm wearing something other than pj's which is defnately a step in the right direction! We've been out grocery shopping and I've done some housework. Feeling a little tired now so I think its time for a little rest so I thought it was the perfect time to sit and write a little blog post.

So, I am having so much fun playing with the Vivid Vases stamp at the moment! I love how it creates beautiful and simple cards! 


Stamp Set: Vivid Vases
Ink: Black Stazon, Pumpkin Pie, Strawberry Slush, Daffodil Delight, Wisteria Wonder, Gumball Green, Pool Party
Cardstock: Pool Party, Whisper White
DSP: I Am Me
Embellishments: Brights Candy Dots

Just like the vases notecard I shared with you on Sunday, I used blender pens to colour in the flowers and vases. Aren't the bright colourful flowers just so cheerful? 

I stamped the whole stamp again on the pattern paper and then layered for white card over to cover up the vases - if you're feeling lazy and can't be bothered to mask of the stamp, this works just as well! 


I decided to use a technique I haven't done in ages called paper piecing. Its so simple and fun! Just ink up and stamp the vases on the pattern paper then cut around the vases, layer over the stamped vases on the white cardstock. The pattern paper looks like water in the vases so to add a little more interest and variation in height I cut down some of the patterned papers for the different water levels. I think it's really quite effective!

I wanted to add some embellishments but I didn't think rhinestones or pearls would be appropriate. As I was enjoying the bright colours of the flowers I thought I'd pick up on the colours with the candy dots. I just added three in a little strip down the of the card. Simple and understated, but I just love the extra little pop of colour!  

Happy Stampin',

Friday, 25 April 2014

Sanded Watercolor Wonder

Hello! 

Its Friday! I having another sick day. Still feeling pretty awful! I took some sleeping tablets last night and managed to sleep the whole night through, at least I don't feel quite so shattered and sleep deprived as I have been but still feeling pretty horrid. Anyway, I have a card I made on Monday to share with you today.

I'm loving the core'dinations paper that SU has in the current Annual Catalugue. I think it looks so fun embossed and sanded for a lighter shade beneath. Obviously you could emboss and sand any papers but the beauty of the core'dinations is the different colour under the surface. If you haven't played with core'dinations yet I'd totally recommend giving it a try! 

Now, the thought occurred to me that the watercolour notecards might look quite pretty embossed and sanded, yes its only white under the surface but I had a feeling it'd soften the intense colour and create a pretty effect! 


Stamp Set: Label Love, Pennant Parade
Ink: Baked Brown Sugar
Cardstock: Whisper White, Gumball Green, Crushed Curry, Pear Pizzazz, Baked Brown Sugar, Vellum, Watercolor Wonder Notecards
Punch: Itty Bitty, Boho Blossoms, Bird Builder, Artisan Label, 1" Circle
Big Shot: Beautifully Baroque
Embellishments: Gold Sequin Trim

I'm super impressed how this has turned out, the card was very pretty but I did feel the colour was super intense so this just added a beautiful soft texture and finish to the notelet. 


I wasn't entirely sure what I wanted to add to this background but I knew whatever I did add I didn't want anything that would take away from the beauty of the background. I finally opted for the artisan label which has a pretty shape but isn't too big either.


I decorated it with flowers and cracked out the gold sequin trim which I've been meaning to use for ages! I used the sequins in a scattered fashion as I would have with rhinestones or pearls. The beauty of the sequins is they're a lot more post friendly! 

Hope you enjoyed this today! 

Happy Stampin',

Thursday, 24 April 2014

Floral Spray

Hey! 

So, I'm not at school today - just too unwell! Ugh! I was up half the night and just feel totally rough. I've managed to sleep most of the morning but now I've been up an hour or so I'm starting to feel pretty awful again. Gonna have another sleep after I've written this blog post for you!

Despite these last couple days being sick, I think I'm finally getting back into the groove of participating in challenge blogs! The last few weeks I've been a bit flakey and I've missed it. Today's share is the Colour Q challenge. It's a totally beautiful colour combo! 


Love, love, love purple and yellow together. ITs not a colour combo I use often but it just looks so bright, cheerful and fresh! It reminds me of crocuses! 


Stamp Set: Express Yourself, Hardwood
Ink: Elegant Eggplant, Crumb Cake
Cardstock: Crumb Cake, Whisper White, Elegant Eggplant, Daffodil Delight, Pear Pizzazz
Big Shot: Little Leaves, Blossom Party, Floral Frames Framelits
Punch: Boho Blossoms, Itty Bitty
Embellishments: Candy Dots, Vintage Faceted Buttons, Whisper White Baker's Twine

I wanted the elegant eggplant and daffodil delight to have a real colour hit on this card so I thought it'd be nice to do a big blossom with some little white and yellow flowers scattered around. For this big blossom I used the blossom party die for the outer layers and floral frames for the yellow centre. I used the bone folder to split the card into 2 layers. I love the light fluffy texture it gives the paper. To give all the layers I scrunched the layers for that little variation in different sizes. For the centre two layers I actually cut the petals up into individual pieces and adhered as it kept the flower a little neater and flatter. 


I hadn't used the vintage faceted buttons in ages and thought it'd be the perfect touch here. It'd add that sparkle and wow to the card without taking away the punch of colour. 

I realise that I used a lot of candy dots here but they work so well for the centres of the little blossoms. Candy dots are certainly one of my favourite  embellishments of the moment! 

The hardwood background adds the needed texture and seems to fit so well with flowers - like a wood panel fence.

Okay, I need to get off for a sleep. Have a great day! 

Catch you again tomorrow! 

Happy Stampin',