Showing posts with label banner. Show all posts

Wednesday, 26 November 2014

I Return....

Hi! 

Its been a while. What with a new job to get used to, exciting holiday in America, redecorating and now Christmas planning I'm afraid blogging and even CRAFTING has got pushed to the bottom of the list!! I'm finally getting to that stage where I have more energy (I don't come home and crash out to sleep on the sofa). I will update you further o everything that's been going on over the next few weeks but today I just wanted to get back in with a short little post!

Tonight, after work I went to Warwickshire for a Sale-a-Bration Creative tour! I've seen some gorgeous new things and I'm sure you enjoy seeing sneaky peeks in weeks to come! I feel so pepped up and encouraged! (Thanks Michelle!!)

As I can't really post without showing you something pretty...I've got a birthday card I made for my sweet godson Euan's 2nd birthday back in July to show y'all...


Stamp Set: Remembering Your Birthday
Ink: Versa Mark
Cardstock: Lost Lagoon, Hello Honey, Basic Grey, Smokey Slate
DSP: Moonlight
Punch: Owl Builder, Banner
Big Shot: Decorative Dots, Typeset Alphabet (retired)
Embellishments: Mini Brads
Other: White Embossing Powder

I used my favourite technique - selective embossing and then added some little punched dots on top for more colour. 


I just love this paper and the banners look so fun and celebratory.


I'm planning to wean myself back into blogging, creating shorter blog posts which hopefully will be easier to maintain in my busy life I appear to be leading at the moment! 

I'm off to bed as I am completely wiped out!

Have a great day!

Happy Stampin',

Amanda 


Wednesday, 4 June 2014

Masculine Chevrons

Hi! 

Well, my plans went out the window! I got a text from mum really late Sunday night asking for help getting the house cleaned and ready (their house is split in two and they sometimes rent out the other side to people who need temporary accommodation). She had a teacher from school who needs somewhere to stay for the next 7 weeks. Anyway she was way behind on getting things sorted before he arrived on Tuesday. 

Monday morning he asked if he could come today...not tomorrow. She needed all the more help so I went over after school and didn't get back til late. I was completely shattered and ended up going straight to bed. 

This evening I went for a nap and woke a lot later than intended then I spent the rest of the evening making favour boxes for a client's wedding. I'm at 50 now so I thought it was time to stop for the night, get into bed and write a super quick blog post. 


Stamp Set: Happy Day
Ink: VersaMark
Cardstock: Basic Black, Bermuda Bay, Crushed Curry
DSP: Kaleidoscope
Punch: Banner
Other: White Embossing Powder, White Gel Pen, ZigZag rotary cutter

This was a really  quick and simple card I made for my brother-in-law's birthday last week. I'm really loving black for guy cards at the moment! The border was marked out lightly with pencil and then hand drawn over the top with a white gel pen. 

I white embossed the sentiment on the rather boring looking black grid pattern paper. I think it works really well on this card though as it really highlights the bright colour accents. The chevrons are punched out with the banner punch, same as this card. The banner punch was a sale-a-bration item, but will be available again for purchase in the new annual catty beginning July 1st!

Okay so I need some sleep, night all! 

Happy Stampin',

Monday, 14 April 2014

My Digital Monday - Vintage Bike

Hello! 

Monday again? I'm still enjoying being on holiday! For those of you working, at least you can find solace in the fact that its Easter next weekend which means a shorter working week, long weekend and lots of chocolate!!!!!! Yay! 

My day is shaping up to be pretty good, I think. Mom and I are going into town shopping this morning. I know I went in last week, so don't really need to go but Mom wants some new clothes for work and I happen to be her shopping companion - I tell her what looks good and the such! 

This afternoon I need to do some housework - huge stack of ironing I've been ignoring for far too long! Then in the evening Stuart has the wedding rehearsal then we are all out for a nice meal! Happy times! 

Today is a bit of a different My Digital Monday.... I've used MDS but paired it with some hand paper crafting too! They call this style of card a "hybrid". 


Stamp Set: Adventure Awaits (MDS), Teeny Tiny Wishes
Ink: Basic Grey, Coastal Cabana
Cardstock: Whisper White, Basic Grey, Coastal Cabana
DSP: Retro Fresh
Punch: Banner
Embellishments: Brights Candy Dots

So this came about because a friend of mine asked if I'd make her a birthday card for her boyfriend. He's crazy into bicycles, so she really wanted a nice bike card for him. I have to admit I was a bit stumped, I didn't really have a "masculine" looking bike stamp and decided it was WAY to complex to try and punch art it within the short time window I had to make the card. 

I decided my best bet for finding and appropriate bike stamp/paper would be to see if MDS had anything...and I found this vintage bike beauty. I love that I can resize it so I could make a background of small bikes with a larger one for the centre piece. The pieces were printed off then I got to chopping up and making it into more of a card! 


I love the little banner details - I think it really helps to just soften up the card and make it look like a bit more of a celebration. 


I ended up stamping and cutting the sentiment into a little banner because I messed up stamping onto the card - I thought I had stamped it hard enough but when I lifted the stamp only half had stamped! Argh! Does that ever happen to you?

So this is my first ever proper attempt at a hybrid card. I've used MDS to print out sentiments before but never actual images. I think it was quite successful and will definitely be trying it out again. Do you ever make hybrids?

Have a beautiful day!

Happy Stampin',

Thursday, 6 March 2014

Babies & Banners

Hi! 

Its Thursday! Only one more day to go until the weekend! I think its going to be another fairly quiet one although we do have a fellowship lunch at church so that'll be something fun and yummy to look forward

I've got a couple of cards for the SU Only Challenge here. The challenge over at SUO is "Banners". Banners are everywhere at the moment and so common I wondered what to do for this challenge. This is kind of a similar card to another baby card I showed you all last week but its got a bit more stamping and is very fun! 


Stamp Set: Cuddles & Kisses, Sweet Essentials, Banner Blast (SAB)
Ink: Wisteria Wonder, Crisp Cantaloupe, So Saffron, Pool Party, Pistachio Pudding
Cardstock: Whisper White, Pool Party, Wisteria Wonder
Punch: Banner (SAB)
Embellishments: Subtles Buttons, Sweet Sorbet Accessory 


I thought it'd be fun to use the sentiments from the Cuddles and Kisses and the Sweet Essentials sets to make my own DSP. The stamp-a-ma-jig was a total must here to get everything just in the right place. This is a very neat way to use all your sentiments in a fun way - it makes the sentiment the focal point of the card rather than being tagged on!

The hearts are stamped twice to get the different shades which adds some depth to the card.


The banners are at different lengths and layered up to add some interest to the strip. 


The button and twine are the perfect simple little embellishment. 

Instead of hearts for the boy card I thought stars were a more suitable alternative! 


Hope you enjoyed this card - girl and boy versions. I am definitely getting well stocked up on new baby cards for all my friends that are having babies at the moment! 

Happy Stampin',

Thursday, 20 February 2014

Starry Baby

Hello folks! 

Today's little project is for this week's Paper Player's challenge.


At the moment it seems that everyone around me is having babies! My bestie, Kathryn, just had a sweet little babe last week. I am very excited that my little godson now has a gorgeous little baby brother! I know he'll make a great big brother!! Oh, and I just cannot wait to meet the latest addition, baby Arthur! Isn't it just the sweetest name?! Here's a fun little starry card to welcome him in the world!


Stamp Set: Banner Blast (SAB), Sweet Essentials
Ink: Wisteria Wonder, Pool Party, Pear Pizzazz
Cardstock: Wisteria Wonder, Pool Party, Pear Pizzazz, Whisper White, Silver Glimmer Paper
Punch: Merry Minis, Banner

I just LOVE al the stars and banners on this card! The stars stamped in different intensities of tone on tone ink really add a lot of depth to the background. The little star punches just really add that little something extra to the background. 


I just love the banners at different lengths and overlapped. Again it adds a lot of depth to the card. The staggered length of the banners also works to draw the eye across the card too. I liked the little touch of Wisteria here even though its not a traditional boy colour I think it really cuts through al the green and blue just adding a little pop here and there. 

I hope you enjoyed this sweet little new baby card. 

Happy Stampin',

Saturday, 15 February 2014

Arrows CQC228 FMS123 & SUO90

Hello!

Wow, where has the week gone?! This week feels like its just flown by, and I'm not really sure where it went!! I'm off to London for a day out today so here's a quick make for you!

I haven't had much time to do the challenges - they're something I really enjoy doing and its fun to be stretched. This week I'm combining the Colour Q challenge, Freshly Made Sketches and SU Only. SU Only's Challenge is called Punch Parade!! I LOVE punches so as you can imagine, this challenge was totally up my ally!


Isn't this such a bright and fun colour combo? I didn't have Cool Caribbean and Ruby Red but just substituted the nearest colours I did own.


This card came about a little by accident. My friend was over one evening, and she'd placed an order which qualified for a FREE Sale-A-Bration item. When I showed her the Banner punch she was definitely tempted however a little disappointed that it was so short. I had picked it up and was playing around and showed her that by just slipping the card in the punch only at the banner end, you could use the punch just to make the banner end. I did it several time to show her how to do it, at the same time I notice the cute little "arrow" shapes that here falling out. Love it! 


Stamp Set: Lots of Thanks
Ink: Pacific Point
Cardstock: Whisper White, Pacific Point, Coastal Cabana, Real Red, Soft Sky
Punch: Banner (SAB)
Embellishments: Whisper White Baker's Twine
I know this is a loose take on the sketch but I love that sketches can be taken literally or with a creative twist. I was also debating about adding the small white layer onto a Pacific Point card base but eventually decided against it for white. This just meant that the coloured arrows really popped! 


So, do you like these fun arrows?! Love versatile punches! I hope you'll try using punches in a fun and different versatile way. 

Happy Stampin',

Thursday, 6 February 2014

Sweet Treats

Hello! 

Just a super quick post today to share some quick and easy Valentine packaging ideas. These are also for this week's Paper Player's Challenge which has a "Sweet Treat" theme - valentine's card or 3D project with a foodie theme. 

I thought I'd take this opportunity to make some little treats for my hardworking hubby for Valentine's. These are using some of the Valentine's promotion products Stampin' Up! had out last month, but guess what, they've extrended to promotion to February 14th so if yo missed out and wanted some of these darling products, you can still get them. Just hop on over to my shop to get your today! 


Stamp Set: Express Yourself
Ink: Real Red
Cardstock: Silver Glimmer Paper
Punch: Small Heart, Banner (SAB)
Accessories: Sweetheart Treat Bags

I love these cute treat bags and I love that the kit comes with banner tags and baker's twine too so you're all set to wrap up sweet little gifts and just add a little stamped image or sentiment! 
I decided to just jazz this up a tad with some glimmer paper and little heart punch. 


Stamp Set: Express Yourself
Ink: Real Red
Cardstock: Silver Glimmer Paper
Embellishments: Mini Metallic Clothes Pins
Accessories: Sweet Sayings Card Kit

So this is an adorable little pouch is actually made from one of the envelopes from the sweet sayings card kit - just a few scorelines and a dab of glue and voila you've got a cute pouch. I cut a piece of the card off to make a little tag. The clothes pin is a cute accessory and keeps the bag closed too! I just love it! 

Happy Stampin',

Make it Masculine

Hello there!

Bit of a different day to what I'd origionally planned. I was supposed to be going to my friend Vicky's today for a crafty play time and good ol' catch up. I haven't seen her since convention back in November so totally over due for some play time! Unfortunately I've had a rotten cold all this week, super sore throat, hardly and voice and earache to boot! So I've had to take rain check on our play date! Oh and in case I didn't feel bad enough, I've also got the dentist this afternoon - ugh!

I realised that I hadn't show you the card I made for Stuart for his birthday! It was inspired by the masculine card I showed you last week. He really liked it so I thought I'd make another similar version for his birthday! 


Stamp Set: Remembering Your Birthday
Ink: Versa Mark, Whisper White
Cardstock: Very Vanilla, Basic Black, Basic Gray, Smoky Slate
DSP: Modern Medlay
Punch: Banner, Merry Minis
Embellishments: Mini Brads, 
Other: White Embossing Powder, White Gel Pen

I got him a mandolin for his birthday so I knew I totally wanted to use the music notes paper in the Modern Medlay paper pack. I also went all out and made the card a tall one - I actually think I prefer it tall! What do you think?


I used the chalkboard effect here again - just works so well here and adds a little something extra while still keeping it clean and manly!

The arrow paper clip was just a little last minute addition, I had the pack of clips sitting on my desk and I still haven't used them so I thought I'd just slip on of the corner. Pit there wasn't a treble clef shaped one but hey, this still works well!


There was a little more of the chalk board effect inside to finish off the card and sentiment beautifully! 


I thought I'd just finish today's post off with another quick masculine card I made with some left overs I had kicking around - It's not much different to the others I've done so I thought I'd include it here.


I know masculine cards aren't easy so I hope that these two cards have helped you with a few new ideas for the men in your life!

Now, here's a question for you, would you like to see masculine cards become a regular feature on my blog? Say once a week perhaps? Comment me on your thoughts, I'd really appreciate them. 

Happy Stampin',

Wednesday, 5 February 2014

I Lava You

Hi!

Here's another Valentine card. Its cute and super fun!


Stamp Set: Crazy Mixed Up Love
Ink: Basic Gray, Pool Party, Strawberry Slush
Cardstock: Strawberry Slush, Basic Gray, Whisper White, Silver Glimmer
Big Shot: Decorative Dots TIEF (SAB)
Punch: Banner (SAB)
Embellishments: Dazzling Diamonds

I thought the decorative dots embossing folder was just perfect for this lava lamp card - don't the dots just look like little blobs of floating lava!?


Love the glittery detail on the lava in the lamp and the glittery banners just make this card pop! 

I hope you enjoyed today's super quick Valentine share! 

Until tomorrow, 

Happy Stampin',


Double Rainbows SUO89

Hi there! 

Today's creation is for the SU Only Challenge. What I love about SUO Challenges is that they are bi-weekly so it really gives a bit more time to ponder and think about the challenge and come up with something creative! This time the theme is a One Layer card. I think pretty much everyone struggles to make one layer cards - its just too tempting to pile up a few layers of paper and punches. One layer cards aren't very forgiving to mistakes. 

I had a long and hard think about what to do and in the end came up with this bright and cheery number...


Stamp Set: Happy Day
Ink: Real Red, Pumpkin Pie, Daffodil Delight, Old Olive, Pacific Point, Rich Razzleberry, Crumb Cake
Cardstock: Crumb Cake
Embellishments: Dazzling Diamonds

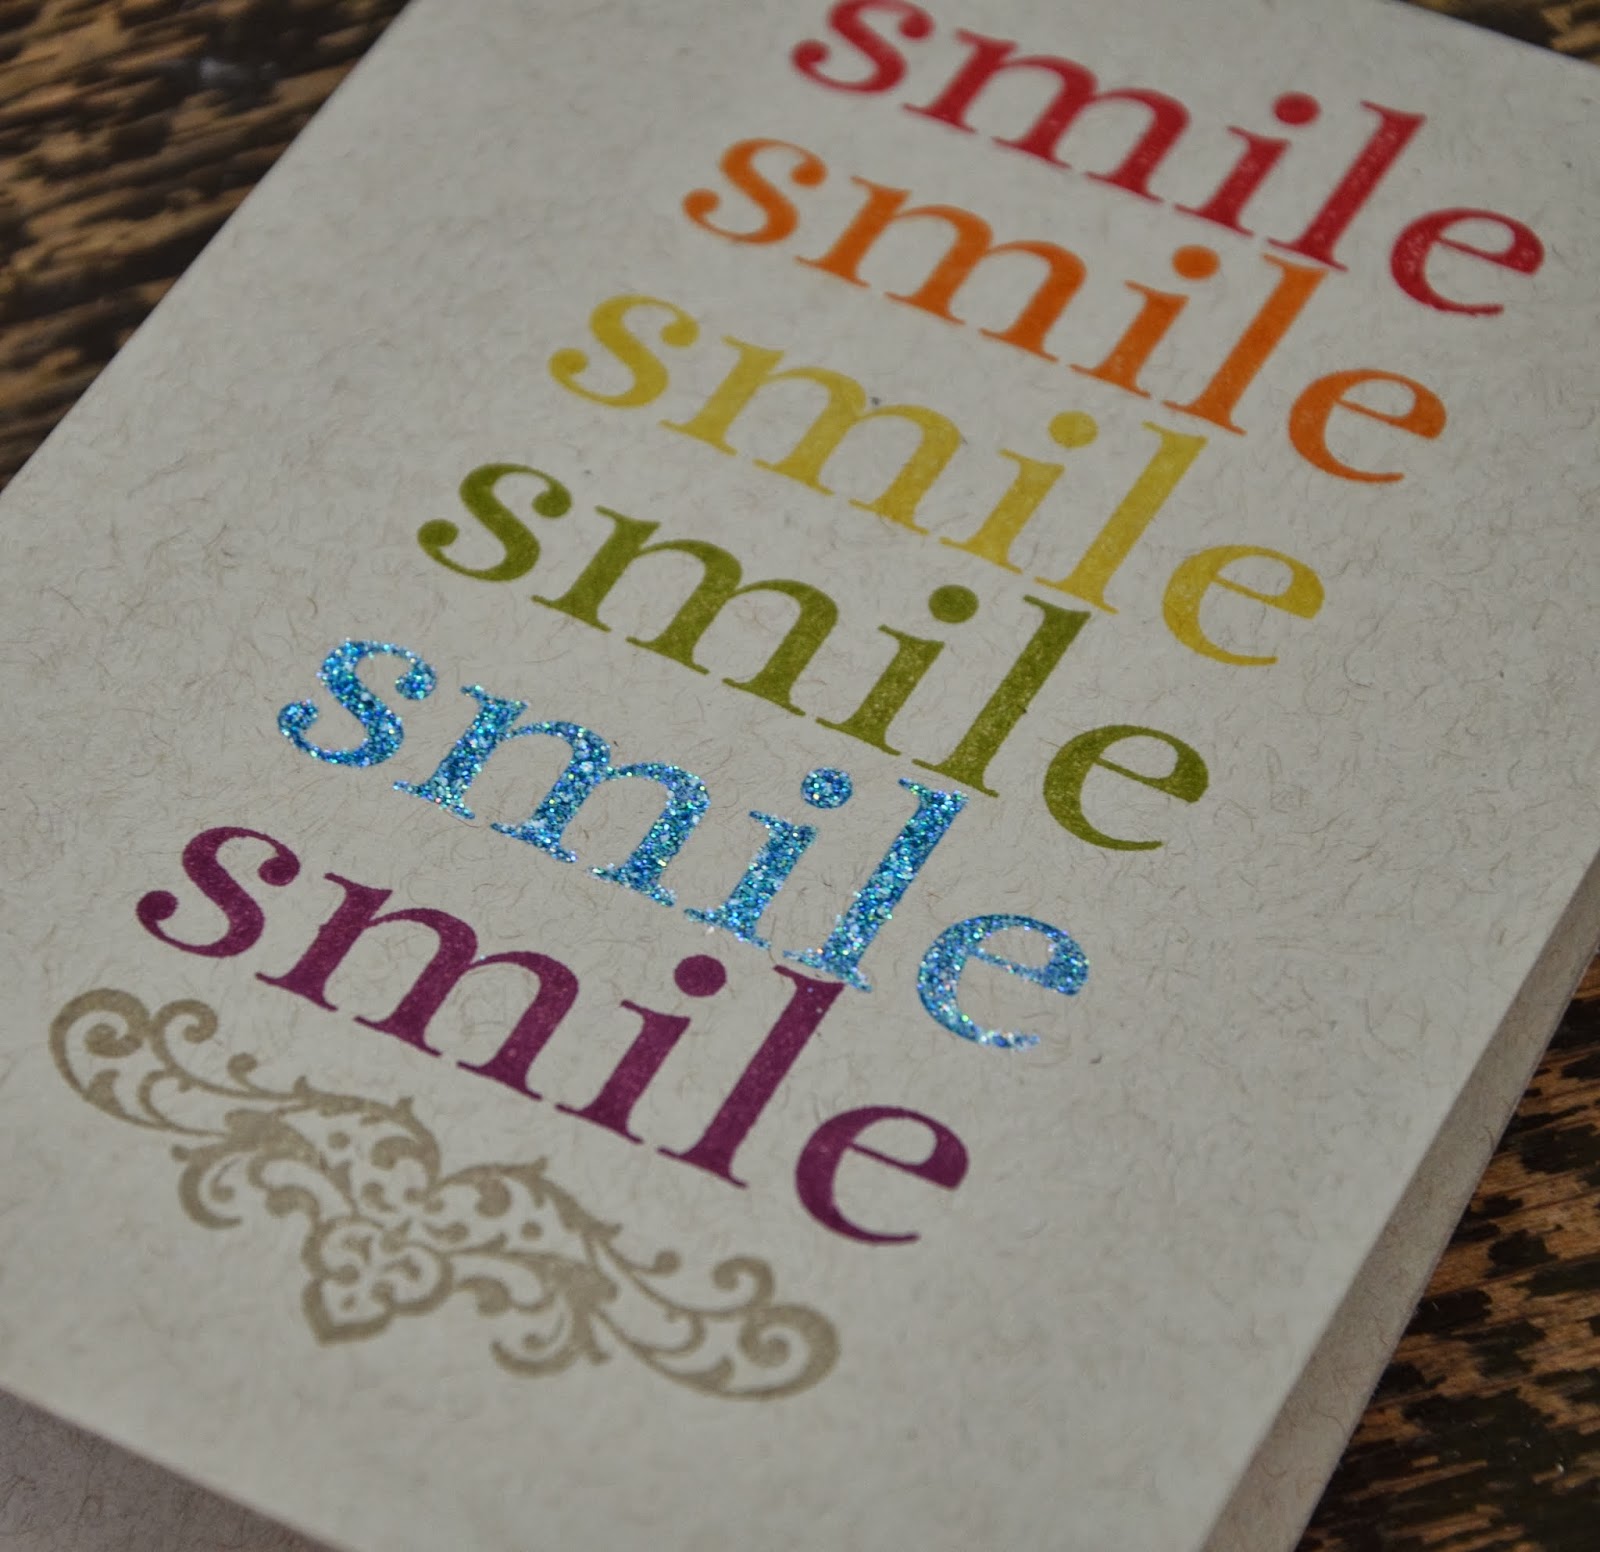
My best friend for this card was my stamp-a-ma-jig. For those of you who haven't been intoduced to the stamp-a-ma-jig, it is a tool for perfectly positioning your stamps! A must have stamping tool! 

I thought it'd be fun to use just one sentiment and repeat it in a rainbow of colours! The flourish at the bottom just finishes this card and adds a touch of elegance to quite a minimalistic funky card! 


For just that extra little touch and a bit of sparkle I used a 2 way glue pen to carefully trace over the letters of just the Pacific Point sentiment and added some dazzling diamonds glitter.

What I love about this card is that it could be easily replicated with a different sentiment, or in different colours for a whole different look at no extra effort! 

Here's another "stepped up" version of the rainbow sentiment card...


Stamp Set: Remembering Your Birthday
Ink: Melon Mambo, Real Red, Tangerine Tango, Daffodil Delight, Old Olive, Bermuda Bay, Pacific Point, Rich Razzleberry
Cardstock: Whisper White
DSP:  Polka Dot Parade
Punch: Banner


Hope you enjoyed both these cards today and maybe I've inspired you to have a go at repeating sentiment as the main focal point of the card, or indeed making it a one layer card! 

Thanks for stopping by,

Happy Stampin',

Sunday, 2 February 2014

Simple Sunday - Baby!

Hi there! 

I've decided to start a theme for my Sunday posts. SIMPLE cards, I hope you won't confuse simple with boring but I thought it'd be cool to show a simple, quick, easy and low product use card once a week. As a demonstrator, we get lots of goodies, and it's tempting to throw everything at a card/project but its also important to remember those who don't have lots of money and all the products in the world, so this is designed to show folks out there simple and easy cards that ANYONE can make!

Today's uses a  Sale-A-Bration set I am totally loving at the moment - Banner Blast!! The patterns on the banners are just so fun and I love the little extras - flower, star and heart - which really makes this set so much more than just a few little banners but a great all round set! 

Earlier this week I showed you a relatively easy card using the Banner Blast set to make a bright and fun birthday card. Today is the turn of a Baby card!


Stamp Set: Banner Blast (SAB), Sweet Essentials
Ink: Marina Mist, Old Olive
Cardstock: Whisper White
Punch: Banner (SAB)
Embellishment: Old Olive Taffeta Ribbon

I just want to point out that the banner punch is absolutely wonderful, but if you don't have it, the banners are so straight forward to cut it wouldn't be a problem to cut these out - snip them to different lengths for a little more variety.


I really think its the star that makes this card stand out! Its just so fun and perfect for a new baby boy. If you're wanting to make a girl version I'd maybe substitute the star for the adorable little heart.

The star is stamped twice in the same colour before reinking for the two tones - great way to get more use from an ink pad. Another great ink pad extender is sponging around the edge of the card - adds that pop of colour without all the extra card! 

Have a great Sunday!

Happy Stampin',

Saturday, 1 February 2014

Baby Girl FMS121 & CQC226

Hello! 

Just a super quick second post of the day. I've got a few challenges I wanted to get something made for and I realised I was running out of time so I thought I'd combine them. Color Q is a beautiful girly pink colour palette and a fun sketch from Freshly Made Sketches.  


Stamp Set: Hearts a Flutter, Banner Blast (SAB), Pennant Parade
Ink: Pink Pirouette, Blushing Bride, Primrose Petals
Cardstock: Whisper White, Primrose Petals, Crumb Cake
Punch: Banner (SAB)
Embellishments: Gold Baker's Twine, Gold Sequin Trim

I am totally LOVING the Banner Blast stamp and punch which are part of the exclusive Sale-a-Bration line available until March 31st! This is a sweet and simple little baby card! Love the layered banners and the hearts and sparkly gold sequins are the perfect finishing touches. 


Happy Stampin',