Showing posts with label paper doilies. Show all posts

Saturday, 5 April 2014

Hello, Baby & Twist on Scattered Embossing Technique

 Hi!

Its Saturday! Doing anything exciting this weekend? Ours is chilled - just what we both need. I've got a card a friend asked me to make for her new baby cousin. I had list of elements/things that she loved and wanted included in the card which was a challenge but it turned out well in the end. 


Cardstock: Crisp Cantaloupe, Calypso Coral, Whisper White, Vellum
Punch: Small Heart, Owl Builder
Embellishments: Subtles Candy Dots, Subtles Buttons, Tea Lace Paper Doily, Calypso Coral Baker's Twine
Other: Chalk Marker, scallop trimmer

I found a new spin on the scattered frosted embossing technique. Instead of using an embossing folder I found a way to use it with a punch! I punched and layered 3 negatives of window sheet together with some glue dots. Then it was just a case of positioning the vellum over the negative punch and use the embossing stylus to emboss the little hearts. Embossed images with a larger area don't work out so well as the centres don't turn white. I rectified this by colouring in the back side with the chalk marker.

I love the subtle little detail the scallop trimmer blade gives to the thin layer of calypso coral.  It just adds a little pop and lift to a rather cool and subtle card. 


Ally really wanted the baby's name on the card so I decided to print it off as I just didn't have a suitable alphabet. I just love the scattered buttons and candy dot - they seem to work really well and tie the sentiment and card together perfectly! 

The small piece of doily and baker's twine just add an extra little girly finishing touch. 

So pleased with how well this has turned out! Allyson loved it too which was the main thing.

Have a great Saturday! Catch you again tomorrow for a Simple Sunday!

Happy Stampin',

Thursday, 20 March 2014

Sixty!

 Hi there! 

So today is my first day of my new temporary job. I'll let you know how it goes later!

I've got a card my friend Ally asked me to make a little while ago. It was for her Auntie that was turning 60. I didn't have much direction apart from she wanted a big 60 on it. 


Stamp Set: Teeny Tiny Wishes
Ink: Island Indigo
Cardstock: Pool Party, Island Indigo
Punch: Decorative Label
Big Shot: Typeset Alphabet, Decorative Dots TIEF (SAB)
Ribbon: Island Indigo Chevron, Baker's Twine
Embellishments: Tea Lace Doily, Pearls

I thought it'd be fun to crack out some of the core'dinations cardstock for the background. Embossed and sanded with the decorative dots makes a really pretty confetti pattern. Because this card was longer than the average card I had to emboss as much as I could then rotate the paper 180 and emboss the rest. With the dots being a bit random there wasn't actually too much of a join mark, however this was covered up with the ribbon and doily anyway!


I just used a tiny piece of the doily, that's all it really needed! 

So unfortunately the chevron ribbon was a bit too big and chunky for the card so I did a new little trick I learnt recently - I cut down the centre of the ribbon. To stop the ribbon from fraying I ran a lighter down the size to just melt the ribbon that little bit. Its a fab way to get more use out of what is a pretty chunky ribbon. Don't you just love it? To cut down on more bulk, I just tied the ribbon with a bit of baker's twine instead of a bow or knot. 

After adding the 60 and a sentiment the final touch was a good sprinkling of pearls! 

Until next time, 

Happy Stampin',

Tuesday, 11 March 2014

All Gold

Hey there! 

Wow Tuesday already?! I spent yesterday making cards with my card club ladies - a nice chilled out time! And I spent the afternoon using My Digital Studio to do some digital scrapbooking of our holiday to Scotland last summer! Its super easy and fun. If you haven't tried out MDS yet, you can download the program for a free 30 day trial and if you decide you like it you can purchase the program for £13.95! A fantastic deal for all you get! Try it now here.

For those of you who have been following me for a while, you might remember I was inundated with a number of 50th wedding anniversary cards. Seven of which were commissions from friends and family for the same couple so they all needed to be different...if you missed them you can catch up on one, two, three, four, five, six and seven

Brenda was so impressed by them all she asked me to make a few for her friends who were also celebrating their 50th anniversary, most of which were very similar to ones I'd already made for her own. But recently she's asked for another, seeing as its been a while and I've had some time I thought I'd make up a new design. I thought I'd show you my latest creation.


Cardstock: Crumb Cake, Gold Foil
DSP: Gold Foil Vellum
Big Shot: Typeset Alphabet
Embellishments: Gold Baker's Twine, Pearls, Tea Lace Doily

I just HAD to use the gold foil vellum. Isn't it pretty? I carefully added glue dots under the gold foil hearts. I think they look really pretty over the softened crumb cake card base. 


I really wanted to add a little bit of doily - some gold baker's twine and gold 50 just seemed the perfect little combo for the focal point. To finish it off I just added a few sprinkled pearls. 

I just couldn't work a sentiment into the card - thought it'd just totally throw off the aesthetics. Besides, I thought the 50 was enough. I did stamp a Happy Anniversary sentiment inside the card using an old retired set, can't remember the name off the top of my head.

Happy Stampin',


Monday, 17 February 2014

Inky Fingers Challenge 7

Hi!

Today is a another Inky Fingers Challenge, its the third week in the month which is also know as stamp set challenge! 

We've got a beautiful stamp set for you to play and create with this week, Flower Shop!


Stamp Set: Flower Shop, Gorgeous Grunge, Happy Day
Ink: Marina Mist, Wisteria Wonder, Pear Pizzazz, Pistachio Pudding, VersaMark
Cardstock: Marina Mist, Wisteria Wonder, Pear Pizzazz, Pistachio Pudding
Punch: Pansy, Bird Builder
Embellishments: Pearls, Tea Lace Paper Doilies, Baker's Twine
Other: White Embossing Powder, Blender Pens

So the flowers are embossed in white on coloured cardstock, for a little more dimension I coloured the flower in with blender pens. It worked really well! 

I had pretty much everything on the card and it was just looking a bit flat, thankfully I hadn't actually stuck everything down yet so it all came off and I added some splatters in the background with the Gorgeous Grunge set. I had toyed with stamping some tone on tone flowers all over the background but I was afraid it'd be too much and I really didn't want to detract from the main focal point. 


The leaves are actually the wing from the bird builder punch. To help them fit in with the flowers I sponged around the edge.


I went a little crazy, stamping, embossing and colouring in some flowers inside the card too! 

I hope you'll hop on over to the Inky Fingers blog to check out what the other talented design team members have made for you and then get creative. Make a card yourself and upload it. I would love to see your creations!

Happy Stampin',

Friday, 24 January 2014

Flower & Ribbon FMS

Hey!

I'm back, and its Friday! Are you doing anything fun this weekend? Think its going to be a quiet one for us. 

Well on to today's card, and I'm playing along with this week's Freshly Made Sketch.  
And here's my take in the sketch...


Stamp Set: Morning Meadow, Express Yourself
Ink: Crushed Curry, Night of Navy
Cardstock: Whisper White, Crushed Curry, Night of Navy
Punch: Pansy
Ribbon: Night of Navy Stitched Grosgrain, Silver Taffeta, Silver Baker's Twine
Embellishments: Night of Navy Button (retired), Tea Lace Paper Doilies, Rhinestones

I saw a cute little treat holder with a flower and lots of ribbon on Peanuts and Pepper Papercrafting, I thought I really had to give it a go. I am a huge ribbon hoarder but seldomly actually use it on my cards. So its basically a bunch of very BIG bows layered under the flower. They were so big it looked pretty rediculous before they were placed behind the flower. 

I chose a colour combo that is bright and punchy - just what yo need to brighten a dreary winter day! Its not a usual choice for me but I've been seeing quite a bit of blue and yellow around and thought I'd try it out. The silver just added that little extra something.


The doily is all scrunched in the middle to make it smaller and also gives it a little more texture and body. I thought with everything going on under the flower the flower itself looked a little plain but the navy button finished it off nicely.

I hope are all having a great end to your week,

Happy Stampin',

Thursday, 9 January 2014

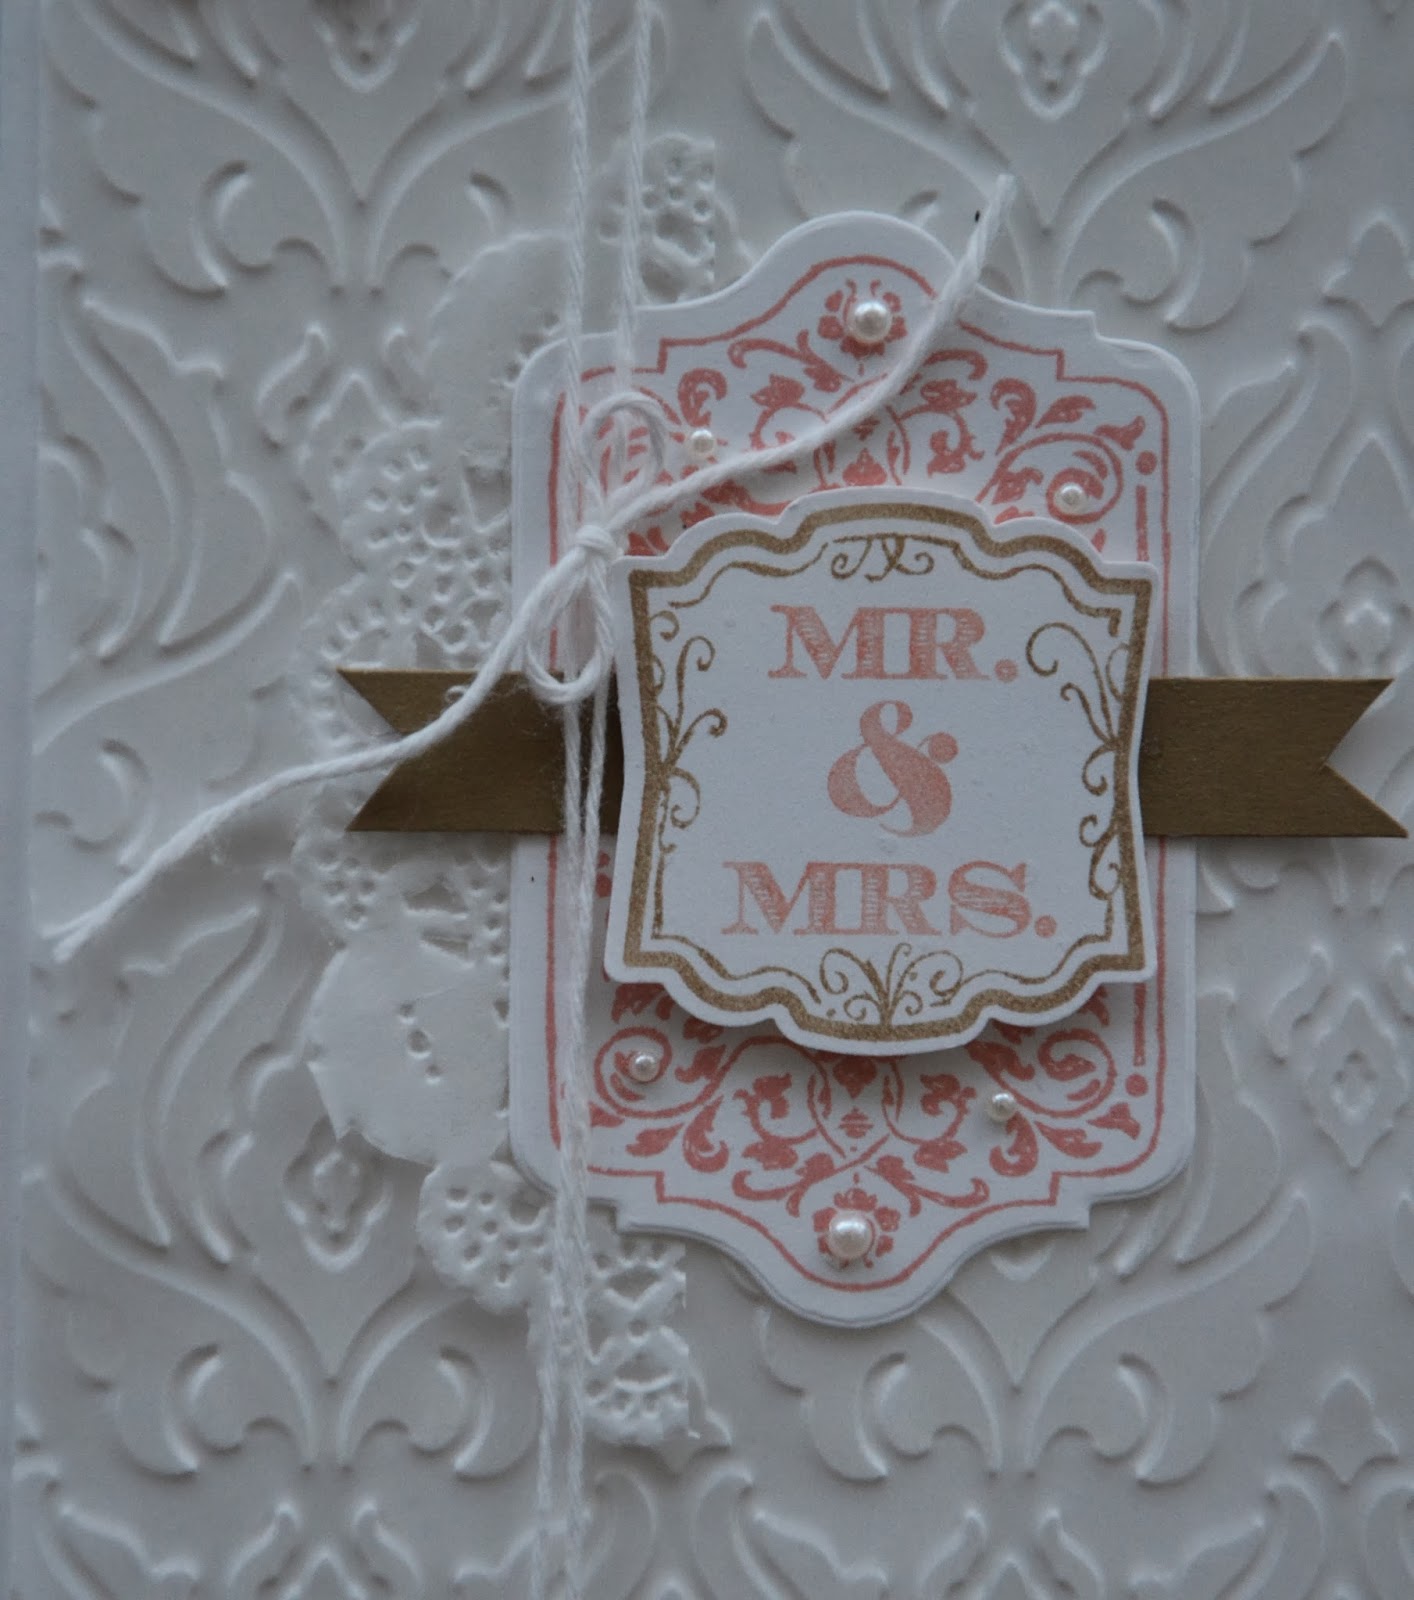
Lacy Wedding

Hi!

I've got a little pretty for you today that I found while trying to sort my photos that I forgot about. My cousin had asked quite a while ago now, if I could make her a wedding card. I hadn't had a chance to craft much with some of my new stamps and I thought it'd be a good oportunity to play and experiment a bit. I was so super pleased with the outcome, I hope you like it too! 


Stamp Set: Chalk Talk, Label Love
Ink: Baked Brown Sugar, Crisp Canteloupe 
Cardstock: Whisper White, Crisp Canteloupe, Baked Brown Sugar, Vellum
Big Shot: Chalk Talk Framelits, Beautifully Baroque
Punch: Artisan Label, Owl Builder
Accessories: Tea Lace Paper Doilies, Pearls
Baker's Twine: Whisper White


I think this card just oozes elegance. I love all the different textures and layers that somehow look effortless. the tiny hearts were totally neccessary - they balance the card beauitfully and just draw the eye out to the corners - plus, I just love the heart. I think the owl punch was worth getting just for the heart alone! 

I've found that embossed vellum on Whisper White card is just beautiful - it has a wonderful quality I'm not sure photos are doing justice. It looks ethereal and lacy - perfect for a wedding, right?!

I must say I think Crisp Canteloupe might be my new favourite colour, I just can't put it down lately! Pear Pizzazz, you better watch out, there's a new crush in town! 

I hope you enjoyed this little creation today, I'll be back soon with more pretties. 

Happy Stampin',

Amanda xo

Wednesday, 8 January 2014

My Little Spotlight!

Hi there!

Each week Inky Fingers gives one of their designers a little spotlight, where you get to know a little more about the designer and we get to share a beautiful little project we are proud of. This week it happens to be mine. 

So, for those of you who are new to this blog and me, my name is Amanda. I am married to my wonderful hubby Stuart and we live in a little house in Northampton, England. 

Stuart is a teacher at a local high school and I am a lady with many strings to my bow - housewife, carer for an elderly relative, an exam invigillator at a high school and working hard at my little Stampin' Up! business too! Yes, I am one busy lady! I have been a demonstrator for very nearly 3 years and loving it! 

The project I have for you today is something I am running as a class later this month. It's using the Sweetheart Treat Bags - which are part of the Valentine's promotion. Unfortunately, Valentine's isn't as big a thing as it is over Stateside so I've been racking my brains for a few little ways to use the products with a little bit more versatility.


Stamp Set: Language of Love
Ink: Pool Party, Crisp Cantelope, Real Red
Cardstock: Whisper White, Pool Party
Kits: Sweetheart Treat Bags
Punch: Small Heart Punch
Accessories: Tea Lace Paper Doilies
Extras: MDS


 I've made mine into a little mini album. This would be perfect for giving as a nice Valentine's gift or for an anniversary. Alternatively it would look sweet filled with photos of the children/grandchildren. Mine, however, is filled with odds and ends - motivational quotes, funny pictures, verses...basically anything that makes me happy!


At the beginning of a new year, we see it stretch out before us - the possibilities are almost limitless! Its easy to feel optomistic about life but all too soon, life gets the better of us and its difficult to remain upbeat. I really struggle to stay positive and keep going when things get rocky so I thought making a little motivational album like this would be perfect. When I feel lonely or down I can read through it and remind myself how good life is!

What's great is its still got lots of spare room for more verses, quotes and funny photos! What do you think to this idea? Isn't it fun?


So, I'm running this as a class on Friday 24th (7pm-9:30pm) or Monday 27th (9:30am-12pm) or (7pm-9:30pm). It costs £18 and includes a pack of the treat bags, cardstock, tea lace doilies and the small heart punch - a product total worth over £15!

Please book by January 18th so I can order your goodies in time!

I hope you enjoyed this project. I'll just leave you with the ever so cute little Valentine Monsters I repurposed for little Christmas gifts for all the little kids I know!


Happy Stampin',

Amanda xx


Wednesday, 27 February 2013

Build-A-Brad

Good evening!!

Sorry its been a while since I last blogged its been a bit manic around here! We are still carless and both been busy with work, begging lifts and then I've come down with the lurgy! Just what I needed! The last couple days I've felt like I got dragged through the hedge backwards, and then run over by a truck! 

Anyway I've been trying to take life a little slower the last few days and thought I'd sit and blog for a bit! 

Have you seen the new brads in the Spring/Summer Catalgoue? They're builder brads and I love them! So I have a couple cards (using similar materials) for you. 


Stamp Set: Curly Cute, Hearts a Flutter
Ink: Melon Mambo, Daffodil Delight, Lucky Limeade
Cardstock: Whisper White, Crumb Cake
DSP: Sunshine & Sprinkles
Punch: Itty Bitty
Big Shot: Hearts a Flutter Framelits
Accessories: Designer Build-A-Brad, Paper Doily
Extras: White Gel Pen


Stamp Set: Hearts a Flutter, That's The Ticket
Ink: Daffodil Delight, Baja Breeze
Cardstock: Crumb Cake, Whisper White
DSP: Sunshine & Sprinkles
Punch: Itty Bitty, Ticket
Big Shot: Hearts a Flutter 
Accessories: Build-A-Brad, Paper Doilies
Ribbon: Melon Mambo Striped Organdy

So the designer build a brads comprise of the metal scalloped brad backs and some clear domes with adesive backing. You simply punch a little piece of patterned paper and stick it in the centre, add the dome to the top and your brad is finished. The little bit of paper in there means it'll fit pretty much any style card you want! I think they look gorgeous! Do you like them?

Have a great evening! 

Amanda xx


Sunday, 17 February 2013

Amore

Hello!

How is your weekend going? I hope you are having a good one! I have my in-laws and a couple friends from church coming for lunch today so I better get my skates on, but first I wanted to show you the last of the cards from this month's card club. T think this might be my favourite. I say might because I love them all so much! 


Stamp Set: Fabulous Phrases
Ink: Real Red
Cardstock: Crumb Cake
DSP: More Amore
Accessories: Vintage Faceted Buttons, Paper Doilies
Baker's Twine: Whisper White
Big Shot: Needlepoint Borders
Punch: Corner Rounder

The large heart and the little round scallop circle are both from the More Amore pattern paper - you get 2 of these die cut sheets, they are all joined together but are easily snipped apart. If you don't have a big shot and want the die cut look, this paper is awesome!!! The paper doily, faceted button and needlepoint border finishes off the card. The very final touch is to round the corners, I love rounded corners, don't you?!

I actually didnt have enough of the faceted buttons for all my ladies to add to their cards so we altered it slightly and used the flower trim instead. One of thise sweet little flowers looked just darling as a replacement. 

Happy Stampin',

Amanda x