Showing posts with label candy dots. Show all posts

Friday, 19 June 2020

Scrappy Stripes

Hello! 

Yesterday I shared with you a scrap busting weave design. Today I have another scrap buster! This one is perfect for even smaller scraps. I have two cards to show you, one using brights scraps and the other with subtles scraps!  You'll have to let me know which is your favourite! 


Stamp Set: Peaceful Moments
Ink: Bermuda Bay
Carstock: Whisper White, Flirty Flamingo, Granny Apple Green, Coastal Cabana, Daffodil Delight, Gorgeous Grape, Bermuda Bay, Melon Mambo, Pacific Point
Punch: Story Label
Accessories: Brights Candy Dots

This is really simple, I layered up all the little strippy scraps that I had onto a piece of white scrap card. I made it a bit wider than I thought I wanted it and then I was able to trim it down to the size I wanted it. I decided to indent the scrappy stripes with the white card down each side popped up with some dimensionals. I think this makes the card look very polished! 

I added a sentiment on the story label punch and as with yesterday's card, added some candy dots which needed using up. 


Stamp Set: Well Said
Ink: Highland Heather
Cardstock: Whisper White, Highland Heather, Pool Party, Pear Pizzazz, Blushing Bride, Soft Sea Foam, Petal Pink
Accessories: Pearls

As with the previous card, I added little strips of scrap to a piece of white card and then trimmed it down so that the edges looked more polished. I added it straight to the card base and added a sentiment on a thin scrap of white card. I finished the whole thing off with a scattering of pearls. 


Do you like this scrap busting idea? I hope you do! 

Thanks for stopping by,

Take care, 

Thursday, 18 June 2020

Scrap Busting!

Hey!

So yesterday I said I had some fun things on the way using up scraps. Today I'd like to share the first one with you! It also involves some weaving - my new favourite technique. 

This one uses up scraps from the brights collection so its incredibly bright and vibrant and super fun!


Stamp Set: Peaceful Moments
Ink: Bermuda Bay
Cardstock: Whisper White, Melon Mambo, Flirty Flamingo, Granny Apple Green, Bermuda Bay, Mango Melody, Coastal Cabana, Daffodil Delight, Gorgeous Grape
Punch: Story Label
Accessories: Brights Candy Dots (retired)

In sorting out my scraps I found lots of thin strips of card that I thought I could use for something but they gradually accumulate and I don't use them as much as I should, its always so much quicker and easier to cut up a new piece than wade through the scrap box for something that will fit. So, I used a few of these scraps as is, and some I cut much thinner so that I had different widths ranging from about 5mm up to 3cm. 

Once I had a bunch cut up I began to weave. Getting the first couple vertical and horizontal ones in place is the most difficult. After those are in place, the tension created is substantial enough to keep the strips in place as they were woven in. When I was happy with the placement - trying to vary the colours and strip widths so that it looked pretty random - I added tombow to the back of the strips and glued it down to a piece of Whisper White. I then went around all the edges gluing all the ends of the strips down. 

I matted it on some Bermuda Bay card and added it to a white card base. I thought a simple white label punch would be best for the sentiment - to try and act as a balance to the vibrant colours. I stamped in Bermuda Bay because I thought it would tie together the matting, weaving and sentiment layers quite nicely - I think that bit of consistency really works. What do you think?  

In the spirit of using up scraps, I found some candy dots that have been retired a long while but haven't got used up yet, so I popped a few around the sentiment just to add a little more colour to the sentiment layer. 


I hope you've enjoyed this scrap buster! I'm for sure going to be making more of these and I have some other scrap busting ideas up my sleeve to show you over the coming days. Stay tuned. 

Take care, 


Monday, 8 December 2014

Rainbow Thank You

Hello! 

Its been a super busy week! I feel like I haven't stopped! I've finally finished decorating the hall, landing and stairs. We still have some work to do - changing up the storage solutions in the hallway but that will all wait for the new year! 

The house is now decorated for Chistmas and I'm starting to feel a bit happier that I feel ready for Christmas. First few gifts are wrapped and the first batches of cookies are fresh out of the oven! Yum!

Anyway I've got a card I though y'all might like which is pretty simple really! 


Stamp Set: Another Thank You
Ink: Pumpkin Pie, Daffodil Delight, Old Olive, Bermuda Bay, Pacific Point, Rich Razzleberry
Cardstock: Whisper White
Punch: Itty Bitty Accessory Punch Pack
Accessories: Brights Candy Dots, Dazzling Diamonds, Crystal Effects

So the rainbow effect was really simple to do, I just used sponge daubers to apply the ink to the thank you stamp and then as you would with the markers, give the stamp a quick huff and stamp! 


I sponged scrap card with rainbow colours and punched some stars. Finally some crystal effects and dazzling diamonds gives the card a little sparkle. Oh and candy dots are always fun, right?!

Hope you enjoyed this fun and CAS card. I'm off to write some Christmas cards and then get ready for an evening out with some of my besties! 

Catch you again soon, 

Happy Stampin',

Monday, 23 June 2014

Floral Quatrafancy

Hello!!

Its been a while hasn't it!! Did you miss me?! Life has been totally manic around here lately and I'm afraid doing much of anything in my craft room or on the blog has had to take a bit of a back seat. 

Today was my first day on the new permanent job as a Learning Mentor. Its quite different to working in the manic Student Services and I'm still not entirely sure what to make of it. I just want to get properly stuck in to the job now and its a bit frustrating as I don't have any students to see as my group of kids don't start school until September. 

Anyway, I've also been super busy finishing off a million and one wedding things for a client - 90 favour boxes with bows, tags, menu cards, table plan, table numbers, orders of service....as you can imagine, I've been very busy! 

Now that the wedding is over I'm hoping to have a quieter few weeks where I can get creating beautiful things for you. I have a bunch of new goodies from preorder that I haven't even touched yet!! Scandalous I know!!


Stamp Set: Remembering Your Birthday
Ink: Strawberry Slush, Pear Pizzazz
Cardstock: Pear Pizzazz, Whisper White
DSP: Quatrafancy, Gingham Garden
Punch: Bird Builder, Pansy, Blossom
Embellishments: Brights Buttons, In-Color Buttons, Brights Candy Dots
Other: White Gel Pen

I totally love these bright happy flowers. The patterned papers are beautiful and I will really miss both the Quatrafancy and Gingham Garden papers when they retire next week! 

Buttons and candy dots are the finishing touches this card needs. I also added some cute doodles too! 


I layered up lots of the flowers for a really full effect - love it! I used the wing from the bird punch to make some large leaves. I also decided I wanted a little more body and texture so added some curly twirly sprigs too! 


For a smaller little flower in the centre of the pansy flower I cut the petals apart and layered four of them on top to make a smaller flower. The button just covers up the joins in the centre.

Right, I am off to have a run. I'm back to trying to get through the couch to 5k challenge. I feel like I've been lazy of late and really need to get into some exercise again. 

Catch you again tomorrow,

Happy Stampin',

Sunday, 27 April 2014

Simple Sunday - Watercolor Butterflies

Hello there! 

Another day and I'm feeling a little better still! My stack of super simple and easy cards is getting a little thin, I'd intended on stocking up on new designs this week but that didn't happen for obvious reasons! Anyway, here's a simple-ish card. 


Stamp Set: Flower Shop, Remembering Your Birthday
Ink: Early Espresso
Cardstock: Watercolor Wonder Notecards
DSP: Watercolor Wonder
Punch: Pansy, Itty Bitty Butterfly
Embellishments: Candy Dots

Did you know that you can make the pansy punch into a butterfly by cutting out one petal. Isn't it fun?

I'm loving the watercolor notecards and pattern paper - they have such beautiful watercolour looks and patterns but with none of the fuss! 


I added a few smaller butterflues and some candy dots to finish off the card. 

I'm planning to be back to work tomorrow - hoping for a better and healthier week this week! 

Happy Stampin',

Saturday, 26 April 2014

Bright Vases

Hi!

The weather is supposed to be pretty rubbish today but its surprisingly nice out! I'm even feeling a bit better, I'm wearing something other than pj's which is defnately a step in the right direction! We've been out grocery shopping and I've done some housework. Feeling a little tired now so I think its time for a little rest so I thought it was the perfect time to sit and write a little blog post.

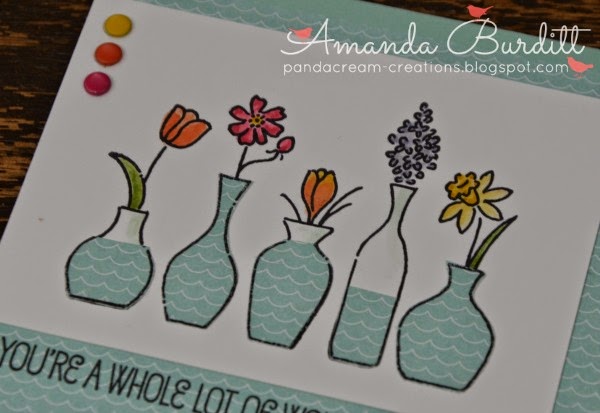
So, I am having so much fun playing with the Vivid Vases stamp at the moment! I love how it creates beautiful and simple cards! 


Stamp Set: Vivid Vases
Ink: Black Stazon, Pumpkin Pie, Strawberry Slush, Daffodil Delight, Wisteria Wonder, Gumball Green, Pool Party
Cardstock: Pool Party, Whisper White
DSP: I Am Me
Embellishments: Brights Candy Dots

Just like the vases notecard I shared with you on Sunday, I used blender pens to colour in the flowers and vases. Aren't the bright colourful flowers just so cheerful? 

I stamped the whole stamp again on the pattern paper and then layered for white card over to cover up the vases - if you're feeling lazy and can't be bothered to mask of the stamp, this works just as well! 


I decided to use a technique I haven't done in ages called paper piecing. Its so simple and fun! Just ink up and stamp the vases on the pattern paper then cut around the vases, layer over the stamped vases on the white cardstock. The pattern paper looks like water in the vases so to add a little more interest and variation in height I cut down some of the patterned papers for the different water levels. I think it's really quite effective!

I wanted to add some embellishments but I didn't think rhinestones or pearls would be appropriate. As I was enjoying the bright colours of the flowers I thought I'd pick up on the colours with the candy dots. I just added three in a little strip down the of the card. Simple and understated, but I just love the extra little pop of colour!  

Happy Stampin',

Thursday, 24 April 2014

Floral Spray

Hey! 

So, I'm not at school today - just too unwell! Ugh! I was up half the night and just feel totally rough. I've managed to sleep most of the morning but now I've been up an hour or so I'm starting to feel pretty awful again. Gonna have another sleep after I've written this blog post for you!

Despite these last couple days being sick, I think I'm finally getting back into the groove of participating in challenge blogs! The last few weeks I've been a bit flakey and I've missed it. Today's share is the Colour Q challenge. It's a totally beautiful colour combo! 


Love, love, love purple and yellow together. ITs not a colour combo I use often but it just looks so bright, cheerful and fresh! It reminds me of crocuses! 


Stamp Set: Express Yourself, Hardwood
Ink: Elegant Eggplant, Crumb Cake
Cardstock: Crumb Cake, Whisper White, Elegant Eggplant, Daffodil Delight, Pear Pizzazz
Big Shot: Little Leaves, Blossom Party, Floral Frames Framelits
Punch: Boho Blossoms, Itty Bitty
Embellishments: Candy Dots, Vintage Faceted Buttons, Whisper White Baker's Twine

I wanted the elegant eggplant and daffodil delight to have a real colour hit on this card so I thought it'd be nice to do a big blossom with some little white and yellow flowers scattered around. For this big blossom I used the blossom party die for the outer layers and floral frames for the yellow centre. I used the bone folder to split the card into 2 layers. I love the light fluffy texture it gives the paper. To give all the layers I scrunched the layers for that little variation in different sizes. For the centre two layers I actually cut the petals up into individual pieces and adhered as it kept the flower a little neater and flatter. 


I hadn't used the vintage faceted buttons in ages and thought it'd be the perfect touch here. It'd add that sparkle and wow to the card without taking away the punch of colour. 

I realise that I used a lot of candy dots here but they work so well for the centres of the little blossoms. Candy dots are certainly one of my favourite  embellishments of the moment! 

The hardwood background adds the needed texture and seems to fit so well with flowers - like a wood panel fence.

Okay, I need to get off for a sleep. Have a great day! 

Catch you again tomorrow! 

Happy Stampin',

Monday, 14 April 2014

My Digital Monday - Vintage Bike

Hello! 

Monday again? I'm still enjoying being on holiday! For those of you working, at least you can find solace in the fact that its Easter next weekend which means a shorter working week, long weekend and lots of chocolate!!!!!! Yay! 

My day is shaping up to be pretty good, I think. Mom and I are going into town shopping this morning. I know I went in last week, so don't really need to go but Mom wants some new clothes for work and I happen to be her shopping companion - I tell her what looks good and the such! 

This afternoon I need to do some housework - huge stack of ironing I've been ignoring for far too long! Then in the evening Stuart has the wedding rehearsal then we are all out for a nice meal! Happy times! 

Today is a bit of a different My Digital Monday.... I've used MDS but paired it with some hand paper crafting too! They call this style of card a "hybrid". 


Stamp Set: Adventure Awaits (MDS), Teeny Tiny Wishes
Ink: Basic Grey, Coastal Cabana
Cardstock: Whisper White, Basic Grey, Coastal Cabana
DSP: Retro Fresh
Punch: Banner
Embellishments: Brights Candy Dots

So this came about because a friend of mine asked if I'd make her a birthday card for her boyfriend. He's crazy into bicycles, so she really wanted a nice bike card for him. I have to admit I was a bit stumped, I didn't really have a "masculine" looking bike stamp and decided it was WAY to complex to try and punch art it within the short time window I had to make the card. 

I decided my best bet for finding and appropriate bike stamp/paper would be to see if MDS had anything...and I found this vintage bike beauty. I love that I can resize it so I could make a background of small bikes with a larger one for the centre piece. The pieces were printed off then I got to chopping up and making it into more of a card! 


I love the little banner details - I think it really helps to just soften up the card and make it look like a bit more of a celebration. 


I ended up stamping and cutting the sentiment into a little banner because I messed up stamping onto the card - I thought I had stamped it hard enough but when I lifted the stamp only half had stamped! Argh! Does that ever happen to you?

So this is my first ever proper attempt at a hybrid card. I've used MDS to print out sentiments before but never actual images. I think it was quite successful and will definitely be trying it out again. Do you ever make hybrids?

Have a beautiful day!

Happy Stampin',

Sunday, 13 April 2014

Simple Sunday - Pierced Circles

Hi! 

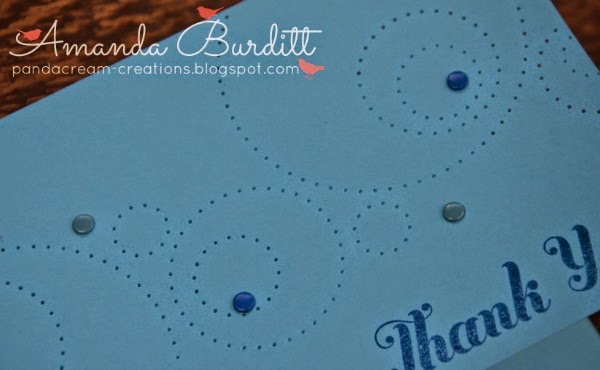
I've got a duo of cards for you today for Simple Sunday! I made these a few days ago as I wanted a masculine thank you for my dad to give along with some chocolates to say thank you for all the lifts to and from work he gave me over the last few weeks! I'm so grateful for all he does! 


I thought I'd keep my design geometric, clean and simple. 


Stamp Set: Lots of Thanks
Ink: Bermuda Bay
Cardstock: Coastal Cabana
Other: Essentials Paper Piercing Pack

I just love the simplicity of the paper pierced circles. It was so easy to do and looks so pretty. If you have difficulty keeping your paper and piercing template in one place I'd suggest trying a little washi tape to hold them together, that way you don't have any fear of the template slipping! 


Really love the pierced circles - the photo doesn't really do it justice! 


Stamp Set: Lots of Thank
Ink: Pacific Point
Cardstock: Tempting Turquoise
Embellishments: Brights Candy Dots
Other: Essentials Paper Piercing Pack

I decided I liked the first one so much that I'd do a second one. This time however I wanted to try off setting the circles rather than centring them as on the first design.


I went a little more crazy on this one and decided to add a few candy dots too! Fun huh?

Personally I think I prefer the first design but both turned out really well. Especially nice for a one layer card. This kind of design really doesn't require lots of materials, is inexpensive and easy. I'd totally recommend giving it a go! 

Hope you are having a happy and blessed Sunday! 

Happy Stampin',

Friday, 11 April 2014

Kaleidoscope Banners

Hi! 

Sorry I didn't get around to blogging yesterday! Literally spent the entire day yesterday sewing!! I've finally got my project finished and spent today getting it washed and laid out to dry. So pleased with how its turned out.

I've had quite a nice relaxed day - spent quite a good portion in my craft room making some new cards! I made one for this week's Freshly Made Sketch and the Paper Players and set it aside to photo and upload later then completely forgot about the deadline for Paper Players today. Whoops! 

So the Paper Players' challenge this week was "Three Spree" so I'd just kept in mind that however the card turned out I wanted 3 or the main element! 


Of course Freshly Made had another beautiful sketch this week...

Here's how my creation turned out!


Stamp Set: Remembering Your Birthday
Ink: Versamark, Whisper White
Cardstock: Basic Black
DSP: Kaleidoscope
Punch: Banner
Embellishments: Sweet Sorbet Twine, Brights Candy Dots
Other: White Embossing Powder

My starting point was actually the black/grey coloured DSP. It's kinda plain and boring but I thought with the right treatment it could look really lovely! I added it to a black card and jut knew it had to become a masculine card. Now this was all very black and just needed a pop of colour.

The banners gives a nice height and movement to the card. Its a bit of a lighter element than a solid strip down the side like in the sketch which I think has worked out well. 

The twine knots were just a nice finishing touch for the banners. 

Hope you liked this one! 

Happy Stampin',

Saturday, 5 April 2014

Hello, Baby & Twist on Scattered Embossing Technique

 Hi!

Its Saturday! Doing anything exciting this weekend? Ours is chilled - just what we both need. I've got a card a friend asked me to make for her new baby cousin. I had list of elements/things that she loved and wanted included in the card which was a challenge but it turned out well in the end. 


Cardstock: Crisp Cantaloupe, Calypso Coral, Whisper White, Vellum
Punch: Small Heart, Owl Builder
Embellishments: Subtles Candy Dots, Subtles Buttons, Tea Lace Paper Doily, Calypso Coral Baker's Twine
Other: Chalk Marker, scallop trimmer

I found a new spin on the scattered frosted embossing technique. Instead of using an embossing folder I found a way to use it with a punch! I punched and layered 3 negatives of window sheet together with some glue dots. Then it was just a case of positioning the vellum over the negative punch and use the embossing stylus to emboss the little hearts. Embossed images with a larger area don't work out so well as the centres don't turn white. I rectified this by colouring in the back side with the chalk marker.

I love the subtle little detail the scallop trimmer blade gives to the thin layer of calypso coral.  It just adds a little pop and lift to a rather cool and subtle card. 


Ally really wanted the baby's name on the card so I decided to print it off as I just didn't have a suitable alphabet. I just love the scattered buttons and candy dot - they seem to work really well and tie the sentiment and card together perfectly! 

The small piece of doily and baker's twine just add an extra little girly finishing touch. 

So pleased with how well this has turned out! Allyson loved it too which was the main thing.

Have a great Saturday! Catch you again tomorrow for a Simple Sunday!

Happy Stampin',

Thursday, 3 April 2014

Flower Power

Hi there!

Another late-ish post today. Feeling a bit down today - mostly tiredness and been struggling with some headaches and dizziness. Not sure if its just a bit of a bug or the current air pollution we're experiencing is having some effect too. Work has just been one of those GRR days too. Glad to be home and relaxing now. I'm about to make dinner and chill out with some crafting - totally need it! 

I've got quite a simple card for you today that I actually made write a while ago but just hadn't shared with you yet! 


Stamp Set: Flower Shop, Sweet Essentials
Ink: Old Olive, Pacific Point, Rich Razzleberry
Cardstock: Crumb Cake, Whisper White, Old Olive, Pacific Point, Rich Razzleberry
Punch:Artisan Label
Embellishments: Brights Candy Dots, Old Olive Taffeta Ribbon

The flowers were just stamped and then punched with the artisan label punch. I also punched another artisan label in the coordinating colour and cutting it in half matted it behind the flower for just a little border of colour along the top and bottom edge.


The candy dots add a nice embellishment to the flower centres but are just so nice and flat too - perfect for the post! 

I also love using the taffeta ribbon - the bows seem to tie really flat so there's no bulk! 

What do you think? Like it? 

Happy Stampin',

Saturday, 29 March 2014

Bubbly Celebrations

Hi! 

So the following blog post was supposed to go out yesterday but by the time I remembered I needed to photograph the card it was too dark, and I'd missed the deadline for adding my card to the Paper Players blog so I just thought as I was so tired I'd have the day off blogging and just get it out today with a decent photo...so sorry for my tardiness, enjoy!

Thank goodness its Friday! Its been a long week and I'm feeling pretty worn out. Yesterday I was not feeling very well at all - the joys of working in Student Services surrounded by kids saying they don't feel very well or telling me they've been throwing up the day before.... wonderful!!

So as a result of not feeling very well I didn't really get much done yesterday when I got home from school and playing Miriam at church for the Bible expo. I did really want to play along with the Paper Players Challenge so I just did something very simple. It was a sketch this week. 


I know that the shapes can be everything and what kept springing to mind was replace the shapes with a spray of flowers but I do a LOT of floral cards and wanted to challenge myself a bit so actually forced myself to keep the circles theme. I thought it could make quite a nice bold masculine card! 


Stamp Set: Remembering Your Birthday
Ink: Basic Grey
Cardstock: Bermuda Bay, Whisper White 
DSP: Kaleidoscope
Big Shot: Circles Framelits
Embellishments: Brights Candy Dots

I think this card turned out quite nicely. I toyed around wit the idea of rotating the sketch to landscape but eventually decided to just keep it portrait. I did think it'd have a bit more of a wow factor by being elongated. 


The sentiment is stamped on a strip which I then cut with the framelits so it'd fit over the centre section of the largest circle. I like that it toned down the big punch of colour and it was also a different way to add a sentiment to the card rather than the banner which I was tempted to do but are quite common these days! 

I added a couple smaller circles that weren't in the sketch just to balance the card out and stretch the circles out across the area more. Candy dots are a nice fin little extra touch.

  
Oh, this got the husband's sign of approval for a "manly" card! 

Happy Stampin',