Showing posts with label lots of thanks. Show all posts

Sunday, 13 April 2014

Simple Sunday - Pierced Circles

Hi! 

I've got a duo of cards for you today for Simple Sunday! I made these a few days ago as I wanted a masculine thank you for my dad to give along with some chocolates to say thank you for all the lifts to and from work he gave me over the last few weeks! I'm so grateful for all he does! 


I thought I'd keep my design geometric, clean and simple. 


Stamp Set: Lots of Thanks
Ink: Bermuda Bay
Cardstock: Coastal Cabana
Other: Essentials Paper Piercing Pack

I just love the simplicity of the paper pierced circles. It was so easy to do and looks so pretty. If you have difficulty keeping your paper and piercing template in one place I'd suggest trying a little washi tape to hold them together, that way you don't have any fear of the template slipping! 


Really love the pierced circles - the photo doesn't really do it justice! 


Stamp Set: Lots of Thank
Ink: Pacific Point
Cardstock: Tempting Turquoise
Embellishments: Brights Candy Dots
Other: Essentials Paper Piercing Pack

I decided I liked the first one so much that I'd do a second one. This time however I wanted to try off setting the circles rather than centring them as on the first design.
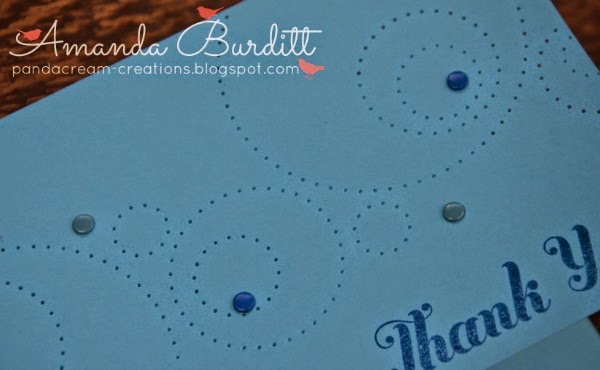

I went a little more crazy on this one and decided to add a few candy dots too! Fun huh?

Personally I think I prefer the first design but both turned out really well. Especially nice for a one layer card. This kind of design really doesn't require lots of materials, is inexpensive and easy. I'd totally recommend giving it a go! 

Hope you are having a happy and blessed Sunday! 

Happy Stampin',

Saturday, 12 April 2014

Silhouette Blossoms

Hello! 

Its Saturday! Yay! After yesterday's flurry of creativity I've topped up my stack of cards to show you all, today's is for this week's Colour Q challenge. Don't you think this dress is just the sweetest? I love the bright cheery colours and blossoms! 


I was so inspired by the bright floral pattern I thought a card with a similar design would just look amazing! Here we are...


Stamp Set: Summer Silhouettes, Lots of Thanks
Ink: Bermuda Bay, Peach Parfait, Tangerine Tango
Cardstock: Whisper White, Coastal Cabana
Other: White Gel Pen

I decided to use Summer Silhouettes - I thought the blossoms would be perfect for this card and I'm trying to use my unloved stamp sets more! I'm so pleased with how it worked out - I think Summer Silhouettes was definitely the right floral set to use here!

I'm not sure why I haven't tried snipping up the leafy branch before but It really works - this is noted and I'm totally going to do this again.  I also decided that the flowers were quite bright and punchy so instead of covering the entire card like I'd originally planned, I'd just do a strip. There's still that wow factor without being too bold. Plus its a lot less hand cutting. 


I pondered for a little while the best way to add white dots to the background. A polka dot background stamp would work nicely but I didn't have one so I thought that the white gel pen could work. Usually I use the gel pen for adding little stitching details but now it makes beautiful little dots too! 

The sentiment is simply stamped on a strip of white - this is sort of emulating the white banding on the dress around the bottom of the dress and top of the pockets. 

Stuart is out picking up his suit for the wedding today so I'm home alone. My plan is chilling and more crafting! My perfect day!

Hope you have a wonderful weekend!

Happy Stampin',


Sunday, 6 April 2014

Simple Sunday - Watercolor Petal Flourish


Stamp Set: Flowering Flourishes, Lots of Thanks, Petite Petals
Ink: Gumball Green, Daffodil Delight, Calypso Coral
Cardstock: Whisper White, Watercolor Wonder Notecards
Punch: Petite Petals

Here's another of those fabulous little watercolor notecards. This card was so simple to make with the flowering flourish and the thank you. The watercolour background is just so special, don't'cha think?


The wow factor here is the flowers. I used the rock and roll technique. If you haven't tried it before, you must give it a go! Ink the stamp with the lighter shade of ink and then rock and roll the edges in a darker colour. I got more colour variation out of these two colours by also using the stamping off technique for a couple lighter coloured blossoms. 

If you wanted you could also add candy dots or pearls to these but I thought I'd keep it really nice and simple. I think it works without. 

Come back tomorrow for a My Digital Monday! 

Happy Stampin',

Wednesday, 12 March 2014

A Graphic Thank You

Hello! 

I have a super speedy post today. I have a busy day and I still have to fit on packing for my few days in London at some point! Ahh! Too much to do!!

So today's card is for the Paper Player's challenge and its a colour challenge. 


This colour scheme seemed quite masculine to me and for some reason I thought it'd be neat to do a very clean graphic style card with lots of text. 


Stamp Set: Lots of Thanks, Fabulous Phrases, Banner Blast
Ink: Marina Mist, Crushed Curry, Smoky Slate
Cardstock: Whisper White, Smoky Slate

As I was gathering the bits together to make this card I was tempted to make a birthday card however I though that I'd do a thank you card. I thought this makes a great masculine thank you card, especially as I really needed one to give our neighbour who very kindly repaired our dividing fence!


I thought the ampersands and the stars just added that little extra touch to the card and fill in and break up all that text nicely! 

I'd originally wanted to stamp the entire area with thank you's  but as it was progressing I decided it might look TOO much and possibly loose the impact by having too much text. The white space around the stamping just gives the text some space to breath! 

Switching up the colour combo would give you a more feminine look too! 

I have some scheduled posts while I'm away so please do check back daily for more creative inspiration and I'll be back with my London exploits at the weekend! 

Happy Stampin',

Wednesday, 5 March 2014

Spring Petals PP185

Hello!

Today I have a card for the Paper Players' weekly challenge! This week the theme is "Thankful for Spring". I know a lot of people out there have had a pretty horrid winter with storms/floods and snow... I know we've had it very fortunate - worst that's happened for us is our fence has blown down! However, I think its safe to say we are ALL looking forward to Spring! 


I love spring - its just such a beautiful time of the year - the weather is getting warmer, there's birds and butterflies, lambs, bunnies, and lots of flowers. Flowers is definitely the first thing that springs to mind for me when I think of Spring. 


Stamp Set: Petite Petals, Lots of Thanks, En Francais
Ink: Blushing Bride, So Saffron, Soft Suede, Pear Pizzazz
Cardstock: Soft Sky, Whisper White, So Saffron, Pearr Pizzazz, Pink Pirouette, Pistachio Pudding
Punch: Petite Petals, Itty Bitty, Bird Builder
Big Shot: Ovals Framelits
Embellishments: Pearls

I chose to use some really lovely pastel/ice-cream colours! They just cry Spring to me! 


I was inspired by a card I saw on Pinterest making a window card - I thought the flowers would be the perfect frame for the Thank You sentiment. I cut the oval out with the framelits and added the White oval inside the card so it matched up. 

I was in two minds about what to do on the Soft Sky - I was toying with the idea of embossing it but I thought that it might be a bit too much texture - I needed something for a little pattern but not too much to detract from what I really wanted to be the star of the show - the flowers! I saw the En Francais stamp and thought it would probably work quite well for some pattern. 


Aren't the flowers gorgeous!?! I only used the watercolour effect stamp from Petite Petals. I used the same stamp for the saffron flowers too and just punched the centres - it gives them a bit of texture which just ties them in with the rest of the card. 

The open flower has 3 layers of flower built up plus a smaller saffron flower in the centre. I used the embossing stylus and the foam mat to give these flowers some real shape. They were worked in a circle in the centre and also inside each petal. It took some time to do all these flowers but the body it produces just gives that real "WOW" factor! 

The budding flowers Also have 3 flowers but the centre one is flipped so when folded into the centre the stamping still shows. To get the petals to meet in the centre I snipped slightly between the petals and worked it a lot with the stylus to get the shape. In the centre is a scrunched ball of paper to keep the shape. 


There's a couple of colours for the leaves because it just adds another little touch - the leaves don't look so heavy. For the tiny saffron flower I snipped off individual leaves and added them to the flowers.Cute, huh? 

The whole thing is finished off with a few pearls for the flower centres. 

Think this is one of my favourite cards of the moment! Its just so pretty and totally screams spring to me! Do you like it? 

Happy Stampin',

Friday, 28 February 2014

Popping Petals CQC230

Hello!

I got quite a lot done yesterday so today I've got another card challenge for you - today its for Colour Q. And again its another really lovely colour combo - but different from colours I usually use.

Tonight I'm going to meet little Arthur! He's my bestie's new babe and also lil bro to my gorgeous godson, Euan! They are such a lovely family and I can't wait to hang with them all this evening, eat pizza and of course have LOTS of cuddles! 


As I was thinking about this combo I decided how striking this combo would be to use black as the main base colour and add pops of colour! 


Stamp Set: Petite Petals, Lots of Thanks, Gorgeous Grunge
Ink: Coastal Cabana, Crumb Cake, Versa Mark
Cardstock: Coastal Cabana, Crumb Cake, Summer Starfruit
Punch: Bird Builder, Petite Petals, Itty Bitty
Embellishments: Pearls
Other: White Embossing Powder

Okay, I am just loving this. I've never been a black girl. I do like colour but I wouldn't say I like dramatic pops of colour like this. However, recently this has really grown on me - I am just loving colour pops against the black! 

After fiddling around with the flowers for a little while on the black card base I decided that it needed something else to ground it so I dug out the gorgeous grunge set and embossed the splatters in white! It was just the perfect background. The flowers' petals are bent up for a bit more dimension. The branch from the bird builder punch made the perfect leaves for the flowers - I just snipped off the three/four leaves and discarded the extra leaves and branch. 


When it came to the sentiment, I really thought I wanted to emboss a sentiment but I was feeling really happy with my card and I was actually feeling pretty nervous about screwing up my card. For that reason I decided to emboss my sentiment on a separate piece of cardstock and then add it over to. Using the tone on tone look it doesn't detract so much as using another colour would have and allowed me to add just a tiny pop of colour with a couple leaves and mini flower! 

What do you think to this card? Are you liking the black and colour "pop" look? 

Happy Stampin',

Sunday, 23 February 2014

Simple Sunday - Watercolor Note

Hello!

What a lovely day yesterday was, we had a pretty chilled day - I did some designing for a little something I'm making and sewing at the moment. I'll be sure to show it when its done and gifted! Stuart and I had brunch - english muffins, eggs and bacon - yummy! Which was followed by a walk around the park and our first ice-cream of the year! The ice-cream van was there and it was just too tempting - so we shared one. I also got my camera to the repair shop, the guy doesn't know exactly what's gone wrong but its something to do with the lens - fingers crossed its not too difficult and costly to fix. I'm currently using my little pocket camera for my card photos and whiles its okay, it just isn't the same as my digital SLR. What did you do with your Saturday?

Anyway, here's a nice and simple card today. 


Stamp Set: Happy Watercolor, Lots of Thanks
Ink: Black Stazon, Tangerine Tango, Gumball Green
Cardstock: Watercolor Wonder Notecards

These beautiful notecards come with a watercoloured effect complete with a watercolor paper texture too (they even have the thickness you'd associate with watercolour paper)! They look great and are so lovely to use. All yo need is a sentiment and a little image or punch and voila you're done! 


Here I stamped the orchid flower from the Happy Watercolor set and using just a couple of ink pads and a blender pen, coloured in the flowers. Added a sentiment and I'm done. 

These watercolour notecards are great to have on had for a quick card or an emergency card - stamp and go! Plus this is only one layer so perfect for posting with no additional costs... oh and they come complete with envelopes too!!! These are £11.95 for 20 which works out at 59p each - such a great deal and such a good quality! If you'd like some, you can order them on my online shop or if you're local to me, you can shoot me an email at amanda_burditt@hotmail.co.uk and place your order. I have an order going in sometime next week and would be happy to tag anything on! 

Happy Stampin',

Monday, 10 February 2014

Inky Fingers Challenge 6

Hi!

Its the second week in February and that means it another sketch challenge over at the Inky Fingers blog.  Here's the sketch...


I thought I'd keep it pretty simple this week, and here's what I made...


Stamp Set: Chalk Talk, Lots of Thanks
Ink: Basic Grey, Strawberry Slush
Cardstock: Whisper White, Smoky Slate, Strawberry Slush, Vellum, Silver Glimmer Paper
Big Shot: Petals a Plenty TIEF, Chalk Talk Framelits
Punch: Boho Blossoms
Accessories: Pearls

Yep there's that frosted scattered embossing technique again. Don't the frosted panels look so pretty on the Strawberry Slush card!? 

Its finished off with a white gel pen line around the edge, a blossom flower and some pearls. 


The inside I just did the same wonky edge lines around the card in strawberry slush and stamped a thank you.


Did you enjoy that one? Why don't you head over to the Inky Fingers blog and check out what the other lovely talented design team members have created for you. And you could even enter your own creation too! I'd love to see it!!!

Happy Stampin',

Sunday, 26 January 2014

Fancy Flowers

Hi! 

How is your weekend going? Mine is lovely, we had a wonderfully relaxing day at home yesterday and today is my dad's birthday! I've made him an awesome card (I'll be showing you it sometime later this week!) I'm super impressed with it and I think he's going to love it too! 

So today is a busy day filled with church and lunch at my parents' but I've just got time to squeeze in a card for you!

My card is using the Flower Shop stamp set which I've been plaing with this week as I've borrowed it off my downline, Debbie. I was inspired by a card I made during last year's Sale-A-Bration using the Bloomin' Marvelous set. 

 I kept the same colour palette of Summer Starfruit, Sahara Sand & Grey but just stepped it up a bit.


Stamp Set: Flower Shop, Lots of Thanks
Ink: Sahara Sand, Summer Starfruit, Smoky Slate
Cardstock: Sahara Sand, Summer Starfruit, Smoky Slate, Whisper White
Punch: Pansy, Boho Blossoms, Itty Bitty
Embellishments: Rhinestones

I stamped the flowers along the edge. I used the masking technique with some printer paper so I could have the flowers overlapping. Then came the fiddly task of cutting the edge. Actually it wasn't TOO hard, just took it nice and slow and went to my happy place. I must be nuts, I LOVE cutting intricate things out!! The cut edge really makes the WOW factor on this card!


I really debated adding the punched flowers, it looked so pretty and fresh without the flowers but you know what I'm like when I get hold of punches....I go nuts! For a simpler version I think this would look so cute without the punched flowers and maybe just add a little glitter to the flowers for some sparkle and shine!? The rhinestones make it even more flashy and special! 

Hope you have a nice Sunday whatever you're doing,

Happy Stampin',