Showing posts with label blender pen. Show all posts

Wednesday, 28 May 2014

Orange Poppy

Hello! 

Wow has it really been a week since I last blogged?! Last week was really crazy. If you remember, I told you that I didn't get the job I applied for at school. On the Tuesday I got told Friday would be my final day working in Student Services - sooner than I had originally been told I'd be leaving so that came as a bit of a shock. Everything was just going really wrong but I was trying to pick myself up and just to my best til the end of the week. I think all the stress and disappointment really made me tired and although the headaches has finally subsided I was sleeping a lot. 

So roll on 7pm on Thursday night, we'd had dinner and I was curled up having a nap on Stuart's lap watching some tv when the phone went, much to my surprise it was the head teacher on the phone wanting to speak to me. Anyway, he basically offered me a job! Not at all what I was expecting to happen and not even a job I had at all considered. This job is as a Learning Mentor. Well you can imagine how happy this made me, and after a night of sleepless consideration, excitement and a chat with the current learning mentors at he school I accepted! Absolutely thrilled to have a permanent full time job! I'll tell you more about it later as this is already getting quite long and I'm sure you'd rather skip to something pretty! 

The card I have for you today reminds me of my Granny - she had these beautiful, big, bright orange oriental poppies in her front garden that she used to love. They were so bright and punchy - I actually have some of them in my garden now - like a little remembrance of her.


Stamp Set: Simply Sketched, En Francais
Ink: Crumb Cake, Baked Brown Sugar, Pumpkin Pie, Tangerine Tango, Old Olive, Black Stazon
CardstockL Very Vanilla, Baked Brown Sugar
Big Shot: Circles Framelits
Embellishments: Brights Buttons, Gold Baker's Twine
Other: Essentials Pierce Pack

I started off with stamping the poppy with the stazon ink on the vanilla cardstock, and used blender pens to colour it in. I then stamped over the top with the En Francais background stamp for a little subtle pattern/texture. 


I used the framelits to cut out a frame for the poppy panel to sit behind, ensuring that it was just big enough to fit the poppy and a sentiment in the frame. I wanted a little extra detail for the circular frame so used the pierce pack to do a little bit of paper piercing around the edge. I think it really finishes off the frame nicely. 

I used the leaves to add a little more pattern to the top and bottom opposing corners in a tone on tone colour. 

Love the final detail of the little button and small knot of baker's twine! 


Inside as it was quite a dark card base I like to add a white or vanilla insert. Of course a little stamping just pretties it up and only took a moment! 

I hope you enjoyed this card. I really love the Simply Sketched set which is a hostess set and will only be available if you host a party before the end of June! 

Now Stuart is taking me away to Chester for a couple nights (as its school holiday this week!), I should be back sometime on Friday. I'll be taking the laptop with me but not sure I'll get much time to blog - it is a holiday afterall! 

Have a lovely week! 

Happy Stampin',

Saturday, 26 April 2014

Bright Vases

Hi!

The weather is supposed to be pretty rubbish today but its surprisingly nice out! I'm even feeling a bit better, I'm wearing something other than pj's which is defnately a step in the right direction! We've been out grocery shopping and I've done some housework. Feeling a little tired now so I think its time for a little rest so I thought it was the perfect time to sit and write a little blog post.

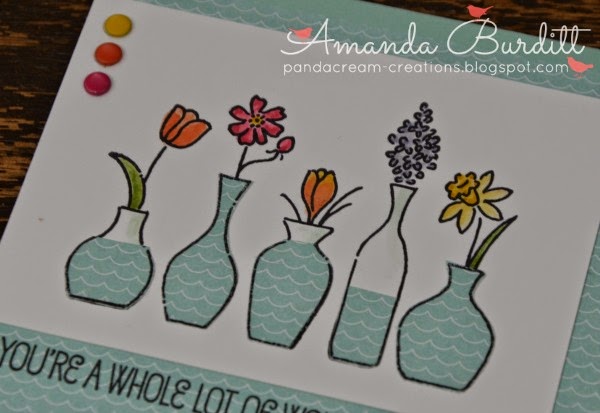
So, I am having so much fun playing with the Vivid Vases stamp at the moment! I love how it creates beautiful and simple cards! 


Stamp Set: Vivid Vases
Ink: Black Stazon, Pumpkin Pie, Strawberry Slush, Daffodil Delight, Wisteria Wonder, Gumball Green, Pool Party
Cardstock: Pool Party, Whisper White
DSP: I Am Me
Embellishments: Brights Candy Dots

Just like the vases notecard I shared with you on Sunday, I used blender pens to colour in the flowers and vases. Aren't the bright colourful flowers just so cheerful? 

I stamped the whole stamp again on the pattern paper and then layered for white card over to cover up the vases - if you're feeling lazy and can't be bothered to mask of the stamp, this works just as well! 


I decided to use a technique I haven't done in ages called paper piecing. Its so simple and fun! Just ink up and stamp the vases on the pattern paper then cut around the vases, layer over the stamped vases on the white cardstock. The pattern paper looks like water in the vases so to add a little more interest and variation in height I cut down some of the patterned papers for the different water levels. I think it's really quite effective!

I wanted to add some embellishments but I didn't think rhinestones or pearls would be appropriate. As I was enjoying the bright colours of the flowers I thought I'd pick up on the colours with the candy dots. I just added three in a little strip down the of the card. Simple and understated, but I just love the extra little pop of colour!  

Happy Stampin',

Sunday, 20 April 2014

Simple Sunday - Vases


Hi! 

Happy Easter folks! I hope you are having a beautiful Easter day! 

I've got a cute little note card for today's Simple Sunday! Its using a new stamp I recently treated myself to, Vivid Vases. This has been on my wishlist from the first moment I saw it so I'm surprised its taken me this long to get it! I've seen some really beautiful things made with this a la carte stamp so I'm looking forward to playing with it some more in the coming weeks!


Stamp Set: Vivid Vases
Ink: Black Stazon, Crushed Curry, Tangerine Tango, Strawberry Slush, Gumball Green, Pool Party
Cardstock: Whisper White

I used the blender pen to colour in these vases. When you're colouring its really important to remember to use a waterproof black in for the outline - there's nothing worse than spending all that time colouring and then having a muddy black bleed! I also love that the blender pens give a nice watercolour look. 


Usually when I use the blender pens I pick up a little colour on the lid of the ink pad but did you know that you can use blender pens with the stampin' write markers too? To use the markers with the blender pens just scribble on a clear block and then use the blender pen as usual. 

Hope you're having a great Easter!

Happy Stampin',

Wednesday, 26 February 2014

Pistachio Flowers

Hey there! 

Man its been a manic day - invigillating, helping out Auntie, Bible study with the ladies and of course more sewing. I'm disappointed that I haven't managed to get into my craft room today. I have some cards I'm desperate to make but alas it just didn't happen today. I am planning on spending most of tomorrow in there - it needs another SERIOUS tidy and of course there will be crafting too! 

Here's another card I made a little while ago and was saving up for one of these spells where I haven't been able to get any crafting done! 


Stamp Set: Flower Shop, Express Yourself
Ink: Pistachio Pudding, Early Espresso
Cardstock: Very Vanilla, Pistachio Pudding
Punch: Pansy
Embellishments: Pearls

I used the 2 way glue pen to mask a strip off on the card and then used a sponge and some yummy Pistachio Pudding ink down it. I then just stamped some flowers and added a punched one too for a bit of depth. 


Pearls are the finishing little touch - yes I added quite a few to the centre here but with a card this simple I felt I could be a little bit more extravagant with my pearls. Besides, they're only 3p each! 


A simple flower and a bit of quick colouring added with a blender pen finishes off the inside.

Hope you enojyed this and I promise I will try to share something fun and new tomorrow! 

Happy Stampin',

Sunday, 23 February 2014

Simple Sunday - Watercolor Note

Hello!

What a lovely day yesterday was, we had a pretty chilled day - I did some designing for a little something I'm making and sewing at the moment. I'll be sure to show it when its done and gifted! Stuart and I had brunch - english muffins, eggs and bacon - yummy! Which was followed by a walk around the park and our first ice-cream of the year! The ice-cream van was there and it was just too tempting - so we shared one. I also got my camera to the repair shop, the guy doesn't know exactly what's gone wrong but its something to do with the lens - fingers crossed its not too difficult and costly to fix. I'm currently using my little pocket camera for my card photos and whiles its okay, it just isn't the same as my digital SLR. What did you do with your Saturday?

Anyway, here's a nice and simple card today. 


Stamp Set: Happy Watercolor, Lots of Thanks
Ink: Black Stazon, Tangerine Tango, Gumball Green
Cardstock: Watercolor Wonder Notecards

These beautiful notecards come with a watercoloured effect complete with a watercolor paper texture too (they even have the thickness you'd associate with watercolour paper)! They look great and are so lovely to use. All yo need is a sentiment and a little image or punch and voila you're done! 


Here I stamped the orchid flower from the Happy Watercolor set and using just a couple of ink pads and a blender pen, coloured in the flowers. Added a sentiment and I'm done. 

These watercolour notecards are great to have on had for a quick card or an emergency card - stamp and go! Plus this is only one layer so perfect for posting with no additional costs... oh and they come complete with envelopes too!!! These are £11.95 for 20 which works out at 59p each - such a great deal and such a good quality! If you'd like some, you can order them on my online shop or if you're local to me, you can shoot me an email at amanda_burditt@hotmail.co.uk and place your order. I have an order going in sometime next week and would be happy to tag anything on! 

Happy Stampin',

Saturday, 1 February 2014

Getting Snappy!

Hello! 

Oh my! Can you believe its February already!?! Craziness!!

How has your week been? I had such a beautiful day yesterday - the weather was just miserable but I got to see Kathryn and Euan. They brought an awesome book (which has given me an idea for a super cool card - going to have a play around today) and some fun cars too! I had great time playing with the cars! He also showed me his fab walking skills - last time I saw him was just before Christmas and he was literally just taking his first steps! Oh he is just such a little cutie!! It was really great to catch up with Kat too. In the evening my friend Sam came over for dinner, we had a delicious homemade stirfry, played a bit of Wii and just hung out! I truly feel so blessed to have such wonderful friends in my life!

So, earlier this week I said I'd made my dad a pretty cool card (in my opinion) for his birthday and promised I'd show it later this week. Seeing as its gotten around to Saturday and its the end of the week, I thought I'd better show you folks what I made! 

For anyone who doesn't know my dad.... He is totally NUTS and taking photos! He hardly goes anywhere without a camera in hand or slung over his shoulder. Now, I love taking photos but not to the extreme of taking thousands in a day!! Anyway, what better card for my daddy than a camera!!

(I'd just like to note, I do love Dad very much despite is obsessive photo taking!!)


Stamp Set: Simply Sketched, Around the World
Ink: Basic Black, Smoky Slate, Daffodil Delight
Cardstock: Basic Black, Whisper White, Window Sheet, Gumball Green
Big Shot: Circles Framelits
Punch: Itty Bitty Circle, Owl Builder, 1" Circle, 3/4" Circle, Envelope Punch Board
Embellishments: Jumbo Rhinestone
Other: White Gel Pen, Blender Pen

Before any camera enthusiasts criticise me for my inaccurate camera, I know it's not exactly right but I followed the basics of my camera and added/removed bits at my discretion. I tried to add enough details to make it interesting and fun but not too much to send me crackers punching tiny little details.

If you were wondering what else, apart from super cool envelopes, the envelope punch board can make, how about a camera?! Its perfect for making the little tab at the top here! 


The lens was a bunch of circles cut with the framelits and stacked using dimensionals (these were actually rogue black dimension pads left from before I joined Stampin' Up! I've got to admit the black came in handy as they really blend in well!)


The cameras from the set Around the World came in very handy for a little stamping embellishment for the inside. I'm glad I saw them in my stack of stamps as I almost forgot I had them! 


I got a recent family photo my dad took of us all, he's not much into taking selfies so this is a rare photo he is actually in too! I just sized it and printed it to fit the back where the LCD screen would be!


All the little details are hand drawn using a white gel pen.

I hope you're having a nice weekend. I'm home alone today as Stuart is at a stag party for his friend Tim who is getting married soon. I think its going to be a day of pottering and crafting for me! 

Happy Stampin',

Friday, 31 January 2014

So Thankful PP180

Hey there!

Its Friday!!! How exciting! My bestie, Kathryn and her little boy Euan are coming over this afternoon! It was before Christmas, last time I saw them and she's about to have another baby any day now! Looking forward to a good catch up with both of them. Next time I see her, she'll really have her hands full with two little ones! I can't wait to meet the new little one, but baby, please don't start coming until after today? Thank you!

I've got cute Paper Player's Challenge entry to show you today. Its a sketch this week, and an interesting sketch it was!


I debated for quite a while about what to do with this and then I had a flash of inspiration! Here's how it finished up...


Stamp Set: So Very Grateful
Ink: Black Stazon, Perfect Plum, Island Indigo, Gumball Green, Crushed Curry
Cardstock: Crumb Cake, Very Vanilla, Perfect Plum, Window Sheet
Big Shot: Chalk Talk Framelits, Apothecary Accents Framelits
Embellishments: Island Indigo Chevron Ribbon, Linen Thread
Extra: Blender Pens

So the front is actually a clear window so you can see the pull out card inside. When the card is removed there's a further sentiment behind that! I thought this would work well as the set I wanted to use had 3 sentiments that seemed to work really well as a trio, how do you put a trio of sentiments on a card though without it looking hugely wordy?!


I was showing this card to Stuart and he was like, "oh that's cool, is the pull out piece a bookmark?"... What a wonderful idea! Now you can send a beautiful thank you to a friend AND it includes a thank you gift! Loved that suggestion.

I seem to be really into the blender pen/watercolor look at the moment but don't those flowers look lovely all coloured in like that!?


The fancy edge was cut using just the very end of one of the Apothecary Accents framelit, and the hole is cut with one of those little tag hole framelits that came in the Chalk Talk framelits...I've never had a use for them but they worked out perfectly here! 


I also did a little doctoring on my ribbon - its the chrevron ribbon cut down the centre and then sealed along the cut edge with a lighter so it doesn't fray! Love the effect and the look of the thinner ribbon. Totally going to do that again!


Anyhow, hope you enjoyed this special card.

Happy Stampin',

Wednesday, 15 January 2014

Valentine Birds

Hello!

Are you having a good week? Isn't this month just flying by!?! It'll be Christmas again before we know it! I wish time would slow down a bit. 

Valentine's is fast approaching and today I've got some more creative inspiration for you. 
I'm aware you might not be so interested in Valentine's so I'm also sharing ways to adapt card/products for other occassions too! 


Stamp Set: For the Birds, Teeny Tiny Wishes
Ink: Black Stazon, Real Red, Pool Party, Soft Sky, Crisp Cantaloupe, Pear Pizzazz, Daffodil Delight
Cardstock: Crisp Cantaloupe, Sweet Sayings Cards & Envelopes
Accessories: Subtles Buttons, Pearls, Dazzling Diamonds

These super sweet note cards come with a pre-printed border and are absolutely perfect for a quick card. A little stamped image or sentiment and you're set to go! They also come with envelopes in Pool Party, Crisp Cantaloupe, and Real Red - so pretty! These come in a pack of 12 for £5.50 so they work out at 45p each for the card and envelope - what a great deal! 

I chose to use the For the Birds set and colour it in with blender pens. The blender pens give it a lovely watercolour look and is so easy to do and makes great use of all those ink pads you own for the price of a blender pen! 


I cut of the sentiment from the bird stamp which makes these stamps so much more versatile, but you could use a post-it note to mask it off too if you didn't want to cut your stamp! Just pop any sentiment you need on here and your card is good to go! 


For a little extra sparkle I added a dab of dazzling diamonds to the hearts and scattered a few pearls and a button! 


Here's another of the stamps from the For the Birds set. It only took a few minutes to throw together and made a fab quick note card to pop in with some goodies for a friend! I can see I'm going to have to stock up on these little notecards - they are only available until January 27th! Get them while you can!!

I'll be back tomorrow and share with you a few more cards using these gorgeous Sweet Sayings note cards for non-valenine purposes!

Happy Stampin',

Amanda xx

Tuesday, 26 July 2011

for rhoda

A couple weeks ago it was my upline, Rhoda's, 30th birthday, so she obviously needed a special card! Unfortunately I didn't have anything with numbers on it, so I improvised and it actually worked even better than I was expecting! Here we go...


30th Birthday

Stamp Set: Slice of Life (Hostess Only), Basic Phrases, Candle Crazy Builder, So Many Stars Builder
Ink: Crumb Cake, Baja Breeze, Rose Red, Regal Rose, Perfect Plum, Basic Black
Cardstock: Regal Rose Texture, Perfect Plum, Rose Red, Crumb Cake, Very Vanilla
Punches: Modern Label
Accessories: Very Vanilla Satin Ribbon, Basic Pearls, Crystal Effects, Dazzling Diamonds
Extras: Blender Pen, Jumbo Wheel Handle, Wheel Guide, Builder Spindle and Spacer, Dimensionals, Tombo, Pencil, Black Pen

So I stamped my cake in some Very Vanilla cardstock and the coloured it in with a blender pen. I drew in pencil the 30 on top of the cake so I could get it exactly how I wanted it before tracing over in pen. I added a spot of glitter to the top of the 30 to make it look like burning candles. I ran the builder wheel across some Perfect Plum cardstock, added some satin ribbon in the centre and adhered it to the Crumb Cake base card. I mounted the cake on some Regal Rose and Rose Red cardstock, and adhered to the card with dimensionals. I then stamped and punched out the sentiment, adhered with dimensionals and added a few pearls. I also decided to add crystal effects to the cake stand to give it a little extra glossy shine. I Rhoda liked it! 

Please leave me a comment and let me know what you thought, I love reading them! 

Come back tomorrow for another card! 

Hugs,

Amanda 

Thursday, 21 July 2011

sail away...

Well I finally got around to purchasing the Sail Away stamp recently. Haven't regretted it for a second! I love it so much, if for no other fact than it makes a really quick and simple masculine card! 


Atmospheric Sail Away

Stamp Set: Sail Away, Fun and Fast Notes
Ink: Crumb Cake, Not Quite Navy, Night of Navy, Basic Black
Cardstock: Very Vanilla, Not Quite Navy, Night of Navy
Punches: Modern Label
Extras: Sponges, Dimensionals, Blender Pen

So this card is actually pretty simple, just requires a LOT of inking and getting rather messy hands! I don't think I could consider myself a crafter without getting messy every once in a while though!! Haha, and with me that seems to be more often that not! So I stamped the sail boat of some Very Vanilla cardstock and the sails on a separate piece and cut them out. I then began inking the edges of the cardstock, being quite vicious with the inking and not at all careful working futher and further in. I layered the Not Quite Navy and the Night of Navy inks on to of one another to create the atmospheric sky and sea. I shaded the cut out sails with a little bit of Crumb Cake and a blender pen and then adhered the sails to the inked up cardstock. I layered it up on some Not Quite Navy and Night of Navy cardstock and finished it off with stamping the sentiment from Fun and Fast Notes on some Very Vanilla cardstock, punching with the modern label and then inking the edges before adhering below. 


I think this has got to be one of my favourite cards I've made recently! What do you think? Please comment.

Til next time,

Amanda x

Monday, 11 July 2011

give it some shimmer!

I've had several commission cards of late, this is just the first. I had 3 for people that were leaving a Christian women's organisation and the others in the group wanted some nice "goodbye" cards for them. The other stipulation was that they wanted them to reflect the reason why they were leaving. 

The first, today's, was for a lady leaving due to a new job and generally being extremely busy! 
  

Best Wishes Hydrangea

Stamp Set: Because I Care (Hostess Only), Silhouette Sentiments (Hostess Only)
Ink: Pretty in Pink, Regal Rose, Pear Pizzazz, Old Olive, Basic Black
Cardstock: Very Vanilla, Pink Pirouette, Old Olive
Accessories: Shimmer Mist (Shimmer Paint and Rubbing Alcohol)
Extras: Blender Pen, Dimensionals

A very simple card. I coloured in the hydrangea with a blender pen, stamped Best Wishes and layered onto some coloured cardstock. Finally to make it look that extra bit special, I gave the card a spritz with my homemade shimmer mist! So pretty! 

Hope you enjoyed this simple card today! 

Hugs, 

Amanda 

Saturday, 18 June 2011

simply stampin' challenge, week 12

This week's challenge is a theme challenge. As it is father's day tomorrow, what better of a theme than 'You've Got Male'. Men are notoriously difficult to make cards, and yes even I struggle...LOTS!


Handyman Dad

Stamp Set: Every Little Bit
Cardstock: Baja Breeze, Early Espresso, Very Vanilla
Ink: Early Espresso, Crumb Cake
Punches: Scallop Square
Extras: Dimensionals, Blender Pens, Brown Pen

This is the card I made for my Dad for Father's day tomorrow. He's been a really big help over the years and especially this past year coming over to help fix things when they go wrong - especially when Stu and I have little or no clue what to do. I wish I could be as good a handyman as my dad is! 

I hope you liked this simple card. Come back tomorrow to see the card I made for my father-in-law for Father's Day. Its possible the most minimal card I've ever created! Looks very cute though! 

Don't forget to head over to the Simply Stampin' Challenge blog, check out the other design team's entries and enter yourself! 

Thanks for stopping by! 

Amanda xx

Tuesday, 14 June 2011

i'm crushing...

As I said, This colour combo was gorgeous and therefore I actually made a couple cards using the same combo, Very Vanilla, Chocolate Chip, Crumb Cake and Concord Crush. I think one of the reasons I have taken so well to this combo is because of its heavy use of neutral colours. The nice thing about a mostly neutral coloured card is that any colour you put in it just really pops and stands out all the more! This is clearly shown in my card below. 


Together Forever Wedding Cake

Stamp Set: Fun and Fast Notes, Fast Flowers Wheel
Cardstock: Very Vanilla, Crumb Cake, Chocolate Chip
Ink: Chocolate Chip, Concord Crush, Pear Pizzaz (just the very slightest bit to bring out the leaves)
Extras: Blender Pen

The strip of Chocolate Chip cardstock and the Fast Flowers wheel breaks up the large expanse of Vanilla cardstock. The Crumb Cake and Chocolate Chip cardstock frame the centre image. I used a blender pen to colour in the image. Concord Crush was used on the flowers on the cakes and also a little sponging around the edges...draws out the colour and also draws in the eye! It definitely shows the eye where the focal point of the card is! 

I hope you liked this second colour combo card. Please do leave me a comment, they make me smile lots! :)

'till next time,

Amanda xx

Tuesday, 5 April 2011

everyone gets to make a magnet!

As promised, here are the projects I demonstrated last night! 


Congratulations Hearts 

Stamp Set: En Francais, I {Heart} Hearts, Fun & Fast Notes
Cardstock: Crumb Cake, Riding Hood Red, Marina Mist
Ink: Versa Mark, Riding Hood Red, Pacific Point
Pastels: Marina Mist, Riding Hood Red, Pumpkin Pie
Accessories: Pumpkin Pie Button, Linen Thread
Extras: Clear Embossing Powder, Heat Tool, Cotton Balls, Sponge, Dimensionals, Glue Dot

In this first demo I really wanted to highlight the wonderful ways you can use the versa mark ink pad (something I don't think I could live without!). This also included embossing!
I stamped the En Francais background stamp with versa mark on the Crumb Cake cardstock and then used cotton balls to gently rub and blend Stampin' Pastels over it to give some gentle colour and bring out the writing! I then stamped the hearts with versa mark and covered them in clear embossing powder and heated with my heat tool. I used a sponge to rub some Pacific Point ink over the small LOVE heart to show the emboss resist technique. Finally, I adhered everything together, stamped the sentiment from Fun & Fast Notes and added a small button!


Get Well Flowers

Stamp Set: Greenhouse Garden, Fun & Fast Notes
Cardstock: Whisper White, Early Espresso, Old Olive, Crumb Cake, Marina Mist
Ink: Marina Mist, Early Espresso, Old Olive
Accessories: Basic Rhinestones, Whisper White Grosgrain Ribbon (dyed Marina Mist)
Extras: Paper Crimper, Sponge, Dimensionals, Glue Dots, Stamp-a-ma-jig, Modern Label Punch

With this demo, I wanted to show how to use a stamp-a-ma-jig as I think it is an amazing peice of kit and show how perfect it makes stamping and possitioning every single time! I also wanted to show how you can get more out of your ink pad by sponging! 

I used the stamp-a-ma-jig to stamp the medium flower from the Greenhouse Garden. Then I used the sponge to sponge Marina Mist ink around the edge of the Whisper White cardstock, I also dampened a piece of whisper white ribbon and sponged it on both size so it was Marina Mist in colour! A great way to get a piece of white ribbon to match any colour ink you have!! I love it! I layered up the cardstock and then stamped, punched and sponged the sentiment before adhering it to the bottom of the Whisper White cardstock, this just "grounds" the flowers so its not floating. finally I crimped the edge! 


Pie Thanks Magnet


Pie Magnet


Gumball Birthday Magnet


Gumball Magnet

Stamp Set: Every Little Bit, Fun & Fast Notes
Cardstock: Whisper White 
Ink: Basic Black, Pumpkin Pie, Real Red, Marina Mist, Pacific Point, Daffodil Delight, Old Olive
Accessories: Linen Thread
Extras: Bottle Cap, Magnet, small piece of tango can, Blender Pen, Crystal Effects, 1" Circle Punch, 1 3/8" Circle Punch, Dimensionals

If you want to see how to make this way cool magnet, come to my workshop next Friday!!! You get to make one yourself!! 

(CASEd from a swap I received at Coventry Training by Zoe Tant - thanks for the awesome idea!)

Hope you enjoyed seeing a bit from my latest workshops! Please do come along next Friday and bring a friend!! It would be great to see you there! 

Ta ta for now! 

Amanda xoxo

Tuesday, 22 March 2011

adorable baby girl

Yesterday my husband's cousin had a little baby girl, Georgia Poppy! (totally adore her name!) I am so excited! The boys are all so sweet, but this is the first girl to be born in the family for 15 years so she is long overdue! I am not a baby person in the slightest but I am really excited to meet her and have a little cuddle! Maybe its my maternal side kicking in or something! I don't know! Anyway, obviously a new baby requires a welcome baby card! I showed one last week, but I wanted to make a special little one just for Georgia today, and here it is...


It's a Girl 

Stamp Set: It's a Girl (Hero Arts, not SU)
Cardstock: Crumb Cake, Pink Pirouette DSP, Very Vanilla
Ink: Basic Black, Elegant Eggplant, Pretty in Pink, Daffodil Delight
Accessories: Brads, Linen Thread
Extras: Blender Pen, Dimensionals, Paper Piercer

A really simple little card, its very tall and thin but the height was important to enable me to have enough space for the elephant and flowers as well as the hanging girl mobile! I really love the little adorable wording and heart in the bottom corner! Adorable is definitely my word of the moment! 

I hope you enjoyed today's short and sweet entry today. 

Hope you're all having a great week! Don't forget to leave a comment!

Amanda xoxo

Monday, 14 March 2011

update 1 - mini cards

Okay, so just I realised when I was taking photos that there's actually A LOT of cards, so I'm going to split up all I have to show you into several more bite size chunks! Here is the first instalment...mini cards! I LOVE this size card, they're just so cute and just perfect for all those little thank you's you have to send out to people all the time! They make excellent little surprise "hello" cards to give someone just for the fun of it too! I think I'm addicted...at least, I suppose there's worse things to be addicted to, right?!


thank you

Stamp Set: Forever Flowers Standard Wheel (retired)
Ink: Rich Razzleberry, Old Olive, Pumpkin Pie, Basic Black 
Cardstock: Very Vanilla, Rich Razzleberry, Old Olive, Early Espresso
Extras: Blender Pen, White Gel Pen, Modern Label Punch, Standard Wheel Handle, Dimensionals

Simple card, I just wheeled out the pattern to cover the background and then coloured it in using the blender pen, adhered some torn cardstock at the top with a dash and dot line and finally wrote the sentiment on the modern label and adhered it to the bottom right hand corner.


hello

Stamp Set: Watercolor Joy Standard Wheel (retired)
Ink: Elegant Eggplant
Cardstock: Very Vanilla, Riding Hood Red, Elegant Eggplant
Extras: White Gel Pen, Modern Label Punch, Standard Wheel Handle, Dimensionals

Again simple card, I wheeled out the pattern to cover the background, adhered some torn cardstock at the top with a dash and dot line and finally wrote the sentiment on the modern label and adhered it to the bottom right hand corner.


happy

Stamp Set: Fast Flowers Wheel
Ink: Basic Black, Pumpkin Pie, Real Red
Cardstock: Very Vanilla, Pumpkin Pie, Real Red
Extras: Blender Pen, White Gel Pen, Modern Label Punch, Standard Wheel Handle, Dimensionals

Simple card, I just wheeled out the pattern to cover the background and then coloured it in using the blender pen, adhered some torn cardstock at the top with a dash and dot line and finally wrote the sentiment on the modern label and adhered it to the bottom right hand corner.


thanks

Stamp Set: It's Beautiful Jumbo Wheel (retired)
Ink: Night of Navy
Cardstock: Very Vanilla, Night of Navy, Garden Green
Accessories: Basic Rhinestones
Extras: White Gel Pen, Modern Label Punch, Jumbo Wheel Handle, Dimensionals

Again simple card, I wheeled out the pattern to cover the background, adhered some torn cardstock at the top with a dash and dot line and added some rhinestones for a little sparkle. Finally I wrote the sentiment on the modern label and adhered it to the bottom right hand corner.


gratitude

Stamp Set: Leaves a la Carte (retired)
Ink: Basic Black, Pacific Point, Old Olive
Cardstock: Very Vanilla, Pacific Point, Old Olive
Extras: Blender Pen, White Gel Pen, Modern Label Punch, Jumbo Wheel Handle, Dimensionals

Simple card, I just wheeled out the pattern to cover the background and then coloured it in using the blender pen, adhered some torn cardstock at the top with a dash and dot line and finally wrote the sentiment on the modern label and adhered it to the bottom right hand corner.

Hope you enjoyed them...second instalment coming soon! Hope you're having a good evening. Please feel free to leave a comment, they make my day! 

Amanda xx