Showing posts with label dazzling diamonds. Show all posts

Thursday, 17 April 2014

Forget-Me-Not!

Hello! 

Wow its been a busy few days! Tim and Sarah's wedding was on Tuesday - the weather was absolutely gorgeous. It was such a beautiful wedding, the bride's dress was gorgeous, the flowers were so pretty...they just looked so so blissfully happy. Love it! 

I've spent yesterday and today catching up on housework and having a fun day with Kathryn and the boys! We went to the park, fed the ducks, saw lots of adorable ducklings (I was so tempted to slip a couple into my handbag!), had a picnic on the grass, did some running and played in the playground. Its such fun being a kid! 

Now its the end of the day and I am finally getting around to looking at my blog again. 


Stamp Set: Morning Meadow, Remembering Your Birthday
Ink: Marina Mist, Crushed Curry, Gumball Green
Cardstock: Whisper White, Gumball Green
Big Shot: Chalk Talk Framelits
Punch: Bird Builder, Pansy, Itty Bitty
Embellishments: Dazzling Diamonds

This is a really simple little card. I thought that the flowers looked like forget-me-nots. I love these flowers a lot and always look forward to seeing them flower each year. They're not out yet, but soon! 
I also thought that forget-me-nots would be a cute idea for the a belated birthday card! 
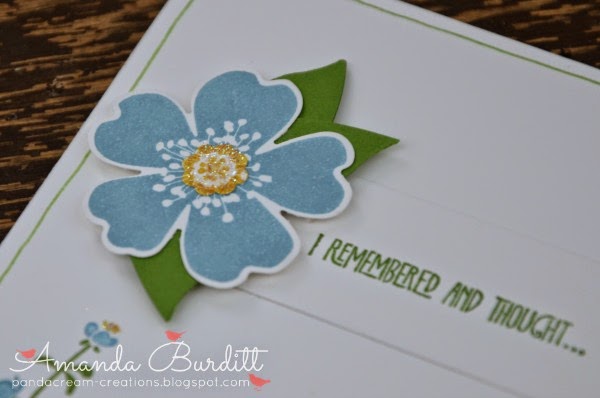

Marina Mist seemed like the perfect colour for the forget-me-nots and the bright yellow centres! I didn't want to cover up the yellow centres with anything like rhinestones or pearls so I thought the best way to add a little sparkle would be to use the 2 way glue pen and the dazzling diamonds glitter.

Don't the bird wings just make the most fab leaves?!


And of course a little quick stamping inside the card finished it off perfectly! 

I'll be back tomorrow with something else to share! 

Happy Stampin',

Monday, 24 February 2014

Fishin' Around....sorta

Hello! 

Wow its been pretty busy today! I had Envelope Punch Board Class here this morning followed by a goodly amount of sewing and some card making! As a result I forgot to get a blog post out so sorry that today's is a little later than usual...but I'm here now. 

Today I have an adorable little project I made a while ago but haven't gotten around to sharing it with you yet. The card was based on the super cute a la carte stamp Fishin' Around


And here's my version.....


Stamp Set: Pennant Parade
Ink: Tangerine Tango, Baked Brown Sugar, Pear Pizzazz, Basic Black
Cardstock: Pool Party, Whisper White, Crushed Curry, Crumb Cake, Pear Pizzazz, Window Sheet
Big Shot: Circle Framelits
Punch: Owl Builder, Small Heart, Bird Builder, 3/4" Circle
Embellishments: Dazzling Diamonds

Aren't the fish just darling?! So to make the shaped card I just made sure my card base was folded and slightly too short on the top and bottom to cut a complete circle. the white is torn to give the impression of water. The crumb cake at the base is also torn to look like sand. Everything was popped up on dimensionals in layers so I could add some window sheet over the top which really gives the impression of a fish bowl. The dimensionals really add a lot of dimension to this card which I just love. 


Just a little photos to show some of the dimension! The window sheet is adhered with glue dots along the top and then cleverly hidden with a strip of Pool Party that looks like the rim of the bowl!


I made sure that the sand layers and the white top was very slightly smaller than the Pool Party card base so it looks like an actual fish bowl. 

The branch from the bird builder punch works great for some weeds and the tiny sentiment from Pennant Parade worked perfectly on the little flag! 
Dazzling Diamonds just takes these little fishies to the next level! Oh and there's glitter on the bubbles too!

Hope you enjoyed this cute little make. 

Happy Stampin',

Wednesday, 5 February 2014

I Lava You

Hi!

Here's another Valentine card. Its cute and super fun!


Stamp Set: Crazy Mixed Up Love
Ink: Basic Gray, Pool Party, Strawberry Slush
Cardstock: Strawberry Slush, Basic Gray, Whisper White, Silver Glimmer
Big Shot: Decorative Dots TIEF (SAB)
Punch: Banner (SAB)
Embellishments: Dazzling Diamonds

I thought the decorative dots embossing folder was just perfect for this lava lamp card - don't the dots just look like little blobs of floating lava!?


Love the glittery detail on the lava in the lamp and the glittery banners just make this card pop! 

I hope you enjoyed today's super quick Valentine share! 

Until tomorrow, 

Happy Stampin',


Double Rainbows SUO89

Hi there! 

Today's creation is for the SU Only Challenge. What I love about SUO Challenges is that they are bi-weekly so it really gives a bit more time to ponder and think about the challenge and come up with something creative! This time the theme is a One Layer card. I think pretty much everyone struggles to make one layer cards - its just too tempting to pile up a few layers of paper and punches. One layer cards aren't very forgiving to mistakes. 

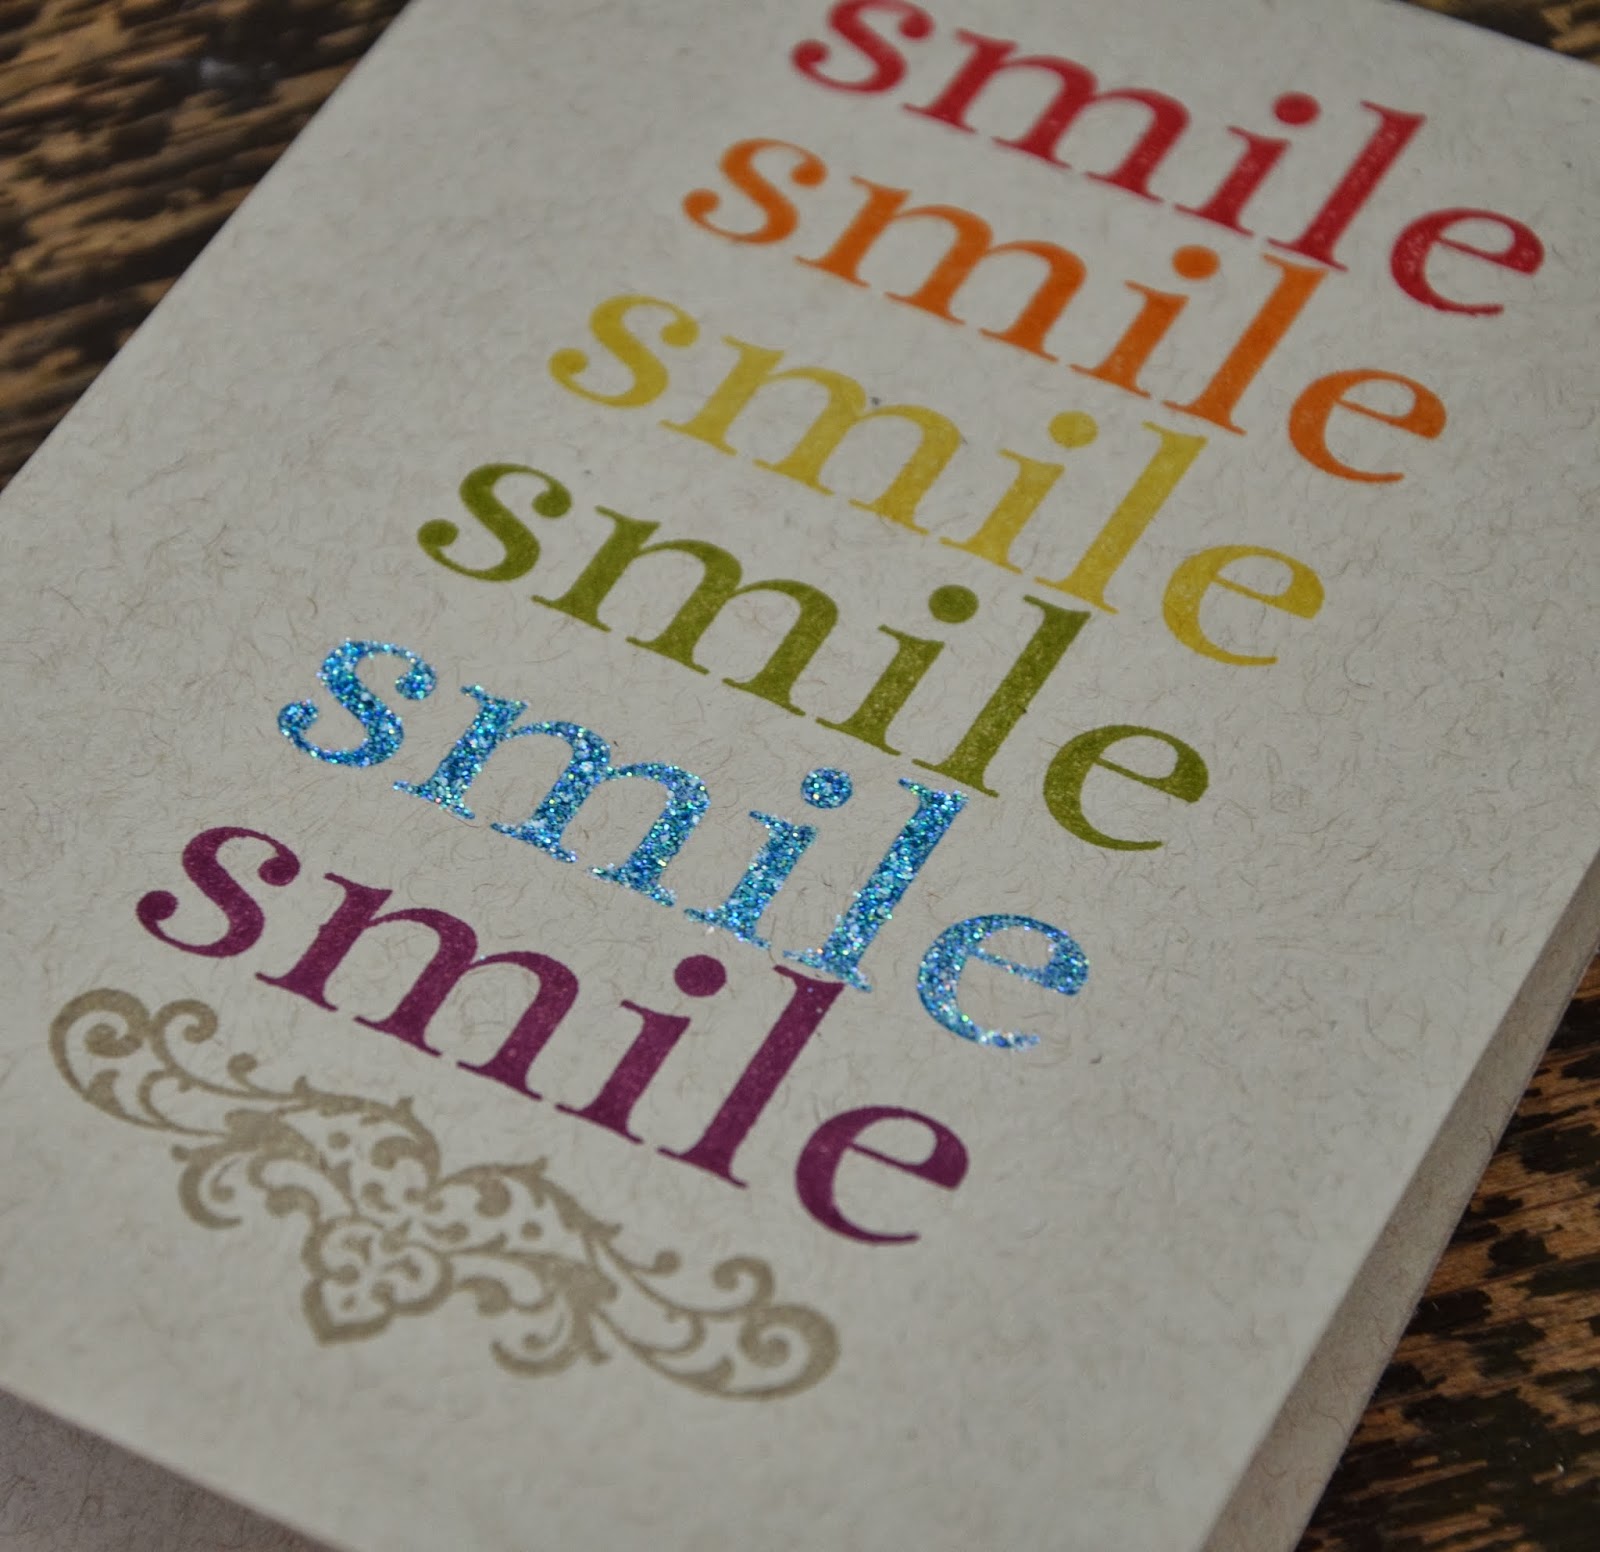
I had a long and hard think about what to do and in the end came up with this bright and cheery number...


Stamp Set: Happy Day
Ink: Real Red, Pumpkin Pie, Daffodil Delight, Old Olive, Pacific Point, Rich Razzleberry, Crumb Cake
Cardstock: Crumb Cake
Embellishments: Dazzling Diamonds

My best friend for this card was my stamp-a-ma-jig. For those of you who haven't been intoduced to the stamp-a-ma-jig, it is a tool for perfectly positioning your stamps! A must have stamping tool! 

I thought it'd be fun to use just one sentiment and repeat it in a rainbow of colours! The flourish at the bottom just finishes this card and adds a touch of elegance to quite a minimalistic funky card! 


For just that extra little touch and a bit of sparkle I used a 2 way glue pen to carefully trace over the letters of just the Pacific Point sentiment and added some dazzling diamonds glitter.

What I love about this card is that it could be easily replicated with a different sentiment, or in different colours for a whole different look at no extra effort! 

Here's another "stepped up" version of the rainbow sentiment card...


Stamp Set: Remembering Your Birthday
Ink: Melon Mambo, Real Red, Tangerine Tango, Daffodil Delight, Old Olive, Bermuda Bay, Pacific Point, Rich Razzleberry
Cardstock: Whisper White
DSP:  Polka Dot Parade
Punch: Banner


Hope you enjoyed both these cards today and maybe I've inspired you to have a go at repeating sentiment as the main focal point of the card, or indeed making it a one layer card! 

Thanks for stopping by,

Happy Stampin',

Wednesday, 22 January 2014

One Layer Valentine

Hi there! 

Really super quick post and card for you today. This is for the Paper Players Challenge, this week is a CAS One Layer Valentine. 


Oh my, I was tempted to skip it as I wasn't very inspired but I thought I really should give it a go. 


Stamp Set: Express Yourself
Ink: Melon Mambo
Cardstock: Whisper White
DSP: Gingham Garden
Big Shot: Hearts a Flutter
Accessories: Dazzling Diamonds
Extra: Essentials Paper Piercing Pack


Now I couldn't quite decide if this was cheating or not. It was a one layer challenge so I've only used one layer on the front but added a piece of DSP for the colour inside the card. Thinking on it now I probably should have stamped the section inside the card but I couldn't find anything just like what I wanted! Oh well, its sort of one layer. (and it does look lovely and crisp open withough the DSP showing too!)


Hope you're having a good week and stop back tomorrow for a bit more creativeness! 

Happy Stampin',

Wednesday, 15 January 2014

Valentine Birds

Hello!

Are you having a good week? Isn't this month just flying by!?! It'll be Christmas again before we know it! I wish time would slow down a bit. 

Valentine's is fast approaching and today I've got some more creative inspiration for you. 
I'm aware you might not be so interested in Valentine's so I'm also sharing ways to adapt card/products for other occassions too! 


Stamp Set: For the Birds, Teeny Tiny Wishes
Ink: Black Stazon, Real Red, Pool Party, Soft Sky, Crisp Cantaloupe, Pear Pizzazz, Daffodil Delight
Cardstock: Crisp Cantaloupe, Sweet Sayings Cards & Envelopes
Accessories: Subtles Buttons, Pearls, Dazzling Diamonds

These super sweet note cards come with a pre-printed border and are absolutely perfect for a quick card. A little stamped image or sentiment and you're set to go! They also come with envelopes in Pool Party, Crisp Cantaloupe, and Real Red - so pretty! These come in a pack of 12 for £5.50 so they work out at 45p each for the card and envelope - what a great deal! 

I chose to use the For the Birds set and colour it in with blender pens. The blender pens give it a lovely watercolour look and is so easy to do and makes great use of all those ink pads you own for the price of a blender pen! 


I cut of the sentiment from the bird stamp which makes these stamps so much more versatile, but you could use a post-it note to mask it off too if you didn't want to cut your stamp! Just pop any sentiment you need on here and your card is good to go! 


For a little extra sparkle I added a dab of dazzling diamonds to the hearts and scattered a few pearls and a button! 


Here's another of the stamps from the For the Birds set. It only took a few minutes to throw together and made a fab quick note card to pop in with some goodies for a friend! I can see I'm going to have to stock up on these little notecards - they are only available until January 27th! Get them while you can!!

I'll be back tomorrow and share with you a few more cards using these gorgeous Sweet Sayings note cards for non-valenine purposes!

Happy Stampin',

Amanda xx

Thursday, 13 December 2012

winter fun!

Sorry for being AWOL once again! Its that time of year where everyone is busy and when I do get a spare moment, blogging is not what first pops into my head, but now that I sit here I am thinking my life is pretty sweet right now... 

Its cold and frosty outside, bit I am inside with the nice hot fire, I'm sitting next to our Christmas tree, in a very Christmassy house. There are a gazillion homemade cookies in boxes in the kitchen waiting to be bagged up, tied and tagged for gifts. We made an awesome gingerbread house too!! Oh I definately have that Christmassy feeling going on! Love it! 

To go with that Christmassy feeling, I have a couple of Christmassy cards for you! 


Winter Skating and Tubing

Stamp Set: Winter Wonderland, Curly Cute 
Ink: Basic Black, Raspberry Ripple, Lucky Limeade, Island Indigo, Summer Starfruit, Pretty in Pink, Pool Party, Crumb Cake,  Blush Blossom
Cardstock: Pool Party, Lucky Limeade
Punch: 1 3/4" Circle
Extras: Silver Dazzling Details 

I used the blender pen to colour in the little kids, everything was assembled and the final thing to do is line the circle punches with a thin line of silver dazzling details! 

Seeing as I've been absent for a while, I thought I'd give you a bonus card today. 


Winter Wonderland Ornaments

Stamp Set: Winter Wonderland, Curly Cute 
Ink: Basic Black, Raspberry Ripple, Gumball Green, Summer Starfruit, Pumpkin Pie, Pretty in Pink, Soft Suede, Lucky Limeade, Blush Blossom Island Indigo
Carstock: Whisper White, Soft Suede, Gumball Green Core'dinations
Bis Shot: Perfect Polka Dots Emboss, Holiday Ornaments Framelits 
Extras: Linen Thread, Dazzling Details 

I just LOVE this card! The "snowglobe" ornaments are adorable aren't they?! I coloured them with the blender pen again for that watercolour look. I used dazzling diamonds because I wanted that thick glittery look but dazzling diamonds would work well too. 
The Gumball Green cardstock is a lighter shade underneath so once embossed I sanded the paper to reveal the pretty colour below! 

I hope you enjoyed a couple Winter Wonderland creations today. If you want any last minute gifts for Christmas you have until the end of today to get your order to me and I will tag it on to the last order before Christmas!! 

Happy crafting! 

Amanda xx

Saturday, 7 July 2012

simply stampin' challenge 67

Good morning! 

Simply Stampin' Challenge time again folks! This week is a sketch again and here we have it...


And my interpretation...


Birthday Cupcake

Stamp Set: Easy Events
Ink: Pretty in Pink, Crumb Cake, Baja Breeze, Basic Black
Cardstock: Very Vanilla, Crumb Cake, Rose Red
Punch: Owl Builder
Ribbon: Blushing Bride Pleated Satin, Pretty in Pink Satin, Pretty in Pink Taffeta (Retired)
Accessories: Dazzling Diamonds

So Deb did some beautiful CAS cards with the Easy Events stamp set last week which has made me want to get my set out for a play again! 

As you can see I rotated the sketch! 

I started by stamping the cupcake and colouring it in with a blender pen for a watercolour look, I mounted it on a some crumb cake for a border and help it stand out against all the pink I was about to throw at the card! I wanted to try something different for the strips in the background so I thought I'd raid my ribbons for pinks - hence the retired taffeta because the colours matched - it really showcases the ribbons and different textures. They were adhered/tied to the card and the cupcake popped up on top. To finish it off and add a small bit of pop to the card I punched the tiny heart from the owl punch and added it to the top of the cupcake and added glitter! That cupcake looks SO yummy!!!

I hope you will head over to the Simply Stampin' blog to check out the other amazingly talented DT entries, and enter yourself! Oh and don't forget to leave me a comment and let me know what you thought to this card! 

Happy Stampin',

Amanda xx


Wednesday, 1 February 2012

twenty one

My cousin asked me to make up some cards for her a while back. One of which was a special one for her sister's 21st birthday! Well, it was Victoria's birthday last week so now I can share the card I made with you all. 


Stamp Set: Happiest Birthday Wishes
Ink: Rich Razzleberry
Cardstock: Crumb Cake, Daffodil Delight, Melon Mambo, Rich Razzleberry
Punch: 1" Circle, Corner Rounder
Big Shot: Alphabet Simple Letters die
Accessories: Crystal Effects, Dazzling Diamonds

So I punched out the circles of cardstock in Daffodil Delight, Melon Mambo and Rich Razzleberry for the bottom edge of the cardstock. Next I cut out the letters for the words 'twenty one' and adhered them down. I stamped the sentiment "it's your day!" above the lettering. Finally I covered the letters in crystal effects and then sprinkled in glitter to give it some extra pizzazz! Cute! 

What do you think? Thanks for stopping by,

Amanda x

Saturday, 29 October 2011

simply stampin' challenge, week 31

This week over at the Simply Stampin' Challenge blog its back to a sketch challenge again! This week's is great so why not create your own card using it and submit it this week - you could be top 3 and I would love to see what you come up with! 

Here's the sketch and my take on it!


Merry & Bright Dasher

Stamp Set: Dasher, Serene Snowflakes, Season of Joy
Ink: Early Espresso
Cardstock: Crumb Cake, Naturals Ivory, Early Espresso, Riding Hood Red Textured
Punch: 3/4" Circle
Accessories: Dazzling Diamonds Glitter

I thought dasher would be perfect for this sketch - he's just so cute! I stamped the small trio of snowflakes over the ivory background as the design matched up really well with the snowflakes surrounding dasher's antlers. I decided I wanted to do a larger scallop edge than the scallop border punch would do so I punched a bunch of small circles and then adhered them in a row so half the circle was overhanging the edge. I added a strip of Riding Hood Red cardstock and added brown stitching lines to that strip and the scallop edge. The sentiment was done by colouring in only one of the sentiments on the block from Season of Joy - a great way to get more use out of the block! I adhered everything together and then finally added some spots of glue and added dazzling diamonds glitter! The sparkle really finished it off! 

So, leave me a comment and then please head over to the Simply Stampin' Challenge blog, check out what the other design team members have created for you and then get creating yourself! I cannot wait to see what you come up with! 

Happy Stampin',

Amanda x

Saturday, 15 October 2011

simply stampin' challenge, week 29

Its Saturday again and that means its the Simply Stampin' Challenge! This week is a colour challenge, which is as follows:


These are the colours that are in the new DSP - Frightful Sight. I don't go in for Halloween so I thought for all you non-halloweeners out there I would do something  a little different.


Glitterful Friend To Friend

Stamp Set: Greenhouse Garden, French Foliage, Teeny Tiny Wishes
Ink: Cajin Craze, Old Olive, Basic Black
Cardstock: Whisper White, Old Olive
Punches: Modern Label
Embossing: Heat & Stick Powder, Dazzling Diamonds, Heat Tool
Accessories: Rhinestones

So I haven't used the Greenhouse Garden stamp set for quite a while so I thought I would get it out and realised it pairs very well with the French Foliage stamp set. I used the 'kissing' technique I was explaining in yesterday's post on the flower and covered with heat and stick powder, then dazzling diamonds glitter. I did the same thing to the leaves. The background was stamped all over with the french script and water drop stamps in the French Foliage set (I stamped off the stamped images on scrap paper to give a softer background and really let the glittery flower stand out!). I stamped the sentiment on Whisper White cardstock, punched out with the Modern Label punch and then ran the Cajun Craze marker around the edge to help it stand out a little from the background! 

I hope you liked today's card using the halloween colours to make a non-halloween card! Now hop on over to the Simply Stampin' Challenge blog and check out what the other lovely talented design team members have created and then enter your own creation! I'd love to see how you use these pretty colours! 

Hugs,

Amanda x


Thursday, 7 July 2011

plus one

I have a piece of rather exciting news, last week I got my first downline member! I'm just a tad excited! I remember how exciting a time it was when I joined the Stampin' Up! family as a demo and how sweet Rhoda was to send me buttons and rhinestones to help me along. So, with my first downline member, I felt it only natural to share that same joy in giving! Its great to give, it always makes me feel so happy to see someone getting joy out of something you have done or given to them. So, as a thank you and a welcome for joining the Stampin' Up! family I made a little gift for Sue.


Butterfly Box

Stamp Set: Punch Potpourri (Hostess Only)
Ink: Marina Mist, Rich Razzleberry, Pacific Point, Elegant Eggplant
Cardstock: Rich Razzleberry Texture, Garden Green, Crumb Cake
DSP: Rose Red, So Saffron, Wild Wasabi 
Punches: Butterfly, Boho Blossoms, Two Step Bird
Accessories: Rhinestones, Crystal Effects, Dazzling Diamonds
Extras: Sticky Strip, Tombo Multi Glue

I bought this little paper mache box very cheaply and decorated it with strips of dsp. I punched out a variety of colours using the Boho Blossoms punch and layered them on top of one another adding a rhinestone to the centre and a few branches from the two step bird punch! For the butterflies I got inspiration from a video on Michelle Last's blog, click here to see her lovely little video! I changed it slightly as I couldn't really find a flower stamp in my collection that was suitable. I originally intended on curling the edge of the butterflies but after trying one decided it just didn't look good! So basically I did the rock and roll technique, punched out the butterflies and covered then with crystal effects and finished them off with a dusting of dazzling diamonds glitter and some rhinestones. when they were dry I bent up the wings, and adhered them in the centre of the lid as if they are sitting on the flowers. The box was just the perfect size for the small box of flower brads that I bought for Sue to help her get going with crafting! When she saw the box she was stunned and when she heard the rattled she was shocked that there was a little something inside. I love seeing people's excited reactions to gifts, especially when they aren't expecting them! 

I hope you liked today's little share. Come back tomorrow to see the little card I made to welcome Sue into my team. 

Hugs, 

Amanda xx

Tuesday, 21 June 2011

totally june class!

Last Saturday was my June class. I only had 3 lovely ladies here this month but I feel that was still a triumph seeing as I have been away between and had very little time/chance to craft or invite people to my class! We had so much fun and it was great to get to know everyone a little bit better!

Our focus this month was on anything heat embossed! We tried our hand at white embossing, clear embossing, emboss resist, watercolour resist and using heat &stick powder with dazzling diamonds glitter. The glitter was a HUGE hit, and lets face it, who doesn't like a bit of glitter...especially when it actually sticks to the card and doesn't shed EVERYWHERE! I am totally in love with heat & stick powder for revolutionising my glitter use!!

We incorporated the embossing, emboss resist and heat & stick with glitter techniques into a envelope mini album...


I made 2 books using the Greenhouse Gala designer paper. The first one before the class to show everyone and then the second during the class!


And the second book I made using the same Greenhouse Gala paper...


I wanted to wait to post what we did at the class as it has been showering at a moment's notice and  I really want to take photos on the decking to do the projects justice!

We also made a card using the watercolour resist technique...


If you like the look of these projects a would like to see how to make them, why not get in touch and book a workshop, you and your friends will love seeing how easy, inexpensive and addictive these are to make! 

Contact me at amanda_burditt@hotmail.co.uk to book your party!

Take care,

Amanda x