Showing posts with label french foliage. Show all posts

Saturday, 8 June 2013

Be an Earlybird!

Hi!

I hope you're having a good weekend! I want to know where the sun has gone! :(

A couple days ago you might remember I told you that I was going to be a guest designer for the NEW catalogue summer session in July. Well, early bird registration opens this weekend and for the first 50 people to register there is a special discount price of $19.95! (For those of you who work in pounds that's £12.85!!) I think you'll agree that is a bargain price considering everything you'll get your hands on!


Inky Fingers Club
Summer 2013 Session
July 7th through July 20th

All New Stampin’ Up! Products
Over 50 Exclusive Designs
Creative Card Sets & Containers
14 Daily Tutorials
Talented Guest Designers
Step by Step Directions
Lots of Photos

Daily Challenges with Prizes
Original Artwork shipped to Members


You can take advantage of this fantastic price and see what I have up my sleeve by registering today!

Here's the link, and send me a message to say you've signed up so I know you're joining in with all the fun!

And don't forget, everything I'm sharing with the Inky Fingers Club is exclusive and won't be seen on my blog so you'll have to sign up to see what I've made for y'all! I know you're sure to LOVE it!!

You can also take advantage of an Embellishment Pack which will include some of the embellishments each of the designers are using at your fingertips! 

Now for something to inspire you to be creative today! 


Stamp Set: French Foliage, Fabulous Phrases, Creative Elements
Ink: Basic Grey, Sahara Sand
Cardstock: Sahara Sand
Punch: Scallop
Accessoires: Buttons
Extras: Boutique Boxes

The Grey and Starfruit card is actually the back of the little notecards that come in the Boutique Boxes kit. The paper button was one of he embellishments and so was the Crumb Cake baker's twine! Layers were added by stamping lots of different stamps on top of one another. 

The feathers are actually the negative left from the feathers - I just cut them apart, added some 2 way glue and then used a sponge dauber to sponge some pretty feathers over the background! I just LOVE how they turned out! Its also a great way to use something that would otherwise get thrown away without a second thought! What do you think? Are you impressed at my use of scraps and throw away items? I hope that this has inspired you to think differently to some of your scraps! 

Stampin' Hugs, 

Amanda x


Monday, 3 June 2013

Feather, feather...

Hi! 

Sorry its been a week since my last blog post, I was supposed to blog on Thursday but I was attempting to tidy my craft room and got distracted and so blogging slipped my mind. 

Exams were in full swing today so I was in school for some invigillation work, gazing at the gorgeous sunshine while watching kids sitting their history exam today. It took me back to my exams...not great memories! Watching them write was much easier! 

So last week/weekend I was trying to make an attempt on tidying my craft room - its a true mess. I kept finding half finished cards or scraps/shapes that would probably have gone in the bin if I hadn't used so I ended up stopping to make something. Unfortunately that meant getting other things out to finish the project...and I was back to the beginning again. 

One of the things I discovered was the Boutique Boxes which you can find in the Spring/Summer catty. Its £7.25 and comes with LOADS of little bits. 8 precut boxes, 8 printed note cards, 16 buttons, a die cut sheet, Very Vanilla/Crumb Cake baker's twine and dimensionals. 

The boxes turned out to be pretty small (great for a very small gift but I just wished they were bigger), as a result I had planned to give away the leftovers - I'd made up two boxes and notecards with a few of the die cuts for my downline at team training but there were tons left over and I was just feeling uninspired. Mainly because I was looking at them as boxes, not card potential! 

Roll in a facebook update from the lovely and talented Teneale Williams. I just fell in love with her use of the feathers and it inspired me to have a go myself and do a CASE of it. I got a little carried away and ended up with 25+ cards using all the bits and bobs in the kit! LOVE IT!!


Stamp Set: En FRancais, French Foliage, Pennant Parade, Fabulous Phrases
Ink: Sahara Sand, Basic Grey
Cardstock: Very Vanilla, Sahara Sand, Summer Starfruit
Extras: Boutique Boxes, Sewing Machine


What do you think? I just love these feathers and sewing them on just adds depth and texture! The background has lots of depth to it by lots of layers of stamping, sponging. 

Did you enjoy today's share? Please do leave me a comment and let me know what you think of them!

Have you ever sewn cards with your sewing machine before? Not crossed your mind? Want to see more of it? I've got more to come. For more information on sewn cards check out tomorrow's post! See you there! 

Stampin' Hugs,

Amanda xo

Monday, 27 May 2013

May Card Club - Masculine

Good afternoon! 

Isn't it just a gloriously weekend?! Right now I'm sitting next to my beloved on our sofa outside, enjoying sun and warmth and drinking in all the beautiful spring smells, mingles with BBQs. I'm guessing quite a lot of my readers will be enjoying a nice long relaxed weekend, being a Bank Holiday in the UK and for my American friends, Memorial Day! I hope wherever you are you are enjoying good weather and spending some time with your dear friends and family. 

Stuart and I are trying our first ever proper BBQ - not like a grill out where you burn charcoal and then stick burgers and sausages on the grill to cook. I'm taking about proper American style BBQ - it involves sticking wet wood chips on the coals to smoke the meat to cook it over hours. I've watched it so many times on the Food Network - love Guy Fieri! So after watching it so many times, doing a bit of research, watching some you tube videos, I've made a dry rub for my beef brisket, made my own BBQ sauce, and got the wood smoking the meat. Now my tummy is grumbling with anticipation. Its going to be epic - if I can remember in my excitement I'll snap a few pics for you guys. 

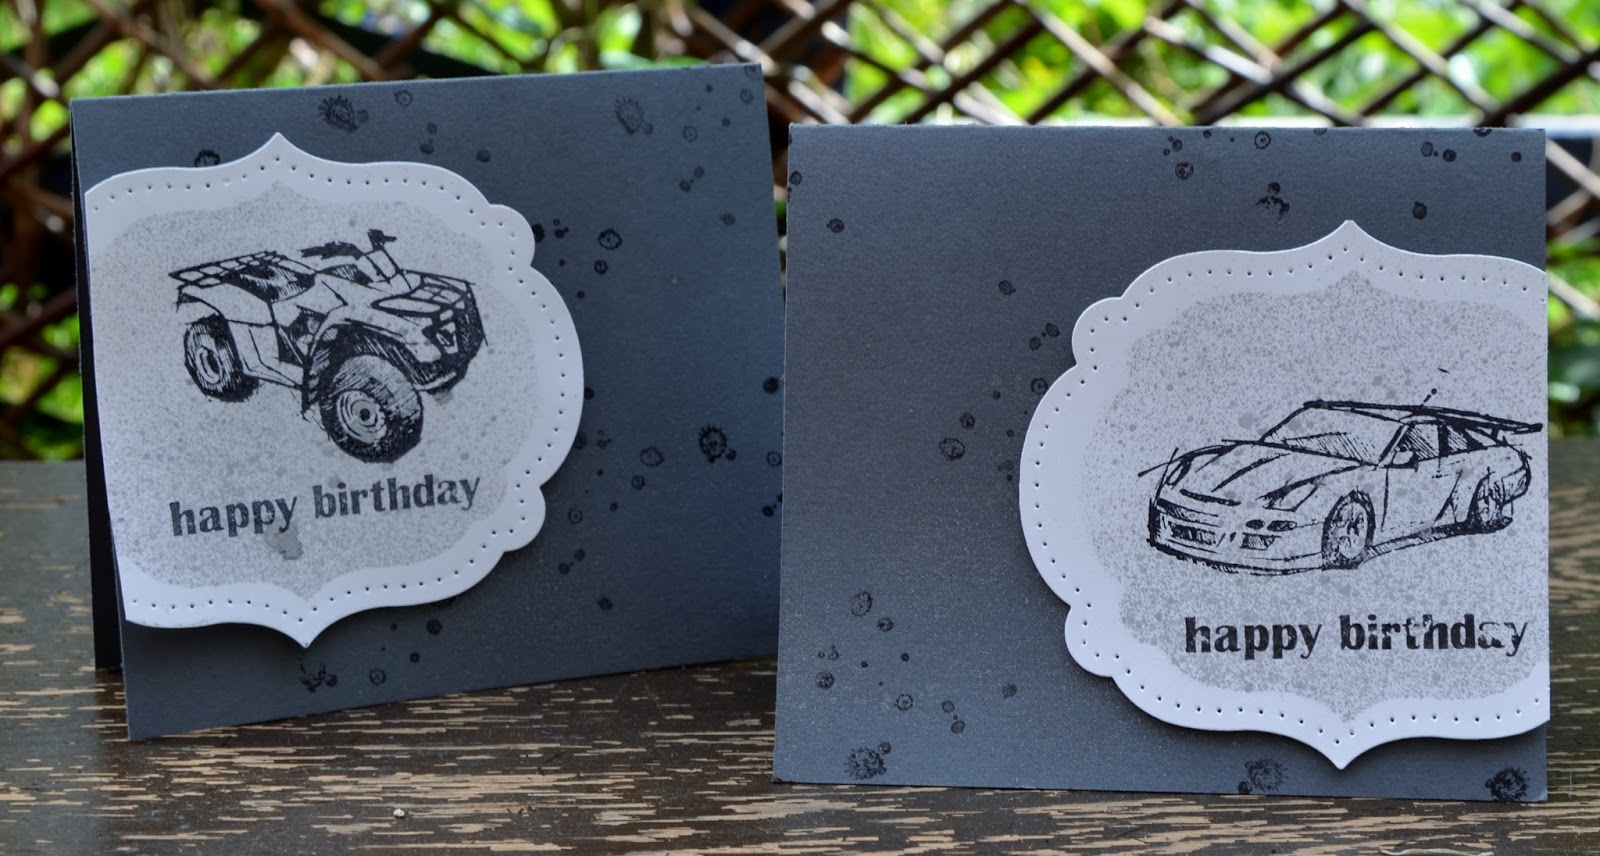
Anyway, onto some card love for y'all. I thought you'd like to see the Masculine collection of cards my lovely card club ladies made last weekend. All were designed so the sentiments could be swapped out - its great to have choice isn't it!? 

With Father's day less than a month away its time to start thinking about making some cards for those special men! 


Aren't these cards fun!?! Do you struggle for inspiration when it comes to masculine cards? They're difficult aren't they!


Stamp Set: Need For Speed, Best Dad Ever, French Foliage
Ink: Basic Black
Cardstock: Whisper White, Basic Grey
Big Shot: Labels Framelits
Extras: Silver Foil Smooch Spritz, Festive Piercing Pack

This card is a bit messy but it looks great and so its well worth getting a little sparkly for! 
A mask was cut from printer paper and temporarily adhered with my awesome two way glue pen to the white cardstock, then spritz with the fab Smooch Spritz (its ready made sparkly spritz that you can mist your projects with - amazing stuff!!). Let it dry a moment while you spritz the background and stamp it with the water blot stamp from French Foliage. By that time it should be dry so peel off the mask and cut with the next size up framelit, pierce with the piercing pack for some extra detail and then stamp the car and sentiment. I thought it looked cool chopping off part of the label. What do you think? Do you like this monochrome card? 

So what are you up to this beautiful bonus weekend day? Have a great day and stop by again soon for more on the other fun man cards we made! 

Happy Stampin',

Amanda x

Sunday, 20 May 2012

vintage style medallion

Another of the stamps I've been eyeing up in the catalogue for ages is the Medallion background stamp, so when Rhoda came down I asked to borrow it. I thought I'd show you one of the creations that I came up with using it...


Medallion Congratulations

Stamp Set: Medallion, Curly Cute, French Foliage
Ink: Crumb Cake, Soft Suede
Cardstock: Crumb Cake, Soft Suede, Very Vanilla, Vellum Paper
Punch: Boho Blossoms
Accessories: Pearls
Extras: Champagne Shimmer

I stamped the medallion in the background and then using a combination of soft suede ink (stamping off for a lighter shade) and champagne shimmer paint  to stamp some water drop marks over the background to add a subtle glittery texture. I stamped the sentiment on vellum and wrapped it around the card. Finally I added some punched flowers and pearls for a bit of a colour punch and voila! 

Hope you enjoyed this vintagy type card. 

Happ Stampin',

Amanda x

Wednesday, 29 February 2012

spring foliage!

Yesterday was Stu's Pap's birthday. Here is the card I made for him - lovely and spring like. The photo looks really light, sorry about that! 


Spring Leaves

Stamp Set: French Foliage, Happiest Birthday Wishes (Hostess)
Ink: So Saffron, Certainly Celery, Wild Wasabi
Cardstock: Naturals Ivory

This was a really simple card but I wanted to have a go making a pretty but masculine-ish card using the french foliage set. I think most people look att he set and see autumn but its a versatile set - love it! So I rock and rolled the leaves in So Saffron and Certainly Celery stamping twice before reinking to give more shading and layers. I then stamped 5 leaves on some extra cardstock, rock and rolling in So Saffron, Certainly Celery and very lightly in Wild Wasabi around the edges. I cut these leaves out and adheres them using dimensionals. Finally I stamped the sentiment at the bottom in Wild Wasabi. 
Oh I also stamped 3 leaves in a row on the bottom of the inside of the card but alas I didn't take a photo - it was a nice finishing touch to the card! I hope Pap liked it!

What do you think? Please do leave me a comment, I love reading them.

Happy Stampin',

Amanda xx


Wednesday, 25 January 2012

fresh vintage

Yesterday saw the beginning of the Sale-A-Bration. Today  want to show you a couple cards I have made using the Fresh Vintage SAB set.

Sorry for the poor image quality - its been pretty miserable outside - I am looking forward to lighter days and happier weather! 


Fresh Vintage Thank you

Stamp Set: Fresh Vintage (SAB), Curly Cute
Ink: Wild Wasabi, So Saffron, Rose Red, Crumb Cake
Cardstock: So Saffron, Very Vanilla
Accessories: Rose Red Seam Binding

I stamped the border stamp all over the background in Crumb Cake. Next I coloured in and stamped the large floral image on some Very Vanilla cardstock. I stamped the sentiment in Rose Red and then sponged everything with Crumb Cake to make it look vintage. Finally I added some ruffled Rose Red seam binding ribbon along the edge and adhered it all together. 


Fresh Vintage Letter 

Stamp Set: Fresh Vintage (SAB), French Foliage, Teeny Tiny Wishes
Ink: Always Artichoke, Rose Red, Crumb Cake, Early Espresso
Cardstock: Whisper White, Always Artichoke
Punch: Postage Stamp
Big Shot: Scallop Envelope 

I stamped the french hand written note from French Foliage on a small piece of Whisper White cardstock. I distressed it and sponged it with Crumb Cake to make it aged and vintage. I also sponged the scallop envelope. I coloured in and stamped the sweet postage stamp from the new fresh vintage set, and punched out the new postage stamp punch. Again I sponged and the adhered to the envelope, I stamped the Paris postmark and water splotches from French Foliage, the friend to friend sentiment from Teeny Tiny Wishes, and the large flower from the Fresh Vintage set on the envelope - each of these images work really well together to add to the vintage feel. The large Fresh Vintage flower was stamped all over the back ground of the card to tie everything together. 

Come back tomorrow for some more creative inspiration! 

Amanda x


Saturday, 12 November 2011

simply stampin' challenge, week 33

Another week has just flown by - been really busy this week with lots of parties and all sorts so sorry for neglecting the blog! Its Saturday again and another challenge over at the Simply Stampin' Challenge blog. This week is a theme, and the theme is...

LEAFY


Happy Thanksgiving

Stamp Set: French Foliage, Teeny Tiny Wishes
Ink: More Mustard, Bravo Burgundy
Cardstock: Naturals Ivory

A really simple and clean card this time for me. I know its so easy (for me) to want to do a really earthy rich and intense colour palette with fall/autumnal leaves but for this I wanted to just try and make something that still retained a hint of carefree summer. I rock and rolled the leaves and then stamped them off onto scrap paper before stamping them over the background for a lighter shade. I then stamped 3 leaves in full intensity onto a scrap, cut them out and used dimensionals to adhere them in a little row. Final thing to do is stamp my sentiment - I am SO VERY MUCH looking forward to thanksgiving - pumpkin pie, turkey, wild rice and all the trimmings here I come! 

I hope this card has inspired you to have some leafy fun of your own and create a card for this week's challenge - you could even be one of our top three! So head on over to the Simply Stampin' Challenge blog, check out the other design team's entries and upload your own! I can't wait to see what you come up with! 

Please do leave me a comment and let me know what you think!

Happy Stampin',

Amanda x

Saturday, 15 October 2011

simply stampin' challenge, week 29

Its Saturday again and that means its the Simply Stampin' Challenge! This week is a colour challenge, which is as follows:


These are the colours that are in the new DSP - Frightful Sight. I don't go in for Halloween so I thought for all you non-halloweeners out there I would do something  a little different.


Glitterful Friend To Friend

Stamp Set: Greenhouse Garden, French Foliage, Teeny Tiny Wishes
Ink: Cajin Craze, Old Olive, Basic Black
Cardstock: Whisper White, Old Olive
Punches: Modern Label
Embossing: Heat & Stick Powder, Dazzling Diamonds, Heat Tool
Accessories: Rhinestones

So I haven't used the Greenhouse Garden stamp set for quite a while so I thought I would get it out and realised it pairs very well with the French Foliage stamp set. I used the 'kissing' technique I was explaining in yesterday's post on the flower and covered with heat and stick powder, then dazzling diamonds glitter. I did the same thing to the leaves. The background was stamped all over with the french script and water drop stamps in the French Foliage set (I stamped off the stamped images on scrap paper to give a softer background and really let the glittery flower stand out!). I stamped the sentiment on Whisper White cardstock, punched out with the Modern Label punch and then ran the Cajun Craze marker around the edge to help it stand out a little from the background! 

I hope you liked today's card using the halloween colours to make a non-halloween card! Now hop on over to the Simply Stampin' Challenge blog and check out what the other lovely talented design team members have created and then enter your own creation! I'd love to see how you use these pretty colours! 

Hugs,

Amanda x


Monday, 25 July 2011

gorgeous foliage...

I am just completely in love with the French Foliage stamp set. The more I play with it the more I like using it. Again this card is another one showcasing the wheel. I think I really am going through a wheel phase at the moment.


French Foliage Birthday

Stamp Set: Basic Phrases, French Foliage, Texture
Ink: Old Olive, More Mustard, Bravo Burgundy, Early Espresso
Cardstock: Very Vanilla, Early Espresso, Old Olive
Accessories: Early Espresso Satin Ribbon
Extras: Clear C Block, Dimensionals, Jumbo Handle, Copy Paper

I just LOVE this card. I wheeled out the texture wheel on the Old Olive card base. I then inked up a clear block (the kind you use for clinging your clear stamps to) in More Mustard ink and stamped it on Very Vanilla cardstock. It actually was just an experiment but worked so well, I was dead impressed! And the texture that the clear block picked up from the ink pad was great, fitted in with the texture wheel. I laid thin copy paper over the edges of the clear block stamp and stamped the leaves so that they over hang the edges. I added the ribbon and stamped the sentiment to finish. 

So, what do you think? Please leave a comment and let me know! 

Thanks for stopping by.

Amanda x

Friday, 15 July 2011

roll on some texture!

Happy Friday everyone! Hope you are all looking forward to the weekend! I am looking forward to a weekend full of crafting! Tonight I have a workshop at one of my friend's houses which I am really looking forward to, and then tomorrow I have a class with some lovely ladies followed by a catch up class on Monday evening for a few people who couldn't make it on Saturday! So much fun! Woohoo! 


So today I just have a little card to wet your appetite for my classes this weekend and show you one of the cards I have been demonstrating a lot at workshops recently! Its actually a slightly CASEd version of a card Rhoda made a little while back, click here to go and see her card. 


This card uses the wheel, a product we shall be getting stuck into this weekend at class! It is so much fun, so easy and a great way of adding texture and pattern to the background! And if you would like to have a go at using the wheel yourself there is just enough time to get in touch and attend my class! Either Saturday 11-2 or Monday 7:30-10. Cost is £12.50 which covers the cost of materials used. I guarantee it will be a lot of fun, so get in touch, email me on amanda_burditt@hotmail.co.uk now to book your place!


French Foliage (Texture Galore!)


Stamp Set: French Foliage

Wheels: Texture (Jumbo)

Ink: Crumb Cake, Early Espresso, Old Olive, Riding Hood Red
Cardstock: Old Olive, Crumb Cake
Accessories: Early Espresso Satin Ribbon, Linen Thread
Extras: Dimensionals, Jumbo Wheel Handle

I wheeled the texture wheel across the entire background in Crumb Cake to give it a subtle tone on tone texture. I then stamped the french script, postmark and water drops in Early Espresso on top of one another. They all work wonderfully together! I slipped a piece of ribbon through the card and instead of tying it in a know or bow, I tied a piece of linen thread around the ends as they hung off the card. This uses less ribbon (great for the economical crafter) and also makes it a much less bulk, post friendly card! Finally, I stamped the leaves using the rock and roll technique to make them look more realistic and adhered then with dimensionals to give more depth to the card. 

Don't forget to get in touch and book your place now if you would like to come along on Saturday or Monday and make some cards like this, plus the message board from the Simply Stampin' Challenge last week also!!

Look forward to reading your comments,

Hugs,

Amanda xx