Showing posts with label greenhouse garden. Show all posts

Saturday, 15 October 2011

simply stampin' challenge, week 29

Its Saturday again and that means its the Simply Stampin' Challenge! This week is a colour challenge, which is as follows:


These are the colours that are in the new DSP - Frightful Sight. I don't go in for Halloween so I thought for all you non-halloweeners out there I would do something  a little different.


Glitterful Friend To Friend

Stamp Set: Greenhouse Garden, French Foliage, Teeny Tiny Wishes
Ink: Cajin Craze, Old Olive, Basic Black
Cardstock: Whisper White, Old Olive
Punches: Modern Label
Embossing: Heat & Stick Powder, Dazzling Diamonds, Heat Tool
Accessories: Rhinestones

So I haven't used the Greenhouse Garden stamp set for quite a while so I thought I would get it out and realised it pairs very well with the French Foliage stamp set. I used the 'kissing' technique I was explaining in yesterday's post on the flower and covered with heat and stick powder, then dazzling diamonds glitter. I did the same thing to the leaves. The background was stamped all over with the french script and water drop stamps in the French Foliage set (I stamped off the stamped images on scrap paper to give a softer background and really let the glittery flower stand out!). I stamped the sentiment on Whisper White cardstock, punched out with the Modern Label punch and then ran the Cajun Craze marker around the edge to help it stand out a little from the background! 

I hope you liked today's card using the halloween colours to make a non-halloween card! Now hop on over to the Simply Stampin' Challenge blog and check out what the other lovely talented design team members have created and then enter your own creation! I'd love to see how you use these pretty colours! 

Hugs,

Amanda x


Saturday, 27 August 2011

simply stampin' challenge, week 22

This week's challenge is a Sketch! With no further introduction, because its VERY late, I haven't packed yet and I'm off on holiday in the morning, here is the sketch and card for this week! 


Hello Autumnal Flowers

Stamp Set: Basic Phrases, Greenhouse Garden
Ink: Riding Hood Red, More Mustard, Versamark
Cardstock: Sahara Sand, More Mustard, Riding Hood Red
Accessories: Pearls
Extras: Clear Embossing Powder, Heat Tool, Paper Piercer, Mat Pack, Corner Rounder

Very simple, I stamped three flowers in the background overlapping one another, and then stamped and embossed some more flowers, cut them out. I did a long line of piercer dots along side the 3 flowers and then added the embossed flowers over top. Lastly I stamped the sentiment, added some pearls and rounded the corners! 

I hope you were inspired by this card and head over to the Simply Stampin' Challenge blog to see the other design team's creations and enter yourself! Don't forget that the added bonus of the Forest Friends stamp set is still up for grabs to all who submit an entry...worth getting the creative juices going for because they are just too cute for words! Please do leave a comment.

Apologies again for such a rushed blog entry this week....summer is almost over and then I promise to get back on track and give everything more time! I an just rushing like crazy at the moment. Still trying to get my cousin's wedding present finished for Monday...eek! 

Hugs,

Amanda xxx

Saturday, 11 June 2011

simply stampin' challenge, week 11

Wow, can you believe its week 11 on the Simply Stampin' challenges already?! Can't believe how time is flying by! This week is another colour challenge. The colours are so lovely I have 2 cards this week, one you will get today and the other sometime later in the week! Without any further ado, here are this week's colours and my first card...


Stamp Set: Greenhouse Garden, Fun & Fast Notes
Cardstock: Crumb Cake, Very Vanilla, Chocolate Chip
DSP: Concord Crush (6x6 Hostess Only pack)
Ink: Concord Crush, Chocolate Chip
Punches: Eyelet Border, Modern Label, Corner Rounder
Extras: Crimper, Crop-a-dile

This is a really simple card, sometimes simple is the most effective though, right?! A few strips of Concord Crush DSP split up with a little bit of Chocolate Chip cardstock. The eyelet border punch mimics the polka dot DSP. I stamped the sentiment on some Very Vanilla cardstock, punched out with te modern label punch and then sponged the edges to give it a softer look. I stamped and cut out a few small flowers from the Greenhouse Garden stamp set to embellish the sentiment (I think the finished effect it looks similar to a stamp in the Just Believe stamp set - just to prove you can get inspiration from stamps you don't own!) To help marry the sentiment and the strips of DSP (and also to soften the very bold flowers) I punched out dots of Very Vanilla cardstock using the small end of the crop-a-dile and added them to the middle of the flowers. Finally I crimped the edge just to break up the large expanse of Crumb Cake, and then rounded the corners. 

Check out the other design team entries at Simply Stampin' Challenge blog, and please do enter!

Please let me know what you think! Are you a lover of Concord Crush?! I certainly am!

Check back later this week for my second entry! 

Amanda xx

Saturday, 21 May 2011

marvellous may class fun!

My first class is over and it was fab! There were 5 lovely ladies that joined me today, and I couldn't have been happier with how it went, apart from perhaps the few moments where I got totally tongue tied but hey ho that happens to everyone, we live and learn! So, I really enjoyed it and from what I can gather, everyone seemed to have a great time too! It makes me so happy to see others getting enjoyment out of creating a card or other project and its such a blessing to be able to share my passion with others! Its actually what gets me out of bed in the morning...love it!


 And now I would like to show you what we did, and if you didn't make it, what you missed out on!


Poppin' Pastels Flower 


Rock And Roll Birdie


Greenhouse Garden Waterfall


This was an BIG hit...its so much fun to make a interactive card and everyone really did go ooh and ahh when they saw it cascade! 


Candle

I gave everyone freedom to create whatever they wanted on their candle! They turned out beautifully and clearly showed each person's individual taste and flare! 

If you like what you saw and really wished that you had come I am thinking of running a catch up class on my return in June so if you are at all interested please email me on amanda_burditt@hotmail.co.uk 
It will depend on the amount of interest I recieve as to whether I run this catch up class so please do email me if you would like to make all of the above projects. 

I will leave you with a comment from today: 

"After using the stamp-a-ma-jig today it has really given me the confidence to use it at home, its a lot less daunting"

It is so lovely to see the confidence build up in people. Please do email me if you are interested. 

For those interested in my June class, it will be on June 18th from 11am-2pm at mine. Don't forget to email me to book your place! (there were "WOWs" today as I showed sneak peaks of June's class!!) 

Can't wait to hear from you! 

Amanda xoxo

simply stampin' challenge, week 8

We are into another colour challenge! And what a colour combo we have this week! 


I just LOVE these colour! They're so bright and cheerful and summery! I thought I'd try going for a little bit more of a busy over the top card this week, and here we are...


Thanks a Bunch

Stamp Set: Greenhouse Garden, Just Perfect Alphabet
Cardstock: Very Vanilla, Old Olive, Pumpkin Pie, Daffodil Delight
Ink: Daffodil Delight, Old Olive, Versamark 
Extras: Big shot, Scallop Envelope, Crop-a-dile, clear embossing powder, Tombo Mono multi glue

I started off by stamping and embossing the large and small flowers from the Greenhouse Garden set. I cut them out and then curved up the petals to make them look a bit more real. I thought the background was looking a little plain so I used the Daffodil Delight marker to colour in the smallest flower and by colouring in very roughly and not breathing on it to re-moisten the ink gave a more rustic look. I thought it would be cool to attach a scallop envelop to the front with a the greeting inside, giving the receiver some way to interact with the card. I stamped "thanks" using the Just Perfect" alphabet and added it inside the envelope. I attached the envelope to the card at an angle to the card and added the flowers all around to make it look like it was in a bed of flowers. To finish off the flowers I used the crop-a-dile to punch out small little circles and added them as the centres to my flowers. 

Please check out the other design team member's creations at Simply Stampin' Challenge

Today is a big day, my first class is today...I'm feeling a little nervous but I hope it will all go okay! Wish me luck hey? 

Leave a comment, I love reading them! 

Amanda xoxo 

Tuesday, 3 May 2011

in-love with in-colour...concord crush

This post is a little late, I made the card using the Sketchy Sunday sketch challenge, last week and then I just didnt quite get time to post it...so here it is. Better late than never hey?  


Concord Crush Rosette

Stamp Set: Greenhouse Garden
Cardstock: Very Vanilla, Riding Hood Red, Certainly Celery Always Artichoke
DSP: Concord Crush (6"x6" Hostess only pack)
Ink: Concord Crush
Accessories: Very Vanilla Satin Ribbon
Punches: Two Step Bird
Extras: White Gel Pen, Big Shot, Lots of Tags Sizzlets

This card really came out as I had recently got the hostess only pack of 6x6 in-colour dsp and having not really had a chance to play with those colours yet thought I'd just set myself a few cards to make...I have a few more that I'll show next month as part of the Simply Stampin' Challenge! Can't wait! I thought I'd use the Sketchy Sunday sketch as a starting point for my card. I love the vast expanse of Concord Crush dsp, it just allows the eye to really drink in gorgeous deep colour. As a focal point I cut out rough circles from Concord Crush dsp and Riding Hood Red cardstock, distressed and then layered them up. For the centre of the flower I stamped the smallest flower from Greenhouse Garden. I used two of the bird wings from the two step bird punch for the leaves. Finally I added some ribbon and a tag from the big shot to fill it out a bit and create a balance between the expanse of colour and detail. 

I hope you enjoyed this card, please do let me know what you think, I love reading people's comments! 

Have a nice day!

Amanda xx

Saturday, 9 April 2011

simply stampin' challenge, week 2

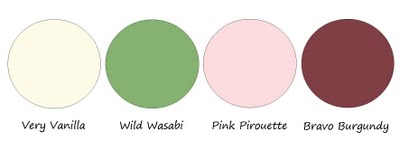
This week's Simply Stampin' Challenge is a colour challenge!


The colours are:


I have to start off by saying that I colour challenges have never really been my strong point, so I struggled a bit with this one! Not to mention that I didn't actually own anything Bravo Burgundy coloured so I just got myself an ink pad, I think I would have liked to use some Bravo Burgundy cardstock too if I had had some! I still think the card turned out ok though! So without further a do, here is this week's project! 


Bouquet

Stamp Set: Every Little Bit, Greenhouse Garden
Ink: Bravo Burgundy, Pink Pirouette
Cardstock: Very Vanilla, Pink Pirouette, Pink Pirouette & Wild Wasabi DSP
Accessories: Whisper White Grosgrain Ribbon
Extras: Sponge, Crystal Effects, Dimensionals

I used used heart and flower stamps from the every little bit stamp set on dsp with Bravo Burgundy ink and then cut them out. I used the stem from the Greenhouse Garden to stamp some stalks for my bouquet on the Very Vanilla cardstock and then layered up the hearts (for leaves) and flowers. I sponged the Whisper White ribbon with the Bravo Burgundy ink and then sponged the edges of the Very Vanilla cardstock with Bravo Burgundy too, just to add some more definition (very important when you have several very pale colours all working together!). I stamped the Pink Pirouette card base with the flower stamp in  Pink Pirouette ink for a tone on tone pattern. Finally I added crystal effects to the centre of the flowers in the bouquet just to add a little more interest! 

I hope you enjoyed this week's offering! Please leave a comment! I love reading them and its so nice to see your opinions! 

It has been so great to see so many of you play along with last week's challenge and I hope even more of you will play along this week...its so fun to see what you all create and how you interpret the challenge! 

Finally, please head on over to the simply stampin' challenge blog to see what the other lovely design team members have created and to enter in for your chance to win lovely goodies! 

Take care! 

Amanda xoxo

Tuesday, 5 April 2011

everyone gets to make a magnet!

As promised, here are the projects I demonstrated last night! 


Congratulations Hearts 

Stamp Set: En Francais, I {Heart} Hearts, Fun & Fast Notes
Cardstock: Crumb Cake, Riding Hood Red, Marina Mist
Ink: Versa Mark, Riding Hood Red, Pacific Point
Pastels: Marina Mist, Riding Hood Red, Pumpkin Pie
Accessories: Pumpkin Pie Button, Linen Thread
Extras: Clear Embossing Powder, Heat Tool, Cotton Balls, Sponge, Dimensionals, Glue Dot

In this first demo I really wanted to highlight the wonderful ways you can use the versa mark ink pad (something I don't think I could live without!). This also included embossing!
I stamped the En Francais background stamp with versa mark on the Crumb Cake cardstock and then used cotton balls to gently rub and blend Stampin' Pastels over it to give some gentle colour and bring out the writing! I then stamped the hearts with versa mark and covered them in clear embossing powder and heated with my heat tool. I used a sponge to rub some Pacific Point ink over the small LOVE heart to show the emboss resist technique. Finally, I adhered everything together, stamped the sentiment from Fun & Fast Notes and added a small button!


Get Well Flowers

Stamp Set: Greenhouse Garden, Fun & Fast Notes
Cardstock: Whisper White, Early Espresso, Old Olive, Crumb Cake, Marina Mist
Ink: Marina Mist, Early Espresso, Old Olive
Accessories: Basic Rhinestones, Whisper White Grosgrain Ribbon (dyed Marina Mist)
Extras: Paper Crimper, Sponge, Dimensionals, Glue Dots, Stamp-a-ma-jig, Modern Label Punch

With this demo, I wanted to show how to use a stamp-a-ma-jig as I think it is an amazing peice of kit and show how perfect it makes stamping and possitioning every single time! I also wanted to show how you can get more out of your ink pad by sponging! 

I used the stamp-a-ma-jig to stamp the medium flower from the Greenhouse Garden. Then I used the sponge to sponge Marina Mist ink around the edge of the Whisper White cardstock, I also dampened a piece of whisper white ribbon and sponged it on both size so it was Marina Mist in colour! A great way to get a piece of white ribbon to match any colour ink you have!! I love it! I layered up the cardstock and then stamped, punched and sponged the sentiment before adhering it to the bottom of the Whisper White cardstock, this just "grounds" the flowers so its not floating. finally I crimped the edge! 


Pie Thanks Magnet


Pie Magnet


Gumball Birthday Magnet


Gumball Magnet

Stamp Set: Every Little Bit, Fun & Fast Notes
Cardstock: Whisper White 
Ink: Basic Black, Pumpkin Pie, Real Red, Marina Mist, Pacific Point, Daffodil Delight, Old Olive
Accessories: Linen Thread
Extras: Bottle Cap, Magnet, small piece of tango can, Blender Pen, Crystal Effects, 1" Circle Punch, 1 3/8" Circle Punch, Dimensionals

If you want to see how to make this way cool magnet, come to my workshop next Friday!!! You get to make one yourself!! 

(CASEd from a swap I received at Coventry Training by Zoe Tant - thanks for the awesome idea!)

Hope you enjoyed seeing a bit from my latest workshops! Please do come along next Friday and bring a friend!! It would be great to see you there! 

Ta ta for now! 

Amanda xoxo

Saturday, 2 April 2011

simply stampin' challenge, week 1

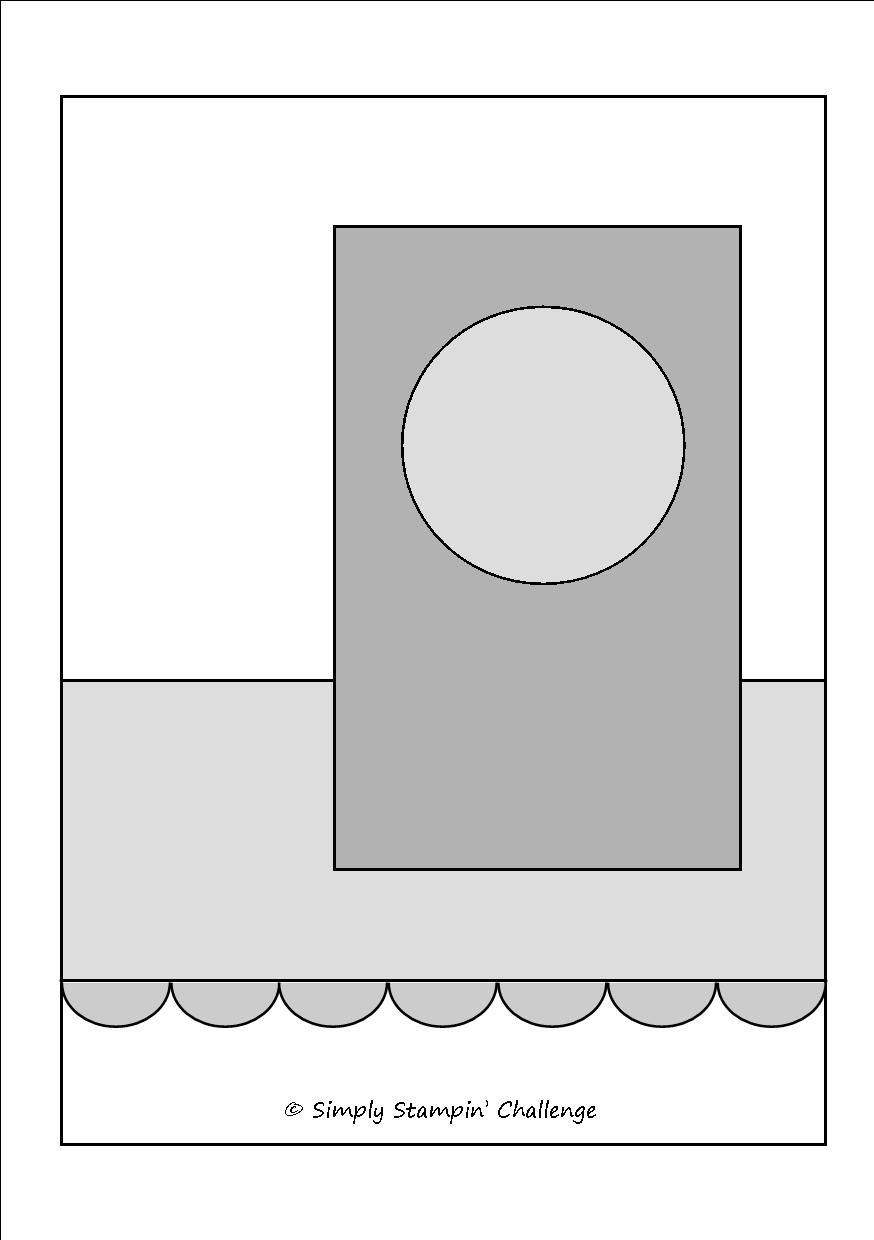
Okay, I am immensely excited to finally show you the first challenge, and what I created from the this week's sketch! Below is the sketch followed by my creation. To see what the other lovely talented DT members created, and to enter the challenge yourself, check out the simply stampin' challenge site!


Get Well Wishes

Stamp Set: En Francais, Fun and Fast Notes, Greenhouse Garden
Ink: Certainly Celery, Rich Razzleberry
Cardstock: Crumb Cake, Rich Razzleberry, Certainly Celery, Very Vanilla
Accessories: Basic Rhinestones, Very Vanilla Satin Ribbon
Extras: Corner Chomper, 1 3/8" Circle Punch, Eyelet Border Punch, White Gel Pen, Dinensionals, Stamp-a-ma-jig

For my workshops next week I was asked to show how to use the stamp-a-ma-jig so as I had it out to work on some samples I thought I'd use it for this project too! The 1 3/8" punched hole works perfectly with the medium sized flower in the Greenhouse Garden stamp set. I'm really loving the Rich Razzleberry and Certainly Celery colour combo at the moment, these two colours are just totally gorgeous! I used the En Francais stamp to add a bit of light texture to the celery background. I finished off the card with a little bit of ribbon, some rhinestones and a bit of white gel pen dot and dash line! 

I hope you enjoyed this first week's entry, leave a comment, and please don't forget to head over to the simply stampin' challenge blog and enter for your chance to win a special prize! 

Take care! 

Amanda xoxo

Monday, 14 February 2011

just a bit of play

I have spent the entire afternoon playing and being creative with all my new goodies...it felt so good! I am just loving all my new stuff and the quality of the materials is outstanding...its so nice to work with materials that don't let you down. On a more serious note, I was also working on demos and make and take stuff for my workshops I have coming up next week. My mom is hosting one on Weds 23rd in the afternoon, and mine is on Fri 25th in the evening, if youre interested and in the area youre very welcome to come along! Anyway, as promised, here are the outcomes of my day of play! (sorry the the low image quality, by the time I had finished playing and cooked dinner and was ready to photograph and blog, there was no natural light left and you know how rubbish indoor lights can be for taking photos, but still, here they are)


Candles 
Stamp Set: Greenhouse Garden
Ink: Pumpkin Pie, Real Red, Old Olive
Extras: Candle, Heat gun, Greaseproof paper
For more information on how I decorated these gorgeous candles come to one of my February workshops. 


So Many Thanks
Stamp Sets: So Many Thanks, Every Little Bit
Ink: Old Olive Classic Ink Pad, Marina Mist & Daffodil Delight Stampin' Write Markers
Cardstock: Whisper White, Kraft & Brights Patterned Paper (Daffodil Delight Polka Dot, Old Olive Flourish, Pacific Point Flourish)
Extras: Dinentionals
The second of my demos for the February workshops. 


Friend Love
Stamp Set: I {heart} Hearts, Fun & Fast Notes
Ink: Real Red, Pumpkin Pie, Old Olive
Cardstock: Whisper White, Pumpkin Pie
Accessories: Whisper White Satin Ribbon
Extras: Dimensionals
My make & take for my February workshops, if you would like to make this card, come along. CASEd from a card made by my upline, cousin-in-law, Rhoda. She has been really helpful and supportive, helping me to get thing and projects organised for my workshops. Its been fab, especially as she lives up in Shetland! 


Thanks For Sharing You With Me
Stamp Set: Fun and Fast Notes, Fast Flowers Wheel
Ink: Basic Black, Versamark, Real Red
Cardstock: Kraft, Pumpkin Pie, Real Red
Extras: Clear Embossing Powder, Blender Pen, Dimentionals 
A sample card to showcase other techniques for my guests to see at my workshops next week. this one is highlighting the use of versmark inkpad for creating a tone on tone background and then I added clear embossing powder to the versamarked hedgehog which I popped up in front with a dimensional! 


Happy Birthday Wishes
Stamp Set: Fun and Fast Notes
Ink: Basic Black, Pumpkin Pie, Marina Mist, Daffodil Delight
Cardstock: Kraft, Whisper White, Brights Patterned Paper (Pumpkin Pie Polka Dot)
Extras: Blender Pen
Just a really simple little card highlighting the blender pen with ink pads and ink refills. 


Clover
Stamp Set: Every Little Bit
Ink: Basic Black, Versamark
Cardstock: Kraft, Whisper White
Extras, Blender Pen, Stampin' Pastels (Garden Green-retired), cotton ball
Again, a really simple card just showing another way to use the blender pen, this time to fill the image with stampin pastels (I had to use a retired colour as the set I have is one I bought in 2002, when I first got into Stampin' Up in the States). the background was stamped in versamark and then the pastel was applied to the inked area with a cotton ball, just to highlight another use of the pastels. 

And finally, I have one last card to share with you all, seeing as its Valentine's Day, I figured I should make my wonderful husband a sweet valentines card. So here it is...


I LOVE U
Stamp Set: I {heart} Hearts
Ink: Old Olive, Real Red
Cardstock: Kraft, Real Red
Accessories: Whisper White Satin Ribbon
Extras: White Gel Pen, Dimentionals, We R Memory Keepers Corner Chomper (I know its not stampin' up but I really felt that the corners could be rounded to improve the card)
To get a more subtle background effect with the heart stamps I used the stamping off technique, stamping each one off once on a piece of scratch paper before stamping onto the Kraft cardstock. I'm really pleased how it turned out, it really makes the white and the red in the foreground stand out! I think that by rounding the corners it really enhances the curves of the hearts. 


And just the finish off this mamoth blog entry, geesh I didn't realise how long it was or how long I've been sitting at this computer screen, I thought I'd just fill you in on a couple other lovely suprises I had today. 


First, was from the lovely Rhoda, my upline, she so sweetly sent me some swatches she made for the designer patterened paper available from the catalogue so I can show it off to all of my lovely guests. The paper is gorgeous and yet another reason why you should totally come to/host a workshop so I can show it all off to you! She also sent me some lovely cards she made with the current sale-a-bration sets that are on offer for free when you spend £45 until the end of February. And some really cute little swaps she got when she went to convention last November. It really was so kind of her, and I am very grateful for all of her wonderful ideas she has given me! 


Second was from my darling husband. He came home from work today with some really gorgeous white daisies and a heart-shaped balloon for me. I LOVE the flowers! I thought the balloon seemed a little out of character and until he told me the florist just gave it to him for free...yay for free stuff! 


I hope you have all enjoyed seeing a little of what I have done and seen a bit of what I'll be showing at my workshops. Comments are always a pleasure to read and make my day! 


Have an awesome rest of your evening,


Amanda xx