Showing posts with label paper stack. Show all posts

Saturday, 13 October 2012

create your own fancy edge...

Do you just love the fancy edges that everyone seems to be making with punches these days but can't afford one or just haven't got around to getting one yet? Maybe you have lots of edge punches and just want to find a new way of making a fancy edge! Well then I have a card you'll love! 

And it showcases more of what Betsy's Blossoms has to offer! 


Betsy Fancy Edge

Stamp Set: Betsy's Blossoms, Tiny Tags 
Ink: Primrose Petals, Summer Starfruit, Old Olive, Rich Razzleberry 
Cardstock: Whisper White
DSP: Brights Paper Stack
Buttons: Itty Bitty
Punch: Jewellery Tag

The key to this is to stamp all the flowers close together and roughly following the edge of the cardstock, obviously you want a little bit of wave but not so much that you loose most of the card! Once the flowers were all stamped up the side I carefully cut out the negative space - yes it takes a little time but is well worth it. I layered some more cut out flowers and leaves and some tiny tag punches on to to fill in gaps and make it a little more fancy but its the knid of card you can do as much or as little as you like to it! Inside the card I added a strip of striped Old Olive paper from the Brights Paper Stack to give it more colour and show off the edge even more! 

This technique would definitely work with other flower stamp sets too. So why not grab a stamp set today and give this technique a go?! I would love to see your creation so why not send me a link to your creation and I'll come have a nosey! I can't wait! 

Thanks for stopping by this Saturday afternoon!

Amanda xx

Monday, 23 January 2012

i'm back - new spring mini!

Wow its been a long time! I finally got a new laptop - one where I can see the whole screen and doesn't drive me mental when I'm trying to do photos and blogging etc on it!

As you can imagine I have a fair few bits and pieces to show you from the past couple of months so stay tuned for some well overdue updates!

To start with a little Stampin' Up! news - Stampin' Up! has released a Spring Mini Catalogue (valid til April 30th) - it has lot of really pretty things in it and I am having fun playing with the things inside! If you'd like to see the catalogue for yourself you can view it here or why not book a party with me, to see and earn products free for yourself!

In addition to this Stampin' Up! is having their annual Sale-A-Bration promotion which starts tomorrow and continues til March 31st. Sale-A-Bration is an exclusive line of stamps and accessories that ANYONE (hostess AND customer) can earn for free when they spend during the SAB period. It is a great sales booster for your party and everyone is a winner.

If a lovely main catalogue, fabulous mini and Sale-A-Bration aren't incentive enough to host a party - what is!?!

If you would like to host or find out more about hosting or placing an order please email me on amanda_burditt@hotmail.co.uk or call me on 01604 949827.

Now for a quick little creation - something from the new mini to tempt you!


You're Loved Sweet Friend

Stamp Set: You Are Loved
Ink: Wild Wasabi, Pretty in Pink, Rose Red, Peach Parfait, Chocolate Chip, Wisteria Wonder
Cardstock: Whisper White, Pretty in Pink
DSP: Wild Wasabi
Punch: Eyelet Border
Big Shot: Petal Cone die

I used the stampin' write markers to colour in the heart stamp - it took a little while but really makes the image pop! The heart was stamped slightly off centre to leave space for the banner. I cut out the banner from the Petal Cone die and stamped my sentiment on it in Rose Red ink. To finish off the card I added a piece of Wild Wasabi DSP with the eyelet border punch just to balance out the card. 

So what do you think? Come back tomorrow for some more Sale-A-Bration info and another creation! I am really sorry for being absent for so long and am really looking forward to getting back into blogging and sharing my creations with you all! 

Until tomorrow, 

Happy crafting,

Amanda xx

Tuesday, 23 August 2011

awesome august

A few days ago was my August class. This month's class focused on punches! I love punches so to do a class on punches was just so much fun!! Here are the project we did...


Flutter Away Butterfly

A cute card using the stencilling technique. To finish it off we added a fe punched butterflies out, this made it look like the butterflies were flying off the page! 


Flower Box

This was the main project we focused on this time as it involved rock and roll, glittery, glossy butterflies, gorgeous rolled roses, and fluffy 3D flowers! 

If you would like to have a go at learning these techniques and doing these projects yourself please get in touch for a catch up class, I have several people who have expressed an interest so please don't hesitate, contact me now, at amanda_burditt@hotmail.co.uk

I hope you enjoyed seeing what I and six lovely ladies got up to on Saturday, and I would love to share it with you too. Please do leave a comment.

Hugs,

Amanda

xxx

Saturday, 13 August 2011

simply stampin' challenge, week 20

Just not with it yet! I've been super busy with rabbit sitting, 3 workshops and other life happening that I just haven't had time to focus on my blog lately...whoops! Anyway I managed to sort of do the Simply Stampin' Challenge this week. By this I mean that I got it made and submitted just in time but was lacking inspiration slightly!! So I did a really simple card, sorry its nothing to write home about. It wasn't 'til I looked at the other entries today that I realised I used the wrong colour. Some how I read Pink Pirouette not Pretty in Pink, so sorry about that. So, moving on, this week's colour challenge colours are...


Hello Flower 

Stamp Set: Tiny Tags
Ink: Early Espresso, Pink Pirouette, Pacific Point
Cardstock: Whisper White, Pacific Point, Early Espresso
DSP: Pink Pirouette
Punches: 5 Petal Flower, Boho Blossoms, Jewellery Tag 
Accessories: Early Espresso Satin Ribbon, Brad
Extras: Sponge, Paper Piercer, Dimensionals

So now you've seen my uber simple effort this week please visit the Simply Stampin' Challenge blog for more inspiration and to enter. Weeks 20-23, there is also a chance to win a stamp set! Its is the uber cute Forest Friends, so for your chance to win please do enter! 

Take care,

Amanda xx

Tuesday, 19 July 2011

fuelling my addiction

Well, I said I was into a wreath theme at the moment, and here is yet another one for you to enjoy. 


For You Summer Wreath

Stamp Set: Basic Phrases
Ink: Rose Red
Cardstock: Very Vanilla, Old Olive Texture
DSP: So Saffron, Rose Red
Punches: Modern Label, Itty Bitty Pack, 1 3/4" Circle, Boho Blossoms
Accessories: Rhinestones 
Extras: Tombo, Dimensionals

Very simple really, just like the Two Step Bird wreath I used the circle punch as a template and stuck the Itty Bitty Punch Pack flower shapes to it to fill it out. Stamped my sentiment on the Modern Label punch and assembled! VoilĂ !

I think this is probably my least favourite of my wreaths to date. Look forward to reading what you think! Thanks.

Amanda x

Tuesday, 10 May 2011

in-love with in-colour...blushing bride

The second in my series of playing with the in-colours, this time its Blushing Bride! I admit, I just wasn't that taken with the colour. My first thought was we have Pink Pirouette and Pretty in Pink, why do we need another pale pink?! But when I got the pack, looked at the colour my opinion changed, its a lovely colour, a little dusty and it really looks great on the hostess patterned paper pack I've been playing with! I loved my upline, Rhoda's, banner cards she made a few months ago (click here to see), and thought it would make a perfect summery baby girl or even wedding card! 


Blushing Bride Congrats

Stamp Set: Just Perfect Alphabet
Cardstock: Whisper White
DSP: Blushing Bride (6x6 Hostess only), Certainly Celery
Ink: Certainly Celery
Punches: Modern Label
Accessories: Linen Thread, Brads (Pale Green-non SU- I wanted to use Certainly Celery brads but I don't have any yet!) Basic Rhinestones
Extras: Stamp-a-ma-jig, paper piercer

Isn't it such a sweet card?! I punched out the modern label punch in different patterns, fold them over and then use the stamp-a-ma-jig to stamp the letters on them (the Just Perfect Alphabet fits PERFECTLY on this punch for banners). I then stuck the two sides together with the linen thread in the middle. I pierced two holes, stuck the brads through then wrapped the thread around the brads so the banner was hanging between the two. SO CUTE! I used a tiny bit of adhesive it keep the "flags" from moving around, adhered a strip of Certainly Celery dsp to the bottom and then added a rhinestone and bow to finish off the banner! 
Doesn't the banner show off the patterns beautifully! It could almost be fabric! 

Please leave a comment, they make my day!!! 

Amanda xx

Saturday, 16 April 2011

simply stampin' challenge, week 3

This week's Simply Stampin' Challenge is a themed challenge. And I was very excited to see that it was an Easter theme! Any excuse to decorate the house...and I'm there! I remember as a kid my mum, brother and I would decorate eggs with food colouring and wax resist. So when I was thinking about this challenge I considered trying something similar...for old time's sake with re-inkers. However at the moment I only have Marina Mist and lets face it, one colour can only go so far...so that idea is on the back burner 'till next year when hopefully I'll have more re-inkers! 


The project I did this week was inspired from an idea that was shared at the Stampin' Up! training day I attended last month, and here it is...


Easter Tree

Stamp Set: N/A
Cardstock: Certainly Celery, So Saffron, Pink Pirouette
DSP: Certainly Celery, So Saffron, Pink Pirouette, Marina Mist, Perfect Plum 
Accessories: Whisper White 1/4" Grosgrain Ribbon, Whisper White Satin Ribbon
Extras: Eyelets, Crop-a-dile, Corner Chomper, Crimper, Sticky Strip
Other: Chocolate Eggs, Chick Marshmallows, Flower Pot, Stones, Twigs

A bit different to what I normally do hey? I thought Id make a "Easter Tree".  On It are hung lots of little boxes which I made (so simple to do and really cute) and decorated with some Brights Collection DSP. Inside each box are little treats, tiny foil wrapped chocolate eggs and marshmallows. I shredded some carstock and crimped it to add inside the box to pad out the treats and make them look extra special - like they're sitting in a little nest! Finally I added some satin ribbon bows to the twigs just to fill it out a little more and make it look extra cute! Below are additional close ups of the tree and boxes! 


I intend on giving these little gifts to guests who visit us over the Easter period...a cute little surprise for them! (Anyone who came to my workshop last night got to choose one!) 

Please don't forget to head over to the Simply Stampin' Challenge blog to see what the other lovely talented design team members have created. Also enter your own creation for your chance to win some lovely goodies (for more details, check out the simply stampin challenge blog!).

Until next time, 

Amanda xoxo

Thursday, 14 April 2011

give a little

A few days ago I said that last Thursday I went over to Vicky's to have some crafty play and use her big shot. I cut out lots with it so I have plenty to play with back at home. Here is a little gift carton I made using the Milk Carton die! I have more things I still plan on making but I will make and share them another day! Today is just a really quick simple little one!


Congrats Milk Carton

Stamp Set: Silhouette Sentiments 
Cardstock: Pink Pirouette, Rose Red DSP
Accessories: Pink Bulldog Clip
 Extras: Sticky Strip, 1" Circle Punch

This is a really great little container for giving a small gift to someone! They would make cute favours at a wedding too! 

Please leave a comment! I love reading them! 

'till tomorrow,

Ciao!

Monday, 11 April 2011

let's rock and roll!

It's been a little while since I added some cards that weren't challenges...I've been busy making and have now got lots to upload! Today I would like to share my experimentation with the rock and roll technique!


Thinking of You

Stamp Set: Silhouette Sentiment, Punch Potpourri 
Cardstock: Very Vanilla, Certainly Celery, Old Olive
Ink: Dafodil Delight, Pumpkin Pie, Old Olive
Extras: Staples, Dimensionals

If you would like to see how to do a card like this, and have a go yourself, why not come along to my class in May when we will all be having a go at doing the Rock and Roll technique! Its really easy and fun....not to mention very cool looking! 


Tea Bag Holder

Stamp Set: Punch Potpourri, Bliss, Silhouette Sentiments
Cardstock: Early Espresso, Certainly Celery, Marina Mist DSP
Ink: Early Espresso, Certainly Celery, Old Olive
Accessories: 1/4" Whisper White Grosgrian Ribbon, Dazzling Diamonds Glitter
Extras: Sticky Strip, Tombo Mono Multi Glue, Dimensionals, Velcro, Eyelet Border Punch, 1" Circle Punch, 1 3/8" Circle Punch

Again, this is going to be a upcoming project in my classes, so keep your eyes peeled for the class featuring this project! Its totally gorgeous and makes a fantastic gift! 

Hope you enjoyed today's offerings, please do leave a comment, they make my day! 

Amanda x

Saturday, 9 April 2011

simply stampin' challenge, week 2

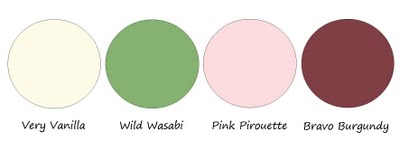
This week's Simply Stampin' Challenge is a colour challenge!


The colours are:


I have to start off by saying that I colour challenges have never really been my strong point, so I struggled a bit with this one! Not to mention that I didn't actually own anything Bravo Burgundy coloured so I just got myself an ink pad, I think I would have liked to use some Bravo Burgundy cardstock too if I had had some! I still think the card turned out ok though! So without further a do, here is this week's project! 


Bouquet

Stamp Set: Every Little Bit, Greenhouse Garden
Ink: Bravo Burgundy, Pink Pirouette
Cardstock: Very Vanilla, Pink Pirouette, Pink Pirouette & Wild Wasabi DSP
Accessories: Whisper White Grosgrain Ribbon
Extras: Sponge, Crystal Effects, Dimensionals

I used used heart and flower stamps from the every little bit stamp set on dsp with Bravo Burgundy ink and then cut them out. I used the stem from the Greenhouse Garden to stamp some stalks for my bouquet on the Very Vanilla cardstock and then layered up the hearts (for leaves) and flowers. I sponged the Whisper White ribbon with the Bravo Burgundy ink and then sponged the edges of the Very Vanilla cardstock with Bravo Burgundy too, just to add some more definition (very important when you have several very pale colours all working together!). I stamped the Pink Pirouette card base with the flower stamp in  Pink Pirouette ink for a tone on tone pattern. Finally I added crystal effects to the centre of the flowers in the bouquet just to add a little more interest! 

I hope you enjoyed this week's offering! Please leave a comment! I love reading them and its so nice to see your opinions! 

It has been so great to see so many of you play along with last week's challenge and I hope even more of you will play along this week...its so fun to see what you all create and how you interpret the challenge! 

Finally, please head on over to the simply stampin' challenge blog to see what the other lovely design team members have created and to enter in for your chance to win lovely goodies! 

Take care! 

Amanda xoxo

Tuesday, 22 March 2011

adorable baby girl

Yesterday my husband's cousin had a little baby girl, Georgia Poppy! (totally adore her name!) I am so excited! The boys are all so sweet, but this is the first girl to be born in the family for 15 years so she is long overdue! I am not a baby person in the slightest but I am really excited to meet her and have a little cuddle! Maybe its my maternal side kicking in or something! I don't know! Anyway, obviously a new baby requires a welcome baby card! I showed one last week, but I wanted to make a special little one just for Georgia today, and here it is...


It's a Girl 

Stamp Set: It's a Girl (Hero Arts, not SU)
Cardstock: Crumb Cake, Pink Pirouette DSP, Very Vanilla
Ink: Basic Black, Elegant Eggplant, Pretty in Pink, Daffodil Delight
Accessories: Brads, Linen Thread
Extras: Blender Pen, Dimensionals, Paper Piercer

A really simple little card, its very tall and thin but the height was important to enable me to have enough space for the elephant and flowers as well as the hanging girl mobile! I really love the little adorable wording and heart in the bottom corner! Adorable is definitely my word of the moment! 

I hope you enjoyed today's short and sweet entry today. 

Hope you're all having a great week! Don't forget to leave a comment!

Amanda xoxo

Friday, 18 March 2011

i'm addicted to mini's


Botanical Blooms Mini

Stamp Set Botanical Blooms (retired)
Cardstock: Whisper White, Wild Wasabi DSP
Ink: Elegant Eggplant, Certainly Celery, Early Espresso
Extras: Eyelet Border Punch

This card is so simple and really elegant! Literally all I did was stamp the flower (I stamped off once on scrap paper for a paler more subtle look) and leaves 3 times on the cardstock base and then punched a strip of Wild Wasabi DSP with the border punch and adhered it to the bottom. It simply gives the flowers a little bit of grounding! 


Thinking of You Ruffles Mini

Stamp Set: So Happy For You (SAB)
Cardstock: Crumb Cake, Melon Mambo, Pumpkin Pie, Old Olive
Ink: Old Olive
Extras: Eyelet Border Punch, We R Memory Keepers Corner Chomper, White Gel Pen

This card was slightly inspired and very loosly CASEd from a card I saw in the current SU ideas book and catalogue. In the card it had several layers on the eyelet border punch layered on top of one another. I was keen to try this, so I punched several strips of coloured cardstock and began playing around. To be honest I felt it was a little too flat how it was, it needed a bit more body and life to it, so I began crumpling, scrunching and distressing the cardstock pieces with my hands. Now I'm happy with it. The thin strip of Pumpkin Pie just helps break up the wide block of Melon Mambo and also just separate the frills from the sentiment slightly as it gives the sentiment something to sit on. I can't help think that it reminds me of those little frilly mini skirts that seem to be the fashion these days! I'm totally loving this card! 


A True Friend is You Friend

Stamp Set: True Friend (retired)
Cardstock: Crumb Cake, Old Olive, Rich Razzleberry
Ink: Early Espresso, Rich Razzleberry, Old Olive
Accessories: Basic Rhinestones
Extras: We R Memory Keepers Corner Chomper, Dimensionals, 1" Circle Punch, 1 3/8" Circle Punch

Recently, I dug this stamp set out of my stash and have been having fun playing around with it.I stamped the circular medallion on Old Olive and Rich Razzleberry and then punched them out with the circle punches. I stamped the larger medallion stamp from the set in Early Espresso on the Crumb Cake background and then layered the punched circles on top using dimensionals. I finally stamped the sentiment at the bottom, added a rhinestone and rounded the corner. 

I hope you enjoyed seeing more minis! 

Have a fab Friday! 

Amanda x

Tuesday, 15 March 2011

update 3 - miscellaneous

This is the third and final of my updates on the past week and half! I have some more stuff I've been making the past few days but I'll leave that for tomorrow (I'm enjoying some nicer weather so I can take the photos outside, they just look so much better in good lighting! Anyhow, its not a very sunshiny day so I'm going to hold off and hope for a better day tomorrow, its not like I haven't got enough to keep me busy on the blog today anyway!) 

This update, as the title suggests, is miscellaneous cards, which include thinking of you, friend and baby cards! 


For You Poppies

Stamp Set: Punch Bunch (SAB)
Cardstock: Very Vanilla, Pumpkin Pie, Old Olive
Ink: Pumpkin Pie, Old Olive
Accessories: Basic Rhinestones
Extras: White Gel Pen, Dimensionals, Eyelet Border Punch

This is a sweet little card which combines stamping the scalloped poppy stamp in several colours, cutting and layering the pieces on top of one another. the Old Olive and Pumpkin Pie background strip just really makes the scalloped circle pop!


Friends

Stamp Set: Cute By The Inch (Level 2 Hostess)
Cardstock: Very Vanilla, Night of Navy/Riding Hood Red
Accessories: Rhinestones
Extras: Dimensionals, Scallop Square Punch, We R Memory Keepers Corner Chomper

I used a post-it note to mask out the word 'friend' on the stamp so that it just says 'friend' in one of the scalloped squares. By repeating the image but only having one of the images complete with the sentiment really enhances the sentiment and help it out stand out!


True Friend

Stamp Set: Punch Bunch (SAB)
Cardstock: Crumb Cake, Old Olive, Pacific Point, So Saffron DSP
Ink: Old Olive, Pacific Point
Extras: White Gel Pen, 1 3/8" Circle Punch, 1/4" Grosgrain Ribbon

This card is CASEd from a card I found on a website called Splitcoast Stampers,  if you have never heard of it before I'd definately recommend checking it out! Its a fabulous place for inspiration and sharing ideas. 


Welcome Baby

Stamp Set: Punch Bunch (SAB), Every Little Bit
Cardstock: Whisper White, Pink Pirouette, So Saffron DSP
Ink: Versamark, Daffodil Delight, Pink Pirouette
Accessories: 1/4" Grosgrain Ribbon 
Extras: Stampin' Pastels (Daffodil Delight), Cotton Ball, Eyelet Border Punch, White Gel Pen, We R Memory Keepers Corner Chomper, Paper piercer

A really sweet little baby card! Again I stamped the tag in 2 colours so I could paper piece over the top to create a multi coloured image, without having the markers! The ducks from Every Little Bit along the bottom mirrors the tiny ducks on the mobile!

Hope you enjoyed these cards and I look forward to hearing your comments! 

Amanda xoxo

update 2 - birthday cards

Second of my card instalments in an attempt to catch up on the last week or so! I hope you enjoy seeing all the things I have been making! Please feel free to leave a comment, I love reading them! 


Birthday Wishes Pressies

Stamp Set: Every Little Bit, So Happy For You (SAB set)
Ink: Basic Black, Pacific Point
Cardstock: Whisper White, Pacific Point DSP, Rich Razzleberry DSP, Wild Wasabi DSP
Extras: Eyelet Border Punch

A really quick easy card. I stamped the presents on Whisper White CS and then stamped again onto Designer Series Paper and cut them out. I punched some Wild Wasabi DSP with the punch and adhered it to the bottom with a narrow strip along the top. I adhered all that to the white background and finally stamped the sentiment above the presents.  


Birthday Wishes Gifts

Stamp Set: --
Ink: --
Cardstock: Whisper White, Pumpkin Pie, Rich Razzleberry, Pumpkin Pie DSP, Rich Razzleberry DSP, Daffodil Delight DSP
Accessories: Silver Embroidery Floss
Extras: We R Memory Keepers Corner Chomper, Modern Label Punch, White Gel Pen, Dimensionals

I wanted to try using DSP to make presents. I saw a card similar to this on the wonderful Kristina Werner's website, unfortunately I dont think it turned out as nicely as hers did. At least I tried! Let me know what you think!


HB Happy Birthday

Stamp Set: Punch Bunch
Cardstock: Crumb Cake, Very Vanilla, Garden Green, Night of Navy
Ink: Night of Navy, Garden Green
Extras: White Gel Pen, Dimensionals, Scallop Square Punch, We R Memory Keepers Corner Chomper

I cut strips in a variety of widths of cardstock, and adhered them to the card, adding the scallop punched saying HB in a row too. I finished off the card by doing some dots and dashes with a white gel pen on the card strips and rounding the corners. This is a good manly card!


Happy Birthday Owl

Stamp Set: Punch Bunch, Fun & Fast Notes
Cardstock: Very Vanilla, Early Espresso, Crumb Cake, Old Olive
Ink: Elegant Eggplant
Extras: Dimensionals, Two Step Bird Punch

I punched out the leaves and branches using the Two Step Bird punch and then  stamped the owl onto Crumb Cake and Cut it out. I adhered it all together and popped the owl up on some dimensionals to add some depth. 


Birthday Flowers 

Stamp Set: Every Little Bit, Fun & Fast Notes
Cardstock: Whisper White, Rich Razzleberry, Old Olive DSP, Pumpkin Pie DSP, Rich Razzleberry DSP
Ink, Basic Black, Rich Razzleberry, Orange Pen (would have used Pumpkin Pie marker if I had one!)
Accessories: 1/4" Whisper White Grosgrain Ribbon
Extras: Eyelet Border Punch, Crystal Effects, Dimensionals

I simply stamped the flower from Every Little Bit onto some DSP and then cut them out, adding dimensionals to the back and adhereing them in a grid pattern to the Whisper White cardstock, which I adhered to Rich Razzleberry cardstock that had a punched bottom edge on. I added some Whisper White grosgrain ribbon to help finish it off and a small blob of crystal effects to the centre of each flower to give it a glossy finish! Finally I stamped the sentiment in the bottom right hand corner!


Birthday Bliss - Donna's Birthday Card

Stamp Set: Bliss (SAB Set), Fun & Fast Notes
Cardstock: Crumb Cake, Elegant Eggplant, Whispter White
Ink: Versamark, Elegant Eggplant
Accessories: Linen Thread
Extras: Modern Label Punch, Eyelet Border Punch, Clear Embossing Powder, Sponge, We R Memory Keepers Corner Chomper, Paper Piercer, Glue Dot

I stamped the flourish onto Crumb Cake in versamark ink and then added clear embossing powder. I then sponged Elegant Eggplant ink over the cardstock to create this spongy purple and kraft coloured effect. I stamped the butterfly, cut it out and folded the wings up to add dimension. I attached it with a glue dot. I punched the eyelet border and adhered the card together. Finally I stamped and punched out the sentiment, pierced a whole in each side and attached it to the card by wrapping linen thread around the card. 

I hope you enjoyed my second update, check back later for my third update! 

Please leave a comment. 

Have a great Tuesday! 

Amanda x