Showing posts with label every little bit. Show all posts

Sunday, 5 February 2012

every little bit

Nothing incredibly new today - this is another version of a card I made about a year ago. This is just a little bit more of a girlie updated version! Enjoy!


Handbags and Gladrags 

Stamp Set: Every Little Bit
Ink: Basic Black, Peach Parfait, Pretty in Pink, Real Red, Pear Pizzazz, So Saffron
Cardstock: Whisper White, Sahara Sand
Ribbon: Pretty in Pink Satin 
Punch: 1" Circle, Corner Rounder
Extra: Paper Crimper

I stamped the purses and perfume bottles on Whisper White cardstock and used the markers to colour them in then punched them out with the circle punch. I rounded the top two corners and crimped the bottom of a Sahara Sand cardbase. I them adhered all the circles down in two rows with dimensionals, added some ribbon and finally did a faux stitching line around the edge of the cardstock. 

Hope you have a brilliant day,

Catch you tomorrow!

Happy Stampin',

Amanda x


Saturday, 18 June 2011

simply stampin' challenge, week 12

This week's challenge is a theme challenge. As it is father's day tomorrow, what better of a theme than 'You've Got Male'. Men are notoriously difficult to make cards, and yes even I struggle...LOTS!


Handyman Dad

Stamp Set: Every Little Bit
Cardstock: Baja Breeze, Early Espresso, Very Vanilla
Ink: Early Espresso, Crumb Cake
Punches: Scallop Square
Extras: Dimensionals, Blender Pens, Brown Pen

This is the card I made for my Dad for Father's day tomorrow. He's been a really big help over the years and especially this past year coming over to help fix things when they go wrong - especially when Stu and I have little or no clue what to do. I wish I could be as good a handyman as my dad is! 

I hope you liked this simple card. Come back tomorrow to see the card I made for my father-in-law for Father's Day. Its possible the most minimal card I've ever created! Looks very cute though! 

Don't forget to head over to the Simply Stampin' Challenge blog, check out the other design team's entries and enter yourself! 

Thanks for stopping by! 

Amanda xx

Saturday, 30 April 2011

simply stampin' challenge, week 5

Colour Challenge time!! Now this week I would like to say a special thanks to Vicky for lending me some cardstock as I didn't have two of the colours in the challenge, they just aren't colours that appealed to me, although I may be having a change of heart about one of them! 


So without further ado, here are the colours in this week's challenge...


And the outcome...


For You (Birdcages)

Stamp Set: Every Little Bit 
Cardstock: Whisper White (textured), Basic Grey, Always Artichoke, Rich Razzleberry
Ink: Versamark
 Punches: Modern Label, 1" Circle, Two Step Bird
Accessories: White Embossing Powder, Linen Thread
Extras: White Gel Pen, Paper Piercer, Tombo Mono, Dimensionals

As I said a couple of these colours, I didn't have - Basic Grey and Always Artichoke! 
I started off with a rough idea that I wanted to use images from Every Little Bit using heat embossing and and a circle punch. I decided to use the bird cage as I love the image and have yet to use it!! Can you believe it!?!  I embossed quite a few, origionally intending to have them in some sort of a 3x3 pattern but when I was laying everything out I just thought, No, this is too boring. I've done a lot of cards like that before, I guess its one of my safety layouts. So I began playing with the circles at different heights, suspended somehow and suddenly thought how cool would it be to have these little birdcages hanging with linen thread on a branch!
I didn't have a long enough branch so used three branches from the two step bird punch joined together. I finished off the card by handwriting the sentiment on the modern label punch in the bottom left hand corner. It really filled the gap and rounded of the card. 
I did say one colour is growing on me, and that one is Always Artichoke! How lovely is it!?! 

Please do let me know what you think. I love reading all your comments! They really do make my day! 

Hope you do take part in this week's challenge. For the other lovely talented design team member's designs head on over to the Simply Stampin' Challenge blog! I look forward to seeing all your entries! 

Amanda xoxo

Saturday, 9 April 2011

simply stampin' challenge, week 2

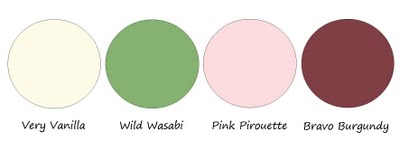
This week's Simply Stampin' Challenge is a colour challenge!


The colours are:


I have to start off by saying that I colour challenges have never really been my strong point, so I struggled a bit with this one! Not to mention that I didn't actually own anything Bravo Burgundy coloured so I just got myself an ink pad, I think I would have liked to use some Bravo Burgundy cardstock too if I had had some! I still think the card turned out ok though! So without further a do, here is this week's project! 


Bouquet

Stamp Set: Every Little Bit, Greenhouse Garden
Ink: Bravo Burgundy, Pink Pirouette
Cardstock: Very Vanilla, Pink Pirouette, Pink Pirouette & Wild Wasabi DSP
Accessories: Whisper White Grosgrain Ribbon
Extras: Sponge, Crystal Effects, Dimensionals

I used used heart and flower stamps from the every little bit stamp set on dsp with Bravo Burgundy ink and then cut them out. I used the stem from the Greenhouse Garden to stamp some stalks for my bouquet on the Very Vanilla cardstock and then layered up the hearts (for leaves) and flowers. I sponged the Whisper White ribbon with the Bravo Burgundy ink and then sponged the edges of the Very Vanilla cardstock with Bravo Burgundy too, just to add some more definition (very important when you have several very pale colours all working together!). I stamped the Pink Pirouette card base with the flower stamp in  Pink Pirouette ink for a tone on tone pattern. Finally I added crystal effects to the centre of the flowers in the bouquet just to add a little more interest! 

I hope you enjoyed this week's offering! Please leave a comment! I love reading them and its so nice to see your opinions! 

It has been so great to see so many of you play along with last week's challenge and I hope even more of you will play along this week...its so fun to see what you all create and how you interpret the challenge! 

Finally, please head on over to the simply stampin' challenge blog to see what the other lovely design team members have created and to enter in for your chance to win lovely goodies! 

Take care! 

Amanda xoxo

Tuesday, 5 April 2011

everyone gets to make a magnet!

As promised, here are the projects I demonstrated last night! 


Congratulations Hearts 

Stamp Set: En Francais, I {Heart} Hearts, Fun & Fast Notes
Cardstock: Crumb Cake, Riding Hood Red, Marina Mist
Ink: Versa Mark, Riding Hood Red, Pacific Point
Pastels: Marina Mist, Riding Hood Red, Pumpkin Pie
Accessories: Pumpkin Pie Button, Linen Thread
Extras: Clear Embossing Powder, Heat Tool, Cotton Balls, Sponge, Dimensionals, Glue Dot

In this first demo I really wanted to highlight the wonderful ways you can use the versa mark ink pad (something I don't think I could live without!). This also included embossing!
I stamped the En Francais background stamp with versa mark on the Crumb Cake cardstock and then used cotton balls to gently rub and blend Stampin' Pastels over it to give some gentle colour and bring out the writing! I then stamped the hearts with versa mark and covered them in clear embossing powder and heated with my heat tool. I used a sponge to rub some Pacific Point ink over the small LOVE heart to show the emboss resist technique. Finally, I adhered everything together, stamped the sentiment from Fun & Fast Notes and added a small button!


Get Well Flowers

Stamp Set: Greenhouse Garden, Fun & Fast Notes
Cardstock: Whisper White, Early Espresso, Old Olive, Crumb Cake, Marina Mist
Ink: Marina Mist, Early Espresso, Old Olive
Accessories: Basic Rhinestones, Whisper White Grosgrain Ribbon (dyed Marina Mist)
Extras: Paper Crimper, Sponge, Dimensionals, Glue Dots, Stamp-a-ma-jig, Modern Label Punch

With this demo, I wanted to show how to use a stamp-a-ma-jig as I think it is an amazing peice of kit and show how perfect it makes stamping and possitioning every single time! I also wanted to show how you can get more out of your ink pad by sponging! 

I used the stamp-a-ma-jig to stamp the medium flower from the Greenhouse Garden. Then I used the sponge to sponge Marina Mist ink around the edge of the Whisper White cardstock, I also dampened a piece of whisper white ribbon and sponged it on both size so it was Marina Mist in colour! A great way to get a piece of white ribbon to match any colour ink you have!! I love it! I layered up the cardstock and then stamped, punched and sponged the sentiment before adhering it to the bottom of the Whisper White cardstock, this just "grounds" the flowers so its not floating. finally I crimped the edge! 


Pie Thanks Magnet


Pie Magnet


Gumball Birthday Magnet


Gumball Magnet

Stamp Set: Every Little Bit, Fun & Fast Notes
Cardstock: Whisper White 
Ink: Basic Black, Pumpkin Pie, Real Red, Marina Mist, Pacific Point, Daffodil Delight, Old Olive
Accessories: Linen Thread
Extras: Bottle Cap, Magnet, small piece of tango can, Blender Pen, Crystal Effects, 1" Circle Punch, 1 3/8" Circle Punch, Dimensionals

If you want to see how to make this way cool magnet, come to my workshop next Friday!!! You get to make one yourself!! 

(CASEd from a swap I received at Coventry Training by Zoe Tant - thanks for the awesome idea!)

Hope you enjoyed seeing a bit from my latest workshops! Please do come along next Friday and bring a friend!! It would be great to see you there! 

Ta ta for now! 

Amanda xoxo

Tuesday, 15 March 2011

update 2 - birthday cards

Second of my card instalments in an attempt to catch up on the last week or so! I hope you enjoy seeing all the things I have been making! Please feel free to leave a comment, I love reading them! 


Birthday Wishes Pressies

Stamp Set: Every Little Bit, So Happy For You (SAB set)
Ink: Basic Black, Pacific Point
Cardstock: Whisper White, Pacific Point DSP, Rich Razzleberry DSP, Wild Wasabi DSP
Extras: Eyelet Border Punch

A really quick easy card. I stamped the presents on Whisper White CS and then stamped again onto Designer Series Paper and cut them out. I punched some Wild Wasabi DSP with the punch and adhered it to the bottom with a narrow strip along the top. I adhered all that to the white background and finally stamped the sentiment above the presents.  


Birthday Wishes Gifts

Stamp Set: --
Ink: --
Cardstock: Whisper White, Pumpkin Pie, Rich Razzleberry, Pumpkin Pie DSP, Rich Razzleberry DSP, Daffodil Delight DSP
Accessories: Silver Embroidery Floss
Extras: We R Memory Keepers Corner Chomper, Modern Label Punch, White Gel Pen, Dimensionals

I wanted to try using DSP to make presents. I saw a card similar to this on the wonderful Kristina Werner's website, unfortunately I dont think it turned out as nicely as hers did. At least I tried! Let me know what you think!


HB Happy Birthday

Stamp Set: Punch Bunch
Cardstock: Crumb Cake, Very Vanilla, Garden Green, Night of Navy
Ink: Night of Navy, Garden Green
Extras: White Gel Pen, Dimensionals, Scallop Square Punch, We R Memory Keepers Corner Chomper

I cut strips in a variety of widths of cardstock, and adhered them to the card, adding the scallop punched saying HB in a row too. I finished off the card by doing some dots and dashes with a white gel pen on the card strips and rounding the corners. This is a good manly card!


Happy Birthday Owl

Stamp Set: Punch Bunch, Fun & Fast Notes
Cardstock: Very Vanilla, Early Espresso, Crumb Cake, Old Olive
Ink: Elegant Eggplant
Extras: Dimensionals, Two Step Bird Punch

I punched out the leaves and branches using the Two Step Bird punch and then  stamped the owl onto Crumb Cake and Cut it out. I adhered it all together and popped the owl up on some dimensionals to add some depth. 


Birthday Flowers 

Stamp Set: Every Little Bit, Fun & Fast Notes
Cardstock: Whisper White, Rich Razzleberry, Old Olive DSP, Pumpkin Pie DSP, Rich Razzleberry DSP
Ink, Basic Black, Rich Razzleberry, Orange Pen (would have used Pumpkin Pie marker if I had one!)
Accessories: 1/4" Whisper White Grosgrain Ribbon
Extras: Eyelet Border Punch, Crystal Effects, Dimensionals

I simply stamped the flower from Every Little Bit onto some DSP and then cut them out, adding dimensionals to the back and adhereing them in a grid pattern to the Whisper White cardstock, which I adhered to Rich Razzleberry cardstock that had a punched bottom edge on. I added some Whisper White grosgrain ribbon to help finish it off and a small blob of crystal effects to the centre of each flower to give it a glossy finish! Finally I stamped the sentiment in the bottom right hand corner!


Birthday Bliss - Donna's Birthday Card

Stamp Set: Bliss (SAB Set), Fun & Fast Notes
Cardstock: Crumb Cake, Elegant Eggplant, Whispter White
Ink: Versamark, Elegant Eggplant
Accessories: Linen Thread
Extras: Modern Label Punch, Eyelet Border Punch, Clear Embossing Powder, Sponge, We R Memory Keepers Corner Chomper, Paper Piercer, Glue Dot

I stamped the flourish onto Crumb Cake in versamark ink and then added clear embossing powder. I then sponged Elegant Eggplant ink over the cardstock to create this spongy purple and kraft coloured effect. I stamped the butterfly, cut it out and folded the wings up to add dimension. I attached it with a glue dot. I punched the eyelet border and adhered the card together. Finally I stamped and punched out the sentiment, pierced a whole in each side and attached it to the card by wrapping linen thread around the card. 

I hope you enjoyed my second update, check back later for my third update! 

Please leave a comment. 

Have a great Tuesday! 

Amanda x

Monday, 28 February 2011

stampin' around

Ok, so I still don't think I'm having a very creative day, I toyed with the idea of starting making some swaps for regional training in a couple weeks time, and also making some little thank you cards to give to my lovely customers from my two recent workshops, but on both occasions I decided to wait because I've ordered some goodies and I can't wait to try them out so I'm holding my horses for the moment! I've got a few ideas floating around in my head, now I just have to wait 'till my stuff arrives! I am really excited! 


So for the mean time I am keeping myself busy with getting to know my wheels a bit better (Mainly due to the success of my card I made for Pap using the Watercolor Vine earlier). I've tried the wheels briefly before but never really got on with them particularly well. Perhaps it was because I was using Stampin' Up inks or my technique has changed slightly but I seem to be connecting a lot better with them and really enjoying using them now! I think previously I was maybe pressing too hard which was sending me crooked and also slightly distorting the design! Both of the following cards are very similar, same layout just different wheel cartridge and accessory.


Thanks

Stamp Set: Leaves a la Carte
Ink: Old Olive
Cardstock: Kraft, Rich Razzleberry Textured & Smooth
Accessories: Old Olive Button
Extras: Linen Thread, White Gel Pen, Glue Dot, We R Memory Keepers Corner Chomper


Thanks

Stamp Set: It's Beautiful
Ink: Pumpkin Pie
Cardstock: Kraft, Rich Razzleberry Textured & Smooth, Very Vanilla 
Accessories: Basic Rhinestones
Extras: White Gel Pen, We R Memory Keepers Corner Chomper

As I said they're both very similar. I rolled out the wheel and then adhered a thin strip of Rich Razzleberry textured cardstock. I rounded the top two corners and then the top two corners of a small rectangle of smooth Rich Razzleberry that I adhered to the bottom right hand corner and wrote Thanks on it. To the first i added a button and some linen thread, the second I rolled the wheel out on sone Very Vanilla cardstock and cut out one of the flowers, I finished it off with a rhinestone in the centre for a little sparkle!


Coco

Stamp Set: Every Little Bit
Ink: Basic Black, Real Red, Pumpkin Pie, Old Olive, Marina Mist
Cardstock: Kraft, Pacific Point Textured and DSP
Extras: 1" Circle Punch, Blender Pen, Dimentionals, Scallop Edge Punch

This is just a little card I was working on last week but finished off today. Its a bit messy, but I was just trying to use up little scraps of cardstock and DSP that I had left over! Its similar to the Girls, Girls, Girls and Pie cards I posted last week! 

Please feel free to leave a comment! I love reading them and they really make my day! 


'til next time, 


Amanda  xoxo

Monday, 21 February 2011

virus free and back in business

I am officially virus free...thanks to my fab husband! I'm so glad that is all over! It was so horrible having a virus and having no clue what to do and there's that really real fear that you could loose everything. As a result, I am now protected...again!


Now, on to more exciting pretty things, I have a few more cards to share with you. First is my mother-in-law's birthday card, it was her birthday on Friday. So here we go...


Heather's Birthday Card

Stamp Set: Stipple Butterfly (Retired)
Ink: Basic Black, Old Olive, Real Red, Pumpkin Pie
Cardstock: Very Vanilla, Old Olive, Kraft
Accessories: Very Vanilla Satin Ribbon
Extras: White Gel Pen, Glue Dots, Dimentionals, Blender Pen

Ok, so, I know this stamp is retired but I thought it would be just perfect for Mum's card, and it turned out so well I just HAD to share it! I used the blender pen to colour in two butterflies, then cut one out to layer over to add another dimension, folding the wings up and adhering it with a glue dot. I used a scrap of Kraft to make my card, a different style card for me than my usual rectangular/square cards! I think the white stitching and ribbon just really finishes it off! The sentiment was written in my own handwriting, to add a personal touch! 


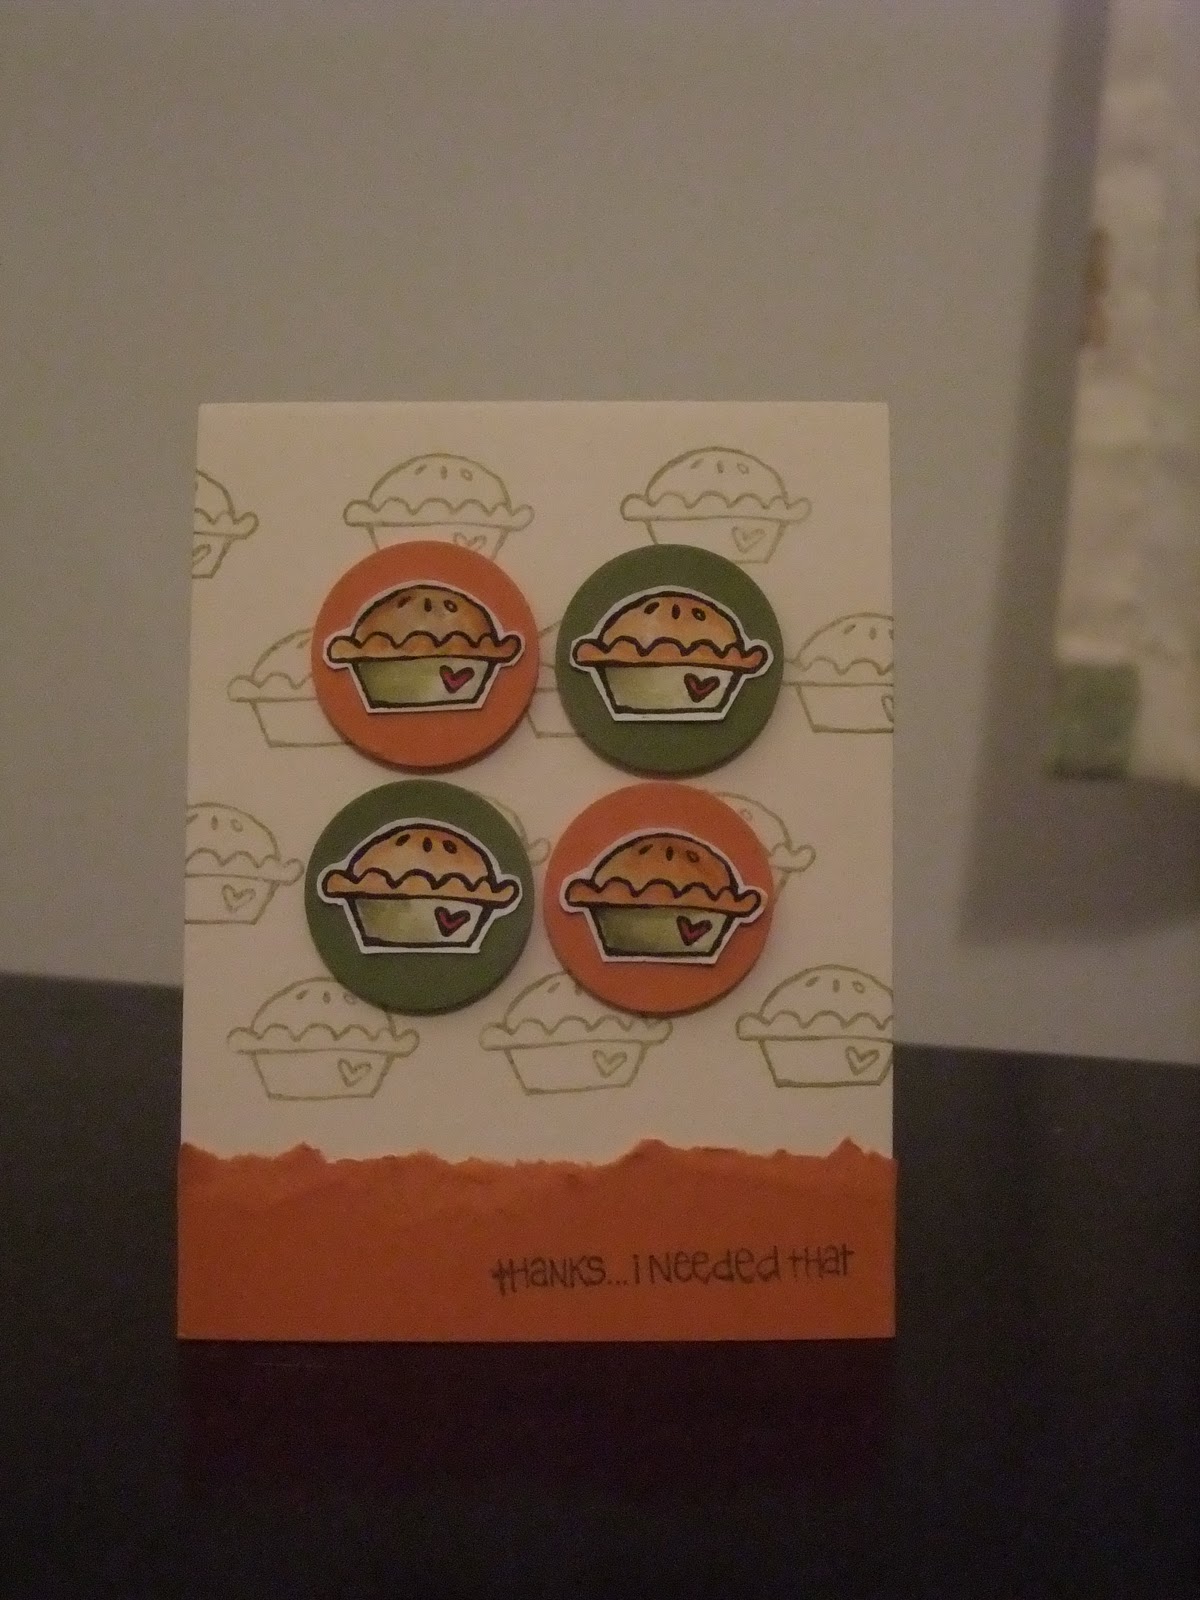
Thanks...I Needed That

Stamp Set: Every Little Bit, Fun and Fast Notes
Ink: Pumpkin Pie, Old Olive, Basic Black, Real Red
Cardstock: Very Vanilla, Pumpkin Pie, Old Olive
Extras: Dimentionals

Just a really quick little card I made to use up some little scraps I had lying around (as you might be able to tell, I am attempting to be better at using up my scraps before starting a fresh sheet). I coloured in the pies with the blender pen, cut them out and mounted them on pumpkin pie and old olive cardstock, but  as I was laying out the card I came to the conclusion it was looking a little bare, after a little thinking, I decided to use the pie stamp and old olive ink (stamped off once for a paler shade) to make my own patterned paper and a little to my surprise it actually worked really well! It not only filled in the empty space but pulled everything together sweetly! Finished off the card with a torn strip of pumpkin pie and the "thanks...i needed that" saying from the fun and fast notes set. 


Birdie

Stamp Set: Fun and Fast Notes, Fast Flowers Wheel
Ink: Versamark, Basic Black, Real Red, Pumpkin Pie, Old Olive, Marina Mist, Daffodil Delight
Cardstock: Whisper White, Marina Mist, Pacific Point (Textured)
Accessories: Linen Thread
Extras: Spiral Border Punch, Stampin' Around Handle, Blender Pen

I used versa mark to stamp the fast flowers background. punched the spiral border punch on the whisper white and then stamped and coloured in the birdie on the cardstock. I ripped and distressed the pacific point cardstock, brushing the versamark pad over the cardstock to emphasise the texture. It was finished off by wrapping the linen thread around several times and then tying into a bow. 

I hope you liked what I had to share today! 

Until next time, 
Amanda x

Tuesday, 15 February 2011

my week just keeps getting better!

Wow, overslept this morning and I must've been shattered as I didn't hear the door bell. When I came down I had a slip of paper saying that I wasn't in and they had delivered the package to my neighbour. Naturally my neighbour was out...grr! I had absolutely no idea what it could possibly be, and its been driving me totally nuts all day! I hadn't ordered anything else and really wasn't expecting anything to come. Finally he came home and I was able to collect my mystery package! It was from Stampin' Up! Even more confused now, but still I opened it and it contained some really wonderful goodies! Some beautiful buttons, linen thread and sparkly rhinestones (the magpie in me has totally come out and I really can't wait to use them, they are just stunning!) So, I still don't really understand, but I am so very grateful to whoever it was! It was a most wonderful surprise! :D


I've spent today cutting out all the pieces I need for my demos and make and takes for the workshops next week. feeling a bit more organised and relaxed about the whole thing now. I'm sure the nerves will pick up again next week but being prepared definitely helps!


I've made a few more cards, but I think I'm going to have to make a couple more now with my new goodies. Exciting!


Girls, Girls, Girls
Stamp Set: Every Little Bit
Ink: Basic Black, Pumpkin Pie, Old Olive, Real Red, Marina Mist, Daffodil Delight
Cardstock: Kraft, Whisper White
Accessories: Whisper White Satin Ribbon
Extras: White Gel Pen, Dimentionals, Fiskars Paper Crimper, 1" Circle Punch, We R Memory Keepers Corner Chomper, Blender Pen

Last night I couldn't sleep, and while I was flicking through the catalogue, in a vain attempt to sleep, I saw the paper crimper, something that my mom and I bought when we first got into Stampin' Up ten years ago. I used to use it on lots of my projects to finish them off, but I haven't used it for the last few years, the white gel pen sort of took over! I kind of miss using it so thought I'd give it a go, trying to make a card using it. I thought I'd use a couple stamps from Every Little Bit and use repetition to make them work for a card. I cut the ribbon into a "V" cut, just to try something else a little different. Its nice to push myself to try different things. I enjoy the challenge! 


Friend

Stamp Set: I {Heart} Hearts
Ink: Old Olive
Cardstock: Whisper White, Kraft, Old Olive
Accessories: Old Olive Button, Linen Thread
 Extras: Dimentionals, Glue Dot, We R Memory Keepers Corner Chomper

I really loved the stamped off heart pattern as a background, this piece of whisper white was a bit I had when done when I was playing around with ideas for Stuart's valentine's card. I figured it was a shame to just let it go to waste so I tore off the remaining paper. Tore some strips of old olive cardstock to enhance the ripped edge (tearing isn't really something I have done much of before so it was nice to have a go and experimenting with it). I decided to ink the edges to give a bit more definition to the layers of cardstock. The buttons and thread came just as I was trying to finish off this card, it was just the perfect finishing touch! I think I will give this card to my mom next week at her workshop to say thank you for hosting a workshop!

I hope you are all having a most pleasant day! 

Amanda xoxo


Monday, 14 February 2011

just a bit of play

I have spent the entire afternoon playing and being creative with all my new goodies...it felt so good! I am just loving all my new stuff and the quality of the materials is outstanding...its so nice to work with materials that don't let you down. On a more serious note, I was also working on demos and make and take stuff for my workshops I have coming up next week. My mom is hosting one on Weds 23rd in the afternoon, and mine is on Fri 25th in the evening, if youre interested and in the area youre very welcome to come along! Anyway, as promised, here are the outcomes of my day of play! (sorry the the low image quality, by the time I had finished playing and cooked dinner and was ready to photograph and blog, there was no natural light left and you know how rubbish indoor lights can be for taking photos, but still, here they are)


Candles 
Stamp Set: Greenhouse Garden
Ink: Pumpkin Pie, Real Red, Old Olive
Extras: Candle, Heat gun, Greaseproof paper
For more information on how I decorated these gorgeous candles come to one of my February workshops. 


So Many Thanks
Stamp Sets: So Many Thanks, Every Little Bit
Ink: Old Olive Classic Ink Pad, Marina Mist & Daffodil Delight Stampin' Write Markers
Cardstock: Whisper White, Kraft & Brights Patterned Paper (Daffodil Delight Polka Dot, Old Olive Flourish, Pacific Point Flourish)
Extras: Dinentionals
The second of my demos for the February workshops. 


Friend Love
Stamp Set: I {heart} Hearts, Fun & Fast Notes
Ink: Real Red, Pumpkin Pie, Old Olive
Cardstock: Whisper White, Pumpkin Pie
Accessories: Whisper White Satin Ribbon
Extras: Dimensionals
My make & take for my February workshops, if you would like to make this card, come along. CASEd from a card made by my upline, cousin-in-law, Rhoda. She has been really helpful and supportive, helping me to get thing and projects organised for my workshops. Its been fab, especially as she lives up in Shetland! 


Thanks For Sharing You With Me
Stamp Set: Fun and Fast Notes, Fast Flowers Wheel
Ink: Basic Black, Versamark, Real Red
Cardstock: Kraft, Pumpkin Pie, Real Red
Extras: Clear Embossing Powder, Blender Pen, Dimentionals 
A sample card to showcase other techniques for my guests to see at my workshops next week. this one is highlighting the use of versmark inkpad for creating a tone on tone background and then I added clear embossing powder to the versamarked hedgehog which I popped up in front with a dimensional! 


Happy Birthday Wishes
Stamp Set: Fun and Fast Notes
Ink: Basic Black, Pumpkin Pie, Marina Mist, Daffodil Delight
Cardstock: Kraft, Whisper White, Brights Patterned Paper (Pumpkin Pie Polka Dot)
Extras: Blender Pen
Just a really simple little card highlighting the blender pen with ink pads and ink refills. 


Clover
Stamp Set: Every Little Bit
Ink: Basic Black, Versamark
Cardstock: Kraft, Whisper White
Extras, Blender Pen, Stampin' Pastels (Garden Green-retired), cotton ball
Again, a really simple card just showing another way to use the blender pen, this time to fill the image with stampin pastels (I had to use a retired colour as the set I have is one I bought in 2002, when I first got into Stampin' Up in the States). the background was stamped in versamark and then the pastel was applied to the inked area with a cotton ball, just to highlight another use of the pastels. 

And finally, I have one last card to share with you all, seeing as its Valentine's Day, I figured I should make my wonderful husband a sweet valentines card. So here it is...


I LOVE U
Stamp Set: I {heart} Hearts
Ink: Old Olive, Real Red
Cardstock: Kraft, Real Red
Accessories: Whisper White Satin Ribbon
Extras: White Gel Pen, Dimentionals, We R Memory Keepers Corner Chomper (I know its not stampin' up but I really felt that the corners could be rounded to improve the card)
To get a more subtle background effect with the heart stamps I used the stamping off technique, stamping each one off once on a piece of scratch paper before stamping onto the Kraft cardstock. I'm really pleased how it turned out, it really makes the white and the red in the foreground stand out! I think that by rounding the corners it really enhances the curves of the hearts. 


And just the finish off this mamoth blog entry, geesh I didn't realise how long it was or how long I've been sitting at this computer screen, I thought I'd just fill you in on a couple other lovely suprises I had today. 


First, was from the lovely Rhoda, my upline, she so sweetly sent me some swatches she made for the designer patterened paper available from the catalogue so I can show it off to all of my lovely guests. The paper is gorgeous and yet another reason why you should totally come to/host a workshop so I can show it all off to you! She also sent me some lovely cards she made with the current sale-a-bration sets that are on offer for free when you spend £45 until the end of February. And some really cute little swaps she got when she went to convention last November. It really was so kind of her, and I am very grateful for all of her wonderful ideas she has given me! 


Second was from my darling husband. He came home from work today with some really gorgeous white daisies and a heart-shaped balloon for me. I LOVE the flowers! I thought the balloon seemed a little out of character and until he told me the florist just gave it to him for free...yay for free stuff! 


I hope you have all enjoyed seeing a little of what I have done and seen a bit of what I'll be showing at my workshops. Comments are always a pleasure to read and make my day! 


Have an awesome rest of your evening,


Amanda xx