Showing posts with label dotted scallop ribbon border. Show all posts

Tuesday, 15 April 2014

Dot, Dot, Dot

 Hello! 

I hope you had a good beginning to the week! Yesterday was not exactly as planned. Stuart managed to scrape off the surface of his nice new smart shoes on Sunday evening playing football (men never learn!!) anyway so we spent the day visiting shop after shop trying to get another pair! It was a stressful ordeal and I'm glad its in the past now. 

The wedding rehearsal was last night and he's been given all his orders now. Big day is today! So I have a very speedy post as we need to be heading out and there's lots to do.


Stamp Set: Geometrical, Happy Day
Ink: Bermuda Bay, Gumball Green, Crushed Curry
Cardstock: Gumball Green, Bermuda Bay, Whisper White
Big Shot: Chalk Talk Framelits
Punch: Dotted Scallop Ribbon Border

This is a card we made back in February at card club, I just haven't got around to sharing it with you until now! I love the pattern we created by just stamping the dot stamp over and over - all the shades were created by restamping without reinking! 


Its a very simple card really, I like the small scallops which mimic the dots in the background and on the colourful strip. I also like the chevron which has a stronger geometric line to it which breaks up all the dots! 

Sorry for being so quick today, 

Hope you enjoyed the quick share! 

Happy Stampin',

Monday, 27 January 2014

Inky Fingers Challenge 4

Hello!

Its Monday again! And now its time for a new Inky Fingers Challenge. Its the fourth week in the month so that means its a "Kit" challenge! Julie sends everyone who requests it a kit of goodies to use to make the card. 


Stamp Set: See Ya Later, Express Yourself
Ink: VersaMark, Basic Black, White Craft
Cardstock: Basic Grey, Smoky Slate, Basic Black, Real Red
DSP: Modern Medlay
Punch: Owl Builder, Dotted Scallop Ribbon Border, Banner (SAB)
Ribbon: Real Red Taffeta 
Accessories: Antique Brad, Mini Brads
Extra: White Emboss Powder, Crystal Effects

This is actually the second card that I made. I didn't realise I had to use EVERYTHING in the kit, so I merrily went to creating a card that only used some of the bits. I couldn't seem to make the red card and ribbon and the big antique brad work, so I thought I'd just leave it a monochrome, masculine card. 

So I fiished off the card and sent it off to Julie only to get an answer that I hadn't used everything. I was like say what?! That's a lot! I scratched my head and thought hmm, how do I get those bits in?! 


Back to the drawing board I thought I'd have a go at making a more manly Valentine card! (I got Stuart's approval so in my book, its okay for a guy!)

I did the chalk board technique with the sentiment and added the red heart from the owl builder over the embossed heart. The red really pops against the black! What was really baffling me was the ribbon, I didn't want to add a bow because that's not manly apparently. I eventually thought I'd add it as a tiny little strip on the banners.


Actually I'm really please with how this turned out. The red pops and really lifts the card. To make the hearts even more special I added crystal effects. 

Be sure to check out the other design team's creations over at the Inky Fingers blog. 

Happy Stampin',


Thursday, 7 February 2013

It's All About The Pattern!

Hi there! 

I've got a really quick card for you today using the Sale-A-Bration set, Patterned Occasions - totally loving this set!


Stamp Set: Patterned Occasions, Alehambra (wheel)
Ink: Rich Razzleberry, Lucky Limeade, Daffodil Delight, Early Espresso
Cardstock: Whisper White, Rich Razzleberry, Lucky Limeade
Punch: Dotted Scallop Ribbon Border, Corner Rounder
Big Shot: Labels Framelits
Extras: Occasions Pierce Pack

Totally love the pattern from the Alehambra wheel - I think it works well with the pattern on the elephant! I also cracked out my sponges again (haven't used them much recently) to give a little colour to the edge of the labels framelit. I also added the paper piercing  inside the framelit for another little added detail. 

This would be a fun card that would work with any of the stamps in the Patterned Occasions set. Isn't it great when you find a layout that works again and again!?! Less thinking is sometimes the way forward! 

I've got a couple more cards with the Patterned Occasions for you tomorrow, so please do come back to see them! 

Happy Stampin',

Amanda x


Sunday, 25 November 2012

snow angels


Stamp Set: Winter Wonderland, Come to Bethlehem
Ink: Raspberry Ripple, Summer Starfruit, Gumball Green, Midnight Muse, Pool Party, Blush Blossom, Pretty in Pink, Basic Black
Cardstock: Whisper White, Pool Party, Raspberry Ripple, Summer Starfruit, Midnight Muse
Punch: Dotted Scallop Ribbon Border
Accessories: Silver Dazzling Details

The snow angel kiddies were coloured in with blender pens for a watercolour look, snow was stamped, tone on tone in the background for a subtle texture. Scraps of paper were added to the side to tie together the colours used for the kids. The red one does look like the stitched grosgrain doesn't it?! Its just a white gel pen for a faux effect! 

Happy Stampin',

Amanda xx

Friday, 23 November 2012

merry minis altogether now

The Merry Minis punch pack has a coordinating stamp set. Today I thought I'd show you how you could use both together. 


Stamp Set: Merry Minis, Teeny Tiny Sentiments
Ink: Gumball Green, Raspberry Ripple, Summer Starfruit
Cardstock: Gumball Green, Crumb Cake, Raspberry Ripple, Whisper White
Baker's Twine: Cherry Cobbler
Punch: Dotted Scallop Ribbon Border, Merry Minis
Extras: Festive Pierce Pack

I pierced the bauble in the background and then layered sentiment and some of the merry minis! A little baker's twine bow finishes it off! 

Happy Stampin',

Amanda x

Tuesday, 20 November 2012

merry mini trees

I've got a quick and easy Christmas card today using the Merry Minis punch pack! 
So with the Merry Minis you get a tree, bauble and star! They are so sweet! 


Stamp Set: For My Family
Ink: Gumball Green
Cardstock: Gunball Green, Lucky Limeade, Crumb Cake, Whisper White 
Baker's Twine: Lucky Limeade
Punch Dotted Scallop Ribbon Border, Merry Minis

What a easy and fun card using up all those little scraps! 

Hope you've enjoyed the real quick post today! 

Thanks for stopping by! 

Amanda xx

Monday, 19 November 2012

watch me on you tube?!

I am sorry once again for being a absentee blogger once again! But I promise you I have a good reason (or two!). 

I'm trying something new! I am trying my hand at some you tube videos! For all of those craft obsessed people like myself who can spend hours watching youtube crafting tutorials, now you can while away the time with the lul of my voice! Haha! Maybe not so much of a lul but hey! I'm on there doing my thing! 

So I am hoping to do some general demos with different products and techniques and I am also planning (in the pipeline) to do some product reviews/how to use and get the most out of a certain product! For example the Big Shot or the Simply Scored board so watch this space! 

In the mean time I have a could videos already on, one was for this sweet little place setting favour for our Thanksgiving meal which we celebrated on Saturday! 


Ink: Raspberry Ripple
Cardstock: Raspberry Ripple, Crumb Cake, Very Vanilla
DSP: Orchard Harvest
Big Shot: Little Leaves, Lots of Tags, Mini Milk Carton
Punch: Dotted Scallop Ribbon Border
Ribbon: Raspberry Ripple Stitched Satin
Accessories: Pearl

For those of you interested to know what I filled these with - two Ferrero Rochers fit perfectly inside!!

And don't forget that if you switch up the colour combo and DSP you would have a delightful place setting for Christmas too! (Or any other dinner party for that matter!)

Please do feel free to leave me some feedback about my videos, if you like them and what you would be interested in seeing yourself! 

Have a lovely day! 

Amanda xx

Wednesday, 17 October 2012

have a break, take a sip!

This month's card club was Tea and Cake theme. I've got the cards we made to show you another day but today I thought I'd show you a couple simple little cards I made with the Take A Sip wheel that I made while I was thinking of what cards to do for card club (we did another card with take a sip).


Stamp Set: Take a Sip wheel, Tea Shoppe
Ink: Basic Black, Baja Breeze, Pretty in Pink, Perfect Plum, So Saffron, Rose Red, Crumb Cake
Cardstock: Baja Breeze, Perfect Plum. Whisper White
Punch: Dotted Scallop Ribbon Border, Modern Label
Other: Simply Scored


Stamp Set: Take a Sip
Ink: Basic Black, Perfect Plum, Pretty in Pink
Cardstock: Pretty in Pink, Perfect Plum, Whisper White
Punches: Scallop Circle, 1" Circle, Dotted Scallop Ribbon Border

So some really simple cards, just using the wheel to add tea cups and mugs to the background, one I coloured in all of them and the second was just one of the cups that I coloured on a separate scrap of paper and layered it over top with some punches. The dotted scallop ribbon border is great for adding a little extra detail and border to the wheeled image! 

Thanks for stopping by and checking out today's brief little post! 

Happy Stampin',

Amanda xox

Saturday, 30 June 2012

simply stampin' challenge 66

Back today with another Simply Stampin' Challenge. This week's challenge is a theme and the theme is 

Clean & Simple


Birthday Flower

Stamp Set: Apothecary Art
Ink: Night of Navy
Cardstock: Whisper White, Night of Navy, Daffodil Delight
Punches: Blossom, 5 Petal Flower, Boho Blossoms, Dotted Scallop Ribbon Border, Corner Rounder
Accessories: Daffodil Delight Brad

So I'm not sure that the photo really does this card justice. The flower is really curvy and poofy! The tab just balances out the rest of the card and adds a place for the sentiment. 

Hope you liked this fun CAS card! I look forward to seeing your CAS creations over on the Simply Stampin' blog.

Happy Stampin',

Amanda xo

Tuesday, 15 May 2012

cup of thanks...

Today's card reminds me of my room after a stampin' party - cups and mugs everywhere! Well who can craft without a cup of tea?! Anyway, on to today's card.


Cup of Thanks

Stamp Set: Tea Shoppe
Ink: Pear Pizzazz, Marina Mist, Pretty in Pink, Regal Rose, Peach Parfait, Perfect Plum, Basic Black
Cardstock: Very Vanilla, Marina Mist, Peach Parfait
Punch: Dotted Scallop Ribbon Border

A really colourful card for you today - thought the teacups needed a bit of spicing up! I think they look like the odd 'vintage' tea cups you see around these days! Each cup was cut out and then they were stacked. I added some of the flowers to one of the cups...yes they make cute flower pots too! I used some of the ribbon border punch for a ledge and finished off with a cup of thanks sentiment. 

So did you like this sweet tea cup of a card? 

Thanks for stopping by, 

Happy Stampin',

Amanda x

Tuesday, 8 May 2012

tea anyone?

Another new set in the mini catalogue is called Tea Shoppe. Yep, you guessed it, its choc full of gorgeous vintage tea cups! 

Today's card is a CASE of a card my friend Vicky made. I haven't really changed it much just added a flower and pearl to one of my teacups. 


Suit me to a Tea

Stamp Set: Tea Shoppe
Ink: Marina Mist, Sahara Sand, Pretty in Pink
Cardstock: Whisper White, Marina Mist, Pretty in Pink
Punch: Dotted Scallop Ribbon Border, itty bitty
Accessories: Pearls

This stamp is three cups in a row so I used the markers to colour in the tea cups different colours and then stamped them close to the bottom of the card. I punched the dotted scallop ribbon border punch and then sliced it in halp for an even thinner and more delicate strip. . I stamped the sentiment below, punched a flower and added a pearl to the centre. I just wanted to show you that  a card doesn't have to have every inch of the card covered in patterned paper, stamps, ribbon and accessories. Sometimes clean and simple cards are just as beautiful! 

Hope you liked this super quick and simple card! 

Happy Craftin',

Amanda xx

Saturday, 28 April 2012

simply stampin' challenge week 57

Hi there everyone! Well I've had a rubish cold this week and therefore just about managed to do the housework nd general bits and bobs that I NEED to do so no energy for blogging this week. Sorry, I do have mountains of stuff to show you all, honestly!
Anyway its Simply Stampin' time again. This week's challenge is a theme, which is...

Perfect Pairs

I've got to say when I sat down pretty late on Thursday night to try and put something together, I was really NOT at all inspired! I didn't know what I was going to do, so I hope you like what I ended up with.


Me & You Hearts

Stamp Set: I {heart} Hearts, Tea Shoppe
Ink: Real Red, Regal Rose
Cardstock: Whisper White, Real Red
Punch: Dotted Scallop Ribbon Border
Accessories: Real Red Button
Thread: Whisper White Baker's Twine

So as I said, I wasn't inspired but I had the Tea Shoppe set out (in the new Summer mini releases May 1st!) and I saw the stamp set that says tea for two, me and you and I thought the me and you kind of links in with the pairs - thought it would make a cute anniversary card. So I stamped that portion on the stamp and cut it out, stamped a few hearts and assembled. I added a little bit of the scallop dot border punch to just fill in the area a bit and "ground" the hearts a tad. Finally I chopped off some of the bottom of the card and added a button. 

Hope you like this and it fits in with the theme enough. I know its a pretty loose interpretation of the theme!  Look forward to reading your comments! Thanks for stopping by,

Amanda xx

Saturday, 4 February 2012

simply stampin' challenge week 45

We are back on a theme challenge this week at the Simply Stampin' Challenge blog. And the theme this time is Heartfelt - just in time for Valentine's day. Aww, sweet!

So for this week's creation, here is one of the cards that you can at my card club on Monday night!


Friend Valentine

Stamp Set: I {Heart} Hearts, Teen Tiny Wishes
Ink: Baja Breeze, Certainly Celery, Perfect Plum
Cardstock: Very Vanilla, Baja Breeze, Certainly Celery
Punch: Dotted Scallop Ribbon Border
Accessories: Linen Thread, Basic Pearls

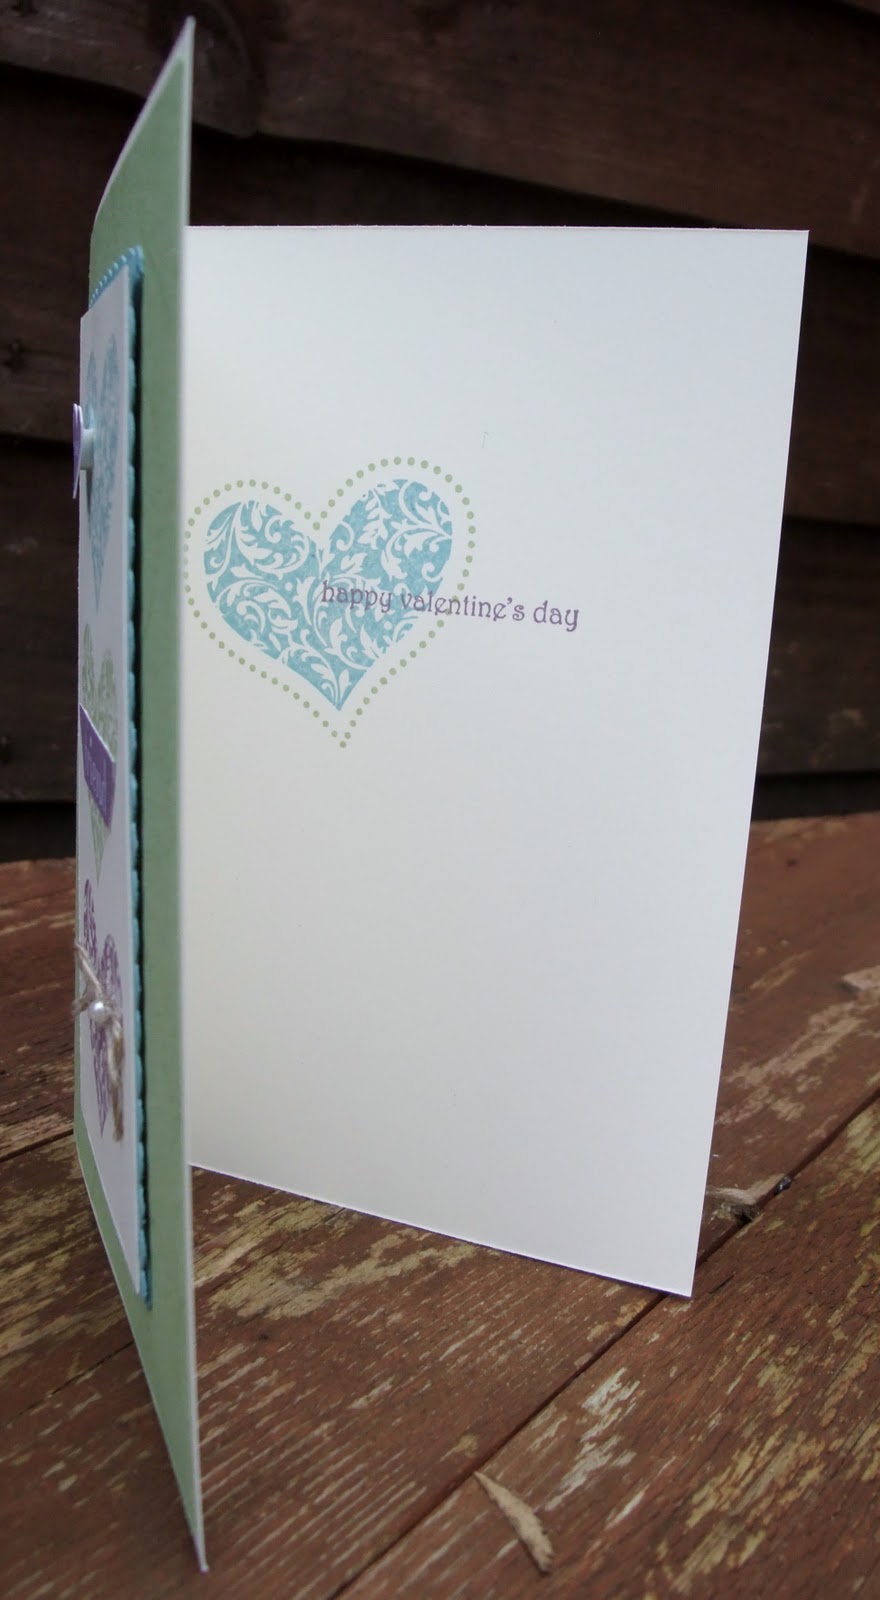
I stamped the flourish heart in Baja Breeze, Certainly Celery and Perfect Plum in a line on Vanilla cardstock. I stamped the LOVE heart in Perfect Plum and used a dimensional to adhere it to the Baja Breeze heart. For the middle heart I stamped the Friend heart and cut out the middle section and adhered that to the centre of the Certainly Celery flourish heart. The bottom heart has a small linen thread bow and a pearl on it. I framed this piece of Vanilla cardstock with the Dotted Scallop Ribbon border punch. I stamped the dotted heart all over the background in Certainly Celery ink on Certainly Celery cardstock for a tone on tone effect. Usually I don't stamp the inside of my cards but this time I decided to - at a slight angle, I stamped the dotted heart in Certainly Celery and then flourish heart inside the dotted one in Baja Breeze. I then stamped Happy Valentine's Day in Perfect Plum to finish off!

So, if you would like to make this card and 4 other gorgeous cards why not come along on Monday evening, from 7:30 - 9:30 to make them with some other lovely ladies. Complete with tea and cake! Cost is £7.50.

Now head over to the Simply Stampin' Challenge blog to see the other design team creations and then enter your own! I can't wait to see what you make!

Thanks for stopping by,

Happy Crafting,

Amanda xx