Showing posts with label linen thread. Show all posts

Tuesday, 16 June 2020

Greenery Embossing


Hi! 

I hope you are well. We had a terrific thunder storm last night! Thankfully my partner was able to rescue the rabbit before it began to bucket with rain! 

Today I thought I'd share with you a couple of inspiration cards that I shared with my ladies using the embossing folders included in their packs. The Greenery mini embossing folders come as a pack of 2 - the first is these little rows of leaves and the other is more organic leaves and berries. They will emboss card up to 8cm x 15cm, so not quite a full card front but certainly enough to layer on top. 


Stamp Set: Well Said
Cardstock: Soft Sea Foam, Just Jade
Ink: Just Jade
DSP: Forever Greenery
Embossing Folders: Greenery
Accessories: Champagne Rhinestones

I originally had intended to have the embossed and layered of the background with the sentiment layered up on top - for something really simple, and I still think it could work like that. However, when I came to laying everything out I began to play with adding a few of the spare leaves I had fussy cut from the DSP and instantly loved it! So, that's exactly what I did, I layered the leaves under the sentiment and finished the whole thing off with a champagne rhinestone. I am so in love with these rhinestones - they add just the right amount of sparkle without being over the top bling-y! 


Stamp Set: Good Greetings
Cardstock: Whisper White, Soft Sea Foam, Garden Green 
Ink: Garden Green
DSP: Forever Greenery
Embossing Folders: Greenery 
Accessories: Linen Thread, Champagne Rhinestones

Before I'd even got my hands on the DSP I had this idea that it had potential for making some Christmas cards! I hope you will forgive me for mentioning the "C" word so early. 

I chose here to only use a matt that showed on the two vertical sides - just playing around with doing something different.  I stuck one of my remaining fussy cut leaves onto a piece of Whisper White and added a linen thread bow and some champagne rhinestones. 

Anyhow, I thought I'd just show the versatility of the paper and inspire you to look for the "C" word in things that aren't blatantly Christmas. 

We're having another thunderstorm tonight, this time it was my time to rescue both the bunnies from torrential rain! 

Take care,


Monday, 15 June 2020

CAS Greenery Wreath


Hello! 

Happy Monday! It's the first day back to school for some of our Year 10 kids today. It seems to have gone really well and the kids have enjoyed it. 

I thought today I might share another of the cards I made using the Forever Greenery DSP for my class at the weekend. This one was a little more labour intensive that the previous too but has absolutely beautiful effects!  


Stamp Set: Well Said
Ink: Shaded Spruce
Cardstock: Whisper White
DSP: Forever Greenery
Die: Circles
Accessories: Linen Thread, Champagne Rhinestones

If you've followed this blog from way back you know I'm a CAS (clean and simple) card girl at heart and I think this one is just that clean and simple. Having said that often the CAS cards are a bit more labour intensive and take longer. 

I got into my zen headspace and sat fussy cutting the leaves out if the pattern paper - you know I love a bit of fussy cutting - because I'm a bit nuts like that! I assembled the leaves around the circle die (roughly about 6cm diameter). I'd like to add that you can purchase dies that will cut out a lot of the leaves from the stamp set and the DSP for you but I haven't got them - I'm sure this card would have been a lot more straightforward with the dies! 

I stamped a sentiment in the bottom corner and added all the layers together with some dimensionals which adds a little height and shadow - I think that really adds to the CAS effect. 

Finally I added a linen thread bow and some champagne rhinestones to add some sparkle. 


I will admit this card turned out differently than I had initially intended it to. I had wanted to use the gold hoops and trim that co-ordinated with the Forever Greenery bundle, unfortunately it was on back order and would arrive in time for the class. With this in mind I had to switch it up a bit - still think this turned out gorgeous! 

The weather is gorgeous today - really warm and sunny! Have a wonderful afternoon! 


Wednesday, 25 June 2014

Language of Love Florals

Hey! 

As promised, I'm back today with some details for card I shared yesterday plus another one too! 

Both these cards are using the Language of Love stamp set. Neither are at all romancey - yes I wanted to get more use out of this cute stamp set. You can still order this set which is in the Spring/Summer catalogue until the end of the month. 


Stamp Set: Language of Love, Happy Day
Ink: Pool Party, Calypso Coral, Pear Pizzazz
Cardstock: Whisper White, Pool Party, Calypso Coral, Pear Pizzazz, Silver Glimmer Paper
Punch: Bird Builder, Small Heart, Owl Builder
Embellishments: Linen Thread, Subtles Buttons

Here I used the sweet little small hearts to make some sweet flowers. I love the patterns on then and look great. I decided I wanted the leaves to have some texture to match the flowers so I used the spotty banner and punched after. I know the banner isn't quite large enough to cover the whole branch but it doesn't look too bad. 

Buttons, a little linen thread bow and glimmer heart are cute finishing touches for this clean and fresh card! 


Stamp Set: Language of Love, Happy Day
Ink: Pool Party, Calypso Coral, Pear Pizzazz
Cardstock: Whisper White, Calypso Coral, Pear Pizzazz, Silver Glimmer Paper
Punch: Bird Builder, Pansy, Fancy Flower, Owl Builder
Embellishments: Linen Thread, Subtles Buttons

Yes this is quite similar to the other card, same colour scheme, but just using one larger flower. I used the love text heart to make my own pattern paper by nesting the heart together a couple times then punching in the centre. If there's a little overlap, it doesn't matter all that much as the button can cover it. See the image below.


The fancy flower punch is retiring at the end of this month so get in quick if you want it before it's gone for good! Doesn't it layer beautifully with the pansy punch?!

I used the wing from the bird builder to make the leaves. Again button, linen thread bow and a glitery heart are sweet finishing touches.

Hope you're having a great day. 

Happy Stampin',

Wednesday, 19 February 2014

Sketched Watercolor

Hiya!

How is your week going? Mine is so, so. Not getting as much accomplished as I'd hoped for, oh well. Some weeks are just like that thought, right? 

Jobs are slowly getting done around here though... I did get my sewing machine into the shop. Its still under warranty so hopefully that means it'll be a free service which I'm hoping that will sort the problems I'm having, if not, my sewing machine guy should be able to work it out. Going to take around 2 weeks though! Boo! :(

One thing I am very excited about is a return of the Great British Sewing Bee!! Anyone else on my side of the pond watching it? Got a favourite yet? I'm undecided although I think Heather seems quite sweet! 


Stamp Set: Simply Sketched
Ink: Black Stazon, Island Indigo, Gumball Green, Raspberry Ripple, Soft Sky, Baked Brown Sugar
Cardstock: Soft Suede, Baked Brown Sugar, Gumball Green, Very Vanilla, Watercolor Paper
Big Shot: Woodgrain TIEF
Embellishments: Naturals Buttons, Linen Thread

This little stamp sets is a hostess set available in the current Annual Catalogue. Its so cute and perfect for a spot of watercoloring! Here I stamped the little bird stamp and then made a mask out of some printer paper and a bit of temporary adhesive. with the mask in place I then stamped all the leaves and berries around it, transforming a sweet little stamp into a pretty little scene. 

I used the super handy aqua painters which have a well that holds water - totally love them! 


I decided to do a bit of a torn edge - its a bit different and rustic which seems to match in with the card well. The background is woodgrain embossed pattern just for a bit of interest. 

I decided that something else was missing so after a bit of contemplation I added some linen thread and a gorgeous little naturals button which seemed to finish it off perfectly!

Thanks for stopping by,

Happy Stampin',

Sunday, 9 February 2014

Simple Sunday - Triangle

Hi! 

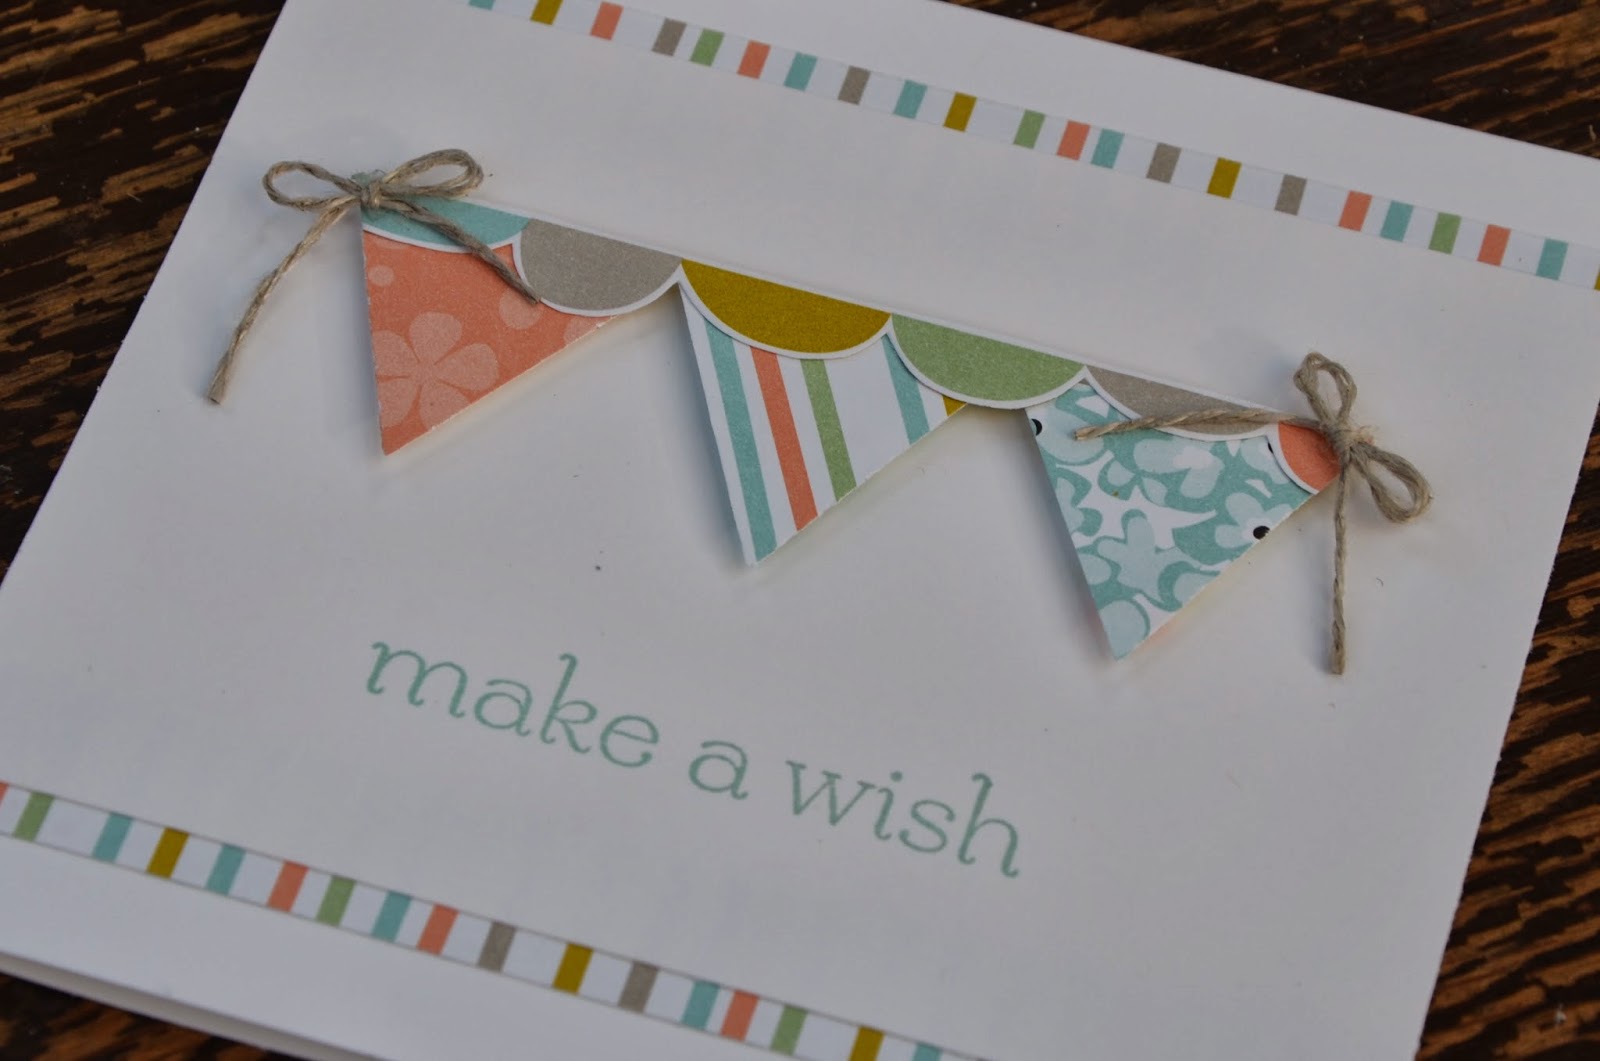
Its Sunday today so I have another Simple Sunday for you. Today's creation was inspired by this super cute and simple card my cousin sent me a photo of. This is one of her first ever cards - isn't it just adorable?!


I just loved the pennant bunting and that inspired me to make a few simple variations of my own. Plus this selection would be great for a beginner. I've worked out that you can get a pack of whisper white cardstock, triangle punch, linen thread, an ink pad and a simple sentiment set (the one I've used here is Sweet Essentials but if you wanted a really basic one, I'd suggest Four You) for just over £45 and then you'll get the gorgeous Sweet Sorbet designer paper for FREE during Sale-A-Bration.


Stamp Set: Sweet Sorbet
Ink: Pool Party
Cardstock: Whisper White
DSP: Sweet Sorbet
Punch: Triangle
Embellishments: Linen Thread


And now here's a few stepped up variations using all the same materials...


Just don't punch the entire punch for a smaller triangle, layer them up for a fuller bunting look. 
The tiny pinked trim along the bottom is also made with the triangle punch.


This scallop trim was one of the patterns in the Sweet Sorbet pattern paper which I just carefully cut out a section of and added to the top edge of the bunting. 


If you don't want bunting and pennants why not use a whole host of patterns and create this fun interlocking border strip? Fun huh?


Hope you enjoyed all these easy creative ideas! 

Don't forget you can get the Sweet Sorbet paper for FREE when you buy everything else you need to make these sweet cards during Sale-A-Bration. Visit my shop now to buy your pieces and get them delivered directly to your door!

Have a great day! 

Happy Stampin',

Saturday, 8 February 2014

All Stitched Up!

Hi there! 

I have been having such a lovely weekend! I had a lovely time at Card Club last night with my ladies (had a few new ones too which is always very exciting!!) This morning was quite chilled out, did a little crafting followed by brunch with my darling. We had waffles, blueberries (for me), maple syrup, bacon and eggs (for him) plus oj of course - it was a true feast! Yum yum! Next was a catch up with an old friend from university. It was so great to see Rachel again, hopefully now we'll stay in touch a bit more! 

This afternoon I caught up on a bit of Winter Olympics - watched the opening ceremony (I like all the random facts that the commentator comes out with)! What I love about the Winter Olympics is that it just seems a bit more "normal" - you get a few crazies and amusing people taking part with just makes it that more enjoyable! Here's a few of my highlights from the opening ceremony 
- the Pakistani who learnt to ski on a pair of wooden skis made by his uncle
- a Jamaican bobsleigh team (always going to get a smile!)
- world famous solo violinist Vanessa May competing for Thailand in the Alpine Skiing 
- Prince Hubertus von Hohenlohe of Mexico - competing in the Alpine Skiing in a mariachi ski outfit!!!
-and finally some pretty interesting country outfits, the top three that got my attention have to be the Russians (a wierd cross between Narnia and Santa outfits!?!), USA (The sweatshirts were a wierd cross between cute patchwork and a bad Christmas jumper), but first place for wierd totally goes to the Germans (I can only describe their outfits as something a unicorn has vomited rainbows over). 

I shall try not to bore you too much in the coming weeks with olympics news - my favourites are figure skating and curling. A new interesting one is totally the slug style snow boarding - pretty amazing the height and turns they get in their jumps!! Are you watching any Olympics? What's your favourite?

Anyway, on to to the card I've got for you, its a sketch from Freshly Made Sketches this week. 


Stamp Set: You're Lovely, Fabulous Phrases
Ink: Versamark
Cardstock: Crumb Cake, Gold Foil, Gold Foil Vellum, Vellum
Accessories: Pearls, Linen Thread
Other: Gold Embossing Powder, Essentials Pierce Pack, Needle

This is one of those, morning waking ideas. I've been wanting to use the pierce pack for hand sewing on a card for ages and this idea just came to me one morning. 


I was so excited to see how well the cross stitching turned out! Isn't it cute?! I thought the tone on tone linen thread and crumb cake needed something else with a similar tone. I wasn't sure a bright colour would have worked, but I still wanted something with a little "wow" factor so opted for the gorgeous gold foil vellum, gold embossing and gold foil cardstock! I have really come round to the gold look which is just SO in fashion at the moment!

Thanks so much for stopping by,

Happy Stampin',

Friday, 31 January 2014

So Thankful PP180

Hey there!

Its Friday!!! How exciting! My bestie, Kathryn and her little boy Euan are coming over this afternoon! It was before Christmas, last time I saw them and she's about to have another baby any day now! Looking forward to a good catch up with both of them. Next time I see her, she'll really have her hands full with two little ones! I can't wait to meet the new little one, but baby, please don't start coming until after today? Thank you!

I've got cute Paper Player's Challenge entry to show you today. Its a sketch this week, and an interesting sketch it was!


I debated for quite a while about what to do with this and then I had a flash of inspiration! Here's how it finished up...


Stamp Set: So Very Grateful
Ink: Black Stazon, Perfect Plum, Island Indigo, Gumball Green, Crushed Curry
Cardstock: Crumb Cake, Very Vanilla, Perfect Plum, Window Sheet
Big Shot: Chalk Talk Framelits, Apothecary Accents Framelits
Embellishments: Island Indigo Chevron Ribbon, Linen Thread
Extra: Blender Pens

So the front is actually a clear window so you can see the pull out card inside. When the card is removed there's a further sentiment behind that! I thought this would work well as the set I wanted to use had 3 sentiments that seemed to work really well as a trio, how do you put a trio of sentiments on a card though without it looking hugely wordy?!


I was showing this card to Stuart and he was like, "oh that's cool, is the pull out piece a bookmark?"... What a wonderful idea! Now you can send a beautiful thank you to a friend AND it includes a thank you gift! Loved that suggestion.

I seem to be really into the blender pen/watercolor look at the moment but don't those flowers look lovely all coloured in like that!?


The fancy edge was cut using just the very end of one of the Apothecary Accents framelit, and the hole is cut with one of those little tag hole framelits that came in the Chalk Talk framelits...I've never had a use for them but they worked out perfectly here! 


I also did a little doctoring on my ribbon - its the chrevron ribbon cut down the centre and then sealed along the cut edge with a lighter so it doesn't fray! Love the effect and the look of the thinner ribbon. Totally going to do that again!


Anyhow, hope you enjoyed this special card.

Happy Stampin',

Tuesday, 28 January 2014

Sale-A-Bration Time!!

Hi!

I am SO excited! Excited enough to be treating you to TWO posts and two fun projects!
Today is the beginning of Sale-A-Bration! The biggest and best promotion of the year, and with a 20 page brochure packed, and I mean PACKED, with free products for you to earn for FREE, you're sure to find something to love!!

This year's SAB exclusive collection just blew me away, there are so many gorgeous things the only problem is choosing which one to get!

You can earn the free and exclusive products - stamp sets, designer paper, accessories, punch, embossing folder, home decor kit or mds packages - each time you spend £45 between January 28th and March 31st!!

Check out the Sale-A-Bration brochure now!!

Just incase a fabulous brochure of free Stampin' Up goodies wasn't enough, its also the launch of the Spring/Summer seasonal catalougue today. It likewise is just beutiful, why not take a few minutes, put your feet up with a cuppa and have a browse through both catalogues?

Check out the Spring/Summer catalogue now!!

When you've compiled your wishlist why not head over to my online shop and treat yourself to a few goodies and choose a free SAB item while you're at it? Everything will arrive direct to your door in just a few days so you can begin playing right away! 

Alternatively, you can really get the party going by hosting a party of your own - you'll get TONS of free stuff just for inviting friends and family over for a relaxed and fun time crafting and nattering! Contact me today for more info or to book your party!

So, let's celebrate today with a bright and fun card, shall we?!


Stamp Set: Banner Blast (SAB), Geometrical
Ink: Bermuda Bay, Old Olive, Pumpkin Pie, Rich Razzleberry, Daffodil Delight
Cardstock: Whisper White, Bermuda Bay
Punch: Banner (SAB)
Embellishments: Linen Thread

This super fun and bright card would be just perfect for anyone's birthday! Its also totally flat (the linen thread ties so tightly there's no bulk) and lightweight so its perfect for popping in the post without costing you a small fortune! 

Now you could totally do this card without the punch, just use the stampin-ma-jig to get everything lined up just the way you'd like it. I chose to stamp and punch so I could move everything around and switch up colour and patterns until I was happy.


I really love the little banner detail along the bottom edge - its another different way to use the banner and just filled that dead space I had kicking around perfectly! 

Have fun browsing and shopping,

Happy Stampin',

Thursday, 13 December 2012

winter fun!

Sorry for being AWOL once again! Its that time of year where everyone is busy and when I do get a spare moment, blogging is not what first pops into my head, but now that I sit here I am thinking my life is pretty sweet right now... 

Its cold and frosty outside, bit I am inside with the nice hot fire, I'm sitting next to our Christmas tree, in a very Christmassy house. There are a gazillion homemade cookies in boxes in the kitchen waiting to be bagged up, tied and tagged for gifts. We made an awesome gingerbread house too!! Oh I definately have that Christmassy feeling going on! Love it! 

To go with that Christmassy feeling, I have a couple of Christmassy cards for you! 


Winter Skating and Tubing

Stamp Set: Winter Wonderland, Curly Cute 
Ink: Basic Black, Raspberry Ripple, Lucky Limeade, Island Indigo, Summer Starfruit, Pretty in Pink, Pool Party, Crumb Cake,  Blush Blossom
Cardstock: Pool Party, Lucky Limeade
Punch: 1 3/4" Circle
Extras: Silver Dazzling Details 

I used the blender pen to colour in the little kids, everything was assembled and the final thing to do is line the circle punches with a thin line of silver dazzling details! 

Seeing as I've been absent for a while, I thought I'd give you a bonus card today. 


Winter Wonderland Ornaments

Stamp Set: Winter Wonderland, Curly Cute 
Ink: Basic Black, Raspberry Ripple, Gumball Green, Summer Starfruit, Pumpkin Pie, Pretty in Pink, Soft Suede, Lucky Limeade, Blush Blossom Island Indigo
Carstock: Whisper White, Soft Suede, Gumball Green Core'dinations
Bis Shot: Perfect Polka Dots Emboss, Holiday Ornaments Framelits 
Extras: Linen Thread, Dazzling Details 

I just LOVE this card! The "snowglobe" ornaments are adorable aren't they?! I coloured them with the blender pen again for that watercolour look. I used dazzling diamonds because I wanted that thick glittery look but dazzling diamonds would work well too. 
The Gumball Green cardstock is a lighter shade underneath so once embossed I sanded the paper to reveal the pretty colour below! 

I hope you enjoyed a couple Winter Wonderland creations today. If you want any last minute gifts for Christmas you have until the end of today to get your order to me and I will tag it on to the last order before Christmas!! 

Happy crafting! 

Amanda xx

Tuesday, 23 October 2012

flurries of snow are coming!

Just a quick and fun Christmas card for you today! This is another one that would be great for mass producing and relatively inexpensive too! 


Christmas Snowflake

Stamp Set: For My Family
Ink: Gumball Green, Crumb Cake
Cardstock: Crumb Cake, Gunball Green, Very Vanilla
DSP: Be of Good Cheer
Big Shot: Snow Flurry
Punch: Boho Blossoms 
Accessories: Linen Thread

 The snowflake was cut with the gorgeous new big shot die and then sponged a little with crumb cake ink to soften it a little. I added a couple of the flowers from the boho blossoms to the centre of the snowflake to fill it out a little more - without using a button or anything bulky! I added some DSP to the card, wrapped some linen thread around it and a sentiment too. 

What I love most about this card is that its super flat so is excellent for posting!! If you did want to jazz it up a bit more you could definately add a button or brad to the card. Or for a post frindly version with a little more sparkle try spritzing with some shimmer mist or adding dazzling details!

Hope you enjoyed this snowy card - did you know we might be getting a little snow this weekend?! I like snow but I'm not ready!! Its far far too early to be donning chunky winter coats, hats, scarves, gloves etc. Ugh, I am so not a winter person! 

Happy Stampin',

Amanda xx


Friday, 1 June 2012

on your bike!

Hi there folks! 

Sorry for not blogging much this week, I haven't really go any excuse, it just slipped my mind and whenever I did think about it, it just wasn't a good moment! 

Anyway I hope you've all had a good week? Everyone ready for the long Jubilee weekend? I hope you're all going to do something fun with these extra holiday days! I'm going to a BBQ Street Party hosted by my old church. There's a cake competition, I'm so very tempted to enter...

Right, enough of my blabbering, here's a cute card for you to brighten your day! 


Vintage Bike Friend

Stamp Set: Pedal Presents(Hostess), Teeny Tiny Wishes
Ink: Basic Black, Real Red, Crumb Cake, Sahara Sand, Basic Grey, Peach Parfait, Regal Rose, Perfect Plum, So Saffron, Pear Pizzazz
Cardstock: Crumb Cake, Whisper White
DSP: First Edition Speciality 
Punch: Scallop Edge
Accessories: Linen Thread

I coloured in the bike and accessories in using a blender pen and then using the paper piercer and mat pack i pierced a line of holes along the top and bottom of the whisper white cardstock. I added some scallop trim strips of First Edition dsp for the vintage look and adhered everything to a Crumb Cake base with some linen thread around it too! 

I just love this hostess set. The bike is really lovely and I like that it comes with lots of fun things to fill the basket with! Such a fun and different stamp set to have so if you'd like to get this set yourself why not host a party and earn this set for free?! 

Why not leave me a comment and let me know what you think. What are you doing this weekend for the Jubilee?!

Happy Stampin',

Amanda xox


Saturday, 24 March 2012

simply stampin' challenge week 52

Its Saturday again and time for another Simply Stampin' Challenge. This week is a sketch! And here is what we had to work with...


And below is what I created with it! 


Birthday Car

Stamp Set: Need For Speed, Happiest Birthday Wishes (Hostess)
Ink: Pool Party, So Saffron, Sahara Sand, Certainly Celery, Pear Pizzazz, Lucky Limeade, Basic Black
Cardstock: Whisper White, Pool Party, Lucky Limeade
Punch: Corner Rounder, Scallop Edge
Ribbon: Pool Party Ruffled, Pear Pizzazz Stitched Poly, Linen Thread

I really didn't play around with this sketch too much - it was a simple one and it worked for me. I actually had lots of ideas but in the end I went with this car as it was floating around my craft room while I was doing my mammoth tidy this week, I really wanted to use it up before it got lost. 

I coloured in the stamped image and mounted it on some Pool Party cardstock. I then punched a scallop edge in Lucky Limeade and added it to the bottom, over the divide between the pool and limeade cardstock  I layered up some ribbon. Ribbon can be manly, right?! Well, that's what I was trying to go for anyway, let me know what you think! First ribbon layer was the Pool Party ruffled ribbon (I just wanted a thin layer of pool ruffled edge), then the Pear Pizzazz Stitched Poly Ribbon. Finally I tied a scrap of linen thread over the top. How lovely does this look? I'm so pleased with it. I popped the entire thing up in dimensionals and layered it on some Whisper White cardstock on a Pool Party card base. At the bottom I stamped the word  "birthday" - its part of a larger sentiment but I only chose to ink up the word birthday - this as mainly because I liked the font and the full sentiment was too large for the space I had. 

Now why don't you step over to the Simply Stampin' Challenge blog, check out what the other DT members have created for you and enter your own creation using this cute sketch! 

Thanks for popping by, please leave a comment, 

Happy Stampin',

Amanda x

Friday, 10 February 2012

Birthday Bunch

Sorry for the super poor quality of this photo - can't wait til its summer and its light for longer so I can photograph outside in the sunshine and warmth! 

Today's card was for my downline, Sue, co-incidentally also my auntie-in-law.


Birthday Bunch

Stamp Set: Everything Eleanor, Teeny Tiny Wishes
Ink: Crumb Cake, Wild Wasabi, Perfect Plum
Cardstock: Very Vanilla, Wild Wasabi, Perfect Plum
Punch: Scallop Circle, Corner Rounder
Accessories: Linen Thread

I wanted to just try and make a little bit of a different card using my favourite stamp set, Everything Eleanor! I cracked out the stem - not one I've felt inspired to use until now! So I stamped the stem twice and then using the scallop circle and cutting each petal almost to the centre wrapped them up tightly and adhered them to the Vanilla cardbase. I used the fancy frame down the side, stamping it 3 times without reinking for differing shades. Finally I stamped the sentiment in Perfect Plum and tied some linen thread around the stems. Hope you liked this little one.

Catch you tomorrow for another Simply Stampin' Challenge! 

Amanda xo

Tuesday, 7 February 2012

heart on a line

Last night was my first ever card club. I had 6 lovely ladies come and we all had a great time! In fact I have had such a good response to my card club that I have added another date for this month - this Friday (Feb 10th)! I have 4 ladies booked on already, if you would like to come along and make 5 great cards for £7.50, its not too late! Call me on 01604 949827 or email me on amanda_burditt@hotmail.co.uk to book you place! 

This is one of the cards that we made this month....


Heart on a Line

Stamp Set: Teeny Tiny Wishes, I {heart} Hearts
Ink: Pool Party, Wisteria Wonder
Cardstock: Whisper White, Pool Party, Wisteria Wonder
Punch: Cupcake Builder
Big Shot: Perfect Polka Dot Embossing Folder
Accessories: Linen Thread, Mini Clothes Peg
Extras: Sponges

So the edges of the cardstock were sponged lightly. The "clouds" are punched from the cupcake builder and run through the big shot for some texture. Linen thread was wrapped around the pool party cardstock and tied in a bow. Finally I stamped and cut out a heart and added it to the line with the mini clothes peg. Lastly I stamped a sentiment at the bottom in Wisteria. 

Hope you liked this cute little card - its very cheery!

Happy Stampin,

Amanda x


Saturday, 4 February 2012

simply stampin' challenge week 45

We are back on a theme challenge this week at the Simply Stampin' Challenge blog. And the theme this time is Heartfelt - just in time for Valentine's day. Aww, sweet!

So for this week's creation, here is one of the cards that you can at my card club on Monday night!


Friend Valentine

Stamp Set: I {Heart} Hearts, Teen Tiny Wishes
Ink: Baja Breeze, Certainly Celery, Perfect Plum
Cardstock: Very Vanilla, Baja Breeze, Certainly Celery
Punch: Dotted Scallop Ribbon Border
Accessories: Linen Thread, Basic Pearls

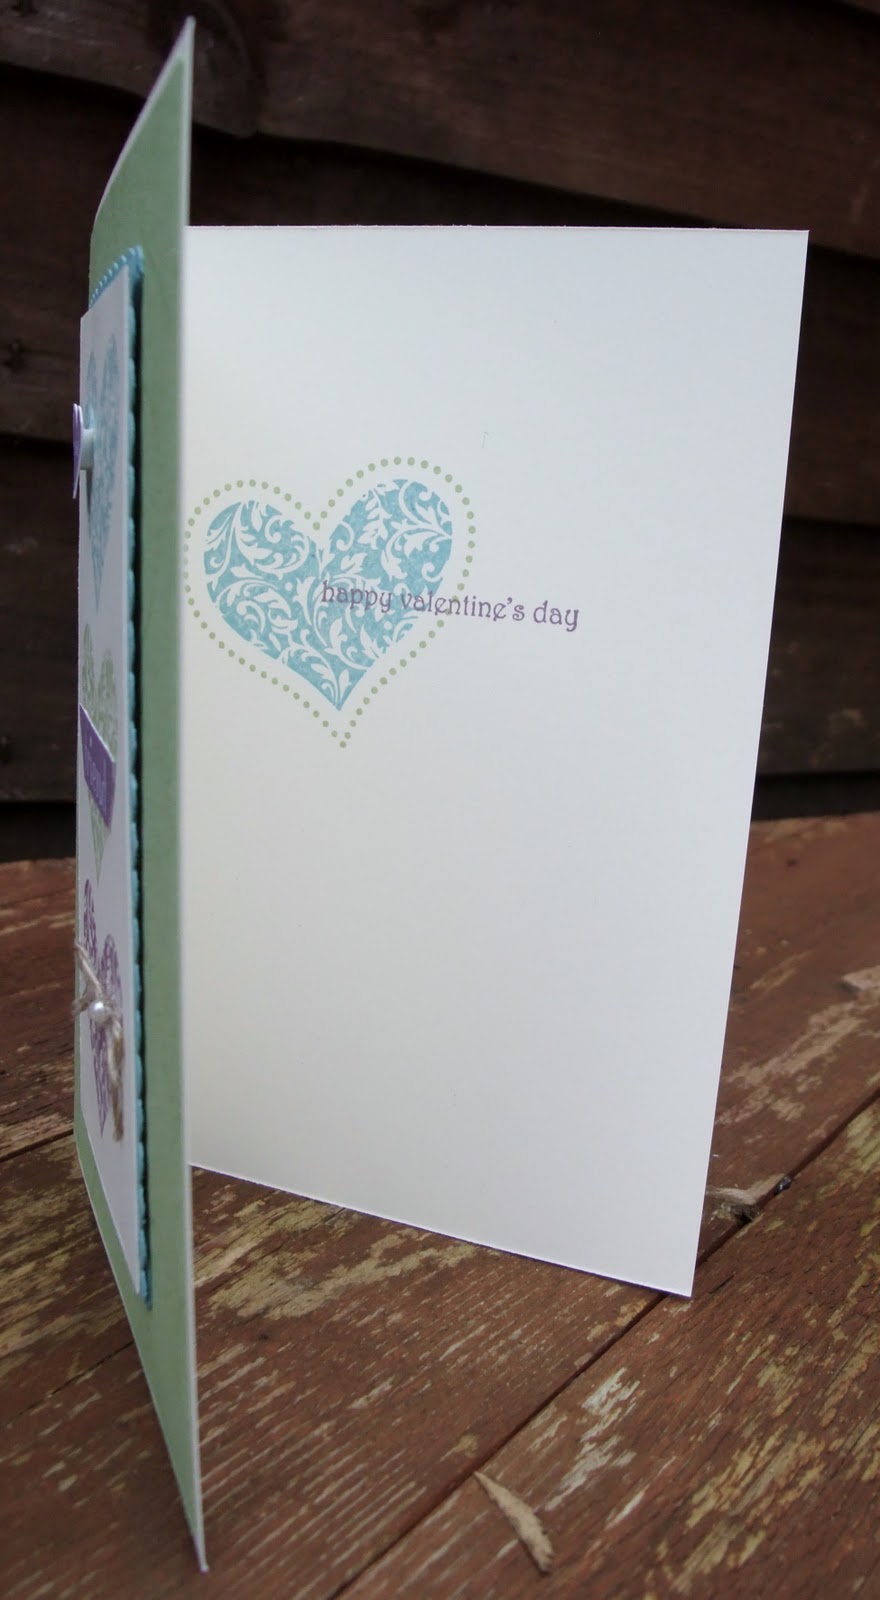
I stamped the flourish heart in Baja Breeze, Certainly Celery and Perfect Plum in a line on Vanilla cardstock. I stamped the LOVE heart in Perfect Plum and used a dimensional to adhere it to the Baja Breeze heart. For the middle heart I stamped the Friend heart and cut out the middle section and adhered that to the centre of the Certainly Celery flourish heart. The bottom heart has a small linen thread bow and a pearl on it. I framed this piece of Vanilla cardstock with the Dotted Scallop Ribbon border punch. I stamped the dotted heart all over the background in Certainly Celery ink on Certainly Celery cardstock for a tone on tone effect. Usually I don't stamp the inside of my cards but this time I decided to - at a slight angle, I stamped the dotted heart in Certainly Celery and then flourish heart inside the dotted one in Baja Breeze. I then stamped Happy Valentine's Day in Perfect Plum to finish off!

So, if you would like to make this card and 4 other gorgeous cards why not come along on Monday evening, from 7:30 - 9:30 to make them with some other lovely ladies. Complete with tea and cake! Cost is £7.50.

Now head over to the Simply Stampin' Challenge blog to see the other design team creations and then enter your own! I can't wait to see what you make!

Thanks for stopping by,

Happy Crafting,

Amanda xx

Thursday, 26 January 2012

yummy cupcakes!!

A quick creation showcasing the new Create A Cupcake stamp set and punch that is in the Sping mini at the moment.


Yummy Cupcakes

Stamp Set: Create A Cupcake
Ink: Soft Suede, Calypso Coral, Pear Pizzazz, Peach Parfait, Regal Rose, Chocolate Chip
Cardstock: Very Vanilla, Pear Pizzazz
Punch: Dotted Scallop Ribbon Border, Cupcake Builder
Big Shot: Polkadot embossing folder 
Accessories: Basic Rhinestones, Linen Thread
Extras: Red Permanent Marker 

I stamped the sentiment at the bottom of a piece of Very Vanilla cardstock and then ran it through the polkadot embossing folder. I used the stamps from the Create a Cupcake set and the Cupcake Builder punch to stamp and punch out all the pieces for my cupcakes. The co-ordinating punch makes using this stamp set such a breeze! I used the Dotted Scallop Ribbon border punch here too and tied some linen thread around the card. Finally I adhered the cupcakes together and added a rhinestone to the centre of the flower for a little glitz. 

TIP: You can colour in the Basic Rhinestones and Pearls with permanent markers to make them coloured! This is the perfect way to insure you will always have the size and colour rhinestone/pearl you are after!! 

Catch you again tomorrow! 

Amanda xx

Wednesday, 19 October 2011

gift bags with a difference

I was surfing the net one night a little while ago when I couldn't sleep and got into watching youtube videos, I find it quite theraputic watching others craft and often get some fab ideas. On this occasion and found this excellent tutorial for how to make a gift bag out of an envelope. Now, I'm stupid and didn't save a link to the video, I really wanted to share the link with you. This is such a fantastic idea - I'm always in need of gift bags for pressies and finding one that's the correct size is almost impossible and can end up being quite pricey!

Below are a few examples of Christmas themed gift bags in a variety of sizes (depending on envelope size) and also different closures! This was the make and take project we did at Sue's party last week.


Stamp Set: Season of Joy
Ink: Real Red, Old Olive
Cardstock: Whisper White Real Red
Accessories: Real Red Grosgrain
Extras: Crop-a-dile
Envelope: to fit A5 card


Stamp Set: Season of Joy
Ink: Crumb Cake, Rose Red
Cardsrtock: Crumb Cake, Rose Red
Accessories: Rose Red Seam Binding, Rhinestones, Linen Thread
Punch: 5 Petal, Boho Blossoms, Decorative Label
Extras: Crop-a-dile
Envelope: to fit A4 letter


Stamp Set: Season of Joy
Ink: Marina Mist, Night of Navy
Punch: Eyelet Border
Accessories: Rhinestone Brads, Linen Thread
Extras: Crop-a-dile, Paper Piercer, Mat Pack
Envelope: to fit square card


Stamp Set: Season of Joy
Ink: Daffodil Delight, Early Espresso
Cardstock: Whisper White, Daffodil Delight
Punch: Decorative Label
Accessories: Rhinestone Brad
Extras: Crop-a-dile, Paper Piercer, Mat Pack
Envelope: to fit A6 size card

I hope you liked today's share! They're so easy to make, have a go today!! 

Hugs,

Amanda x