Wednesday, 13 April 2011

oh baby!

Everyone seems to be popping out babies at the moment, and I realised that I don't really have any baby cards, so I thought it was about time to put that right and use the way cute baby pram from the Fun and Fast Notes set! 


Happy New Baby

Stamp Set: Fun & Fast Notes
Cardstock: Very Vanilla, Early Espresso, Marina Mist
Ink: Early Espresso, Marina Mist 
Extras: Crystal Effects, Dimensionals, Blender Pen

I stamped the image, coloured in the wheels with a blender pen, paper pieced the carriage in marina mist using dimensionals to add a bit of depth to the image and after adhering it all together to the background, added some crystal effects just to jazz up the wheels a little bit more! Its such a simple but very cute baby card 

Side Note: This is a quick one too so good for those last minute rushes when you suddenly realise you need a card and don't have one! The time it would take to make think is probably shorter than the amount of time it would take going to a shop and picking one out! And if I do say myself, much nicer!)


I also did a girly version using Pink Pirouette cardstock and Pretty in Pink ink! 

Hope you enjoyed today's creation and please do leave a comment! 

Amanda x

Tuesday, 12 April 2011

two for tuesday

As I said, I have a fair few projects and cards I've done recently and now I'm slowly adding them so you can see...I figure if I spread them out more you'll be able to appreciate them more! :) Today's two both use the Bliss stamp set which is no longer available but was a Sale-A-Bration stamp set a few months ago!


Thanks 

Stamp Set: Bliss (SAB)
Cardstock: Crumb Cake, Early Espresso, Very Vanilla
Ink: Pacific Point, Rich Razzleberry, Pumpkin Pie, Old Olive, Riding Hood Red, Crumb Cake
Extras: 1" Circle Punch, Sponge, Brown Pen (would have used early espresso pen if I had one!), Dimensionals

I simply stamped the flower image from the Bliss set in a variety of colours and then punched them out with the 1" circle punch. To make them blend in more with the background I sponged them all with Crumb Cake Ink and adhered them with dimensionals to a neutral Crumb Cake background! I hand wrote "thanks" underneath the flowers.


Fluttering Butterflies
Stamp Set: Bliss (SAB)
Cardstock: Crumb Cake, Early Espresso, Very Vanilla
Ink: Early Espresso, Elegant Eggplant
Acessories: Basic Rhinestones
Extras: Tombo Mono Multi Glue

A very simple but elegant card, and as it has no sentiment it is very versatile as to what it can be used for! Loving the cute fluttering wings of the butterflies!

(As you can see from both my cards today, I have been indulging myself in my current favourite colour...Crumb Cake!)

I hope you enjoyed today's shares! Please leave a comment, they make my day! Hope you are all having a very blessed Tuesday! 

Amanda 

Monday, 11 April 2011

let's rock and roll!

It's been a little while since I added some cards that weren't challenges...I've been busy making and have now got lots to upload! Today I would like to share my experimentation with the rock and roll technique!


Thinking of You

Stamp Set: Silhouette Sentiment, Punch Potpourri 
Cardstock: Very Vanilla, Certainly Celery, Old Olive
Ink: Dafodil Delight, Pumpkin Pie, Old Olive
Extras: Staples, Dimensionals

If you would like to see how to do a card like this, and have a go yourself, why not come along to my class in May when we will all be having a go at doing the Rock and Roll technique! Its really easy and fun....not to mention very cool looking! 


Tea Bag Holder

Stamp Set: Punch Potpourri, Bliss, Silhouette Sentiments
Cardstock: Early Espresso, Certainly Celery, Marina Mist DSP
Ink: Early Espresso, Certainly Celery, Old Olive
Accessories: 1/4" Whisper White Grosgrian Ribbon, Dazzling Diamonds Glitter
Extras: Sticky Strip, Tombo Mono Multi Glue, Dimensionals, Velcro, Eyelet Border Punch, 1" Circle Punch, 1 3/8" Circle Punch

Again, this is going to be a upcoming project in my classes, so keep your eyes peeled for the class featuring this project! Its totally gorgeous and makes a fantastic gift! 

Hope you enjoyed today's offerings, please do leave a comment, they make my day! 

Amanda x

Saturday, 9 April 2011

another successful workshop and a general update

Ok, so just to fill you in on the last few days, on Thursday I went over to another demonstrator's house in Northampton (because she found me on the demo finder and we thought it would be lovely to meet up and share some ideas with each other! and have some crafty play) It was so great to meet her and spend some time with another Stampin' Up! demo, that's the sad thing about having an upline that lives in Shetland! Anyway, Vicky was super lovely...and she let me play with her Big Shot!!! *Gasp* It is such a dream to use! I loved it so much and its so great all the materials you can run through it! It would be fab to cut out a load of different shapes that can then be layered on top of one another. I cut out a bunch of different little shapes so I can play at home, I intend to have a go next week and then I shall upload some photos of things I did! (Now, I cannot wait 'till my birthday in August to get my own Big Shot...but I shall be patient!)

Friday I had the day off, my friend Donna came over, I cooked a great Chinese feast - Spring Rolls, Vegetable & Noodle Stirfry, Chicken & Cashew Stirfry, Beef in Oyster Sauce, and Sweet and Sour Pork! It was SO yummy!! My hubby doesn't eat Chinese so I have to take advantage of times like these when I have friends over and just go all out...at least now I have lots of nice left overs to munch on! So we sat and ate our feast and watched Confessions of a Shopaholic...such a funny film! Unfortunately the only downside to yesterday was a rather sore throat and feeling a bit on the unwell side! 

Today I woke at the crazy early time of 7:30am after a bad nights sleep. My throat was worse, I felt awful and I had a workshop later today! I almost thought I wasn't going to make it! Thank goodness for Lemsips! I dosed myself up on Lemsip and made it to Ally's workshop! Despite my croaky voice and feeling under the weather, it went really well! I met some new people which was great (I hope I was sociable enough) and got to catch up with old friends and acquaintances! I'm so glad that my workshops are going so well, its so encouraging and I am really looking forward to running my classes soon! I already have one person signed up for my class on May 21st! It is so encouraging to see all the interest I am receiving at the moment! Thanks for everyone that has supported/supporting me in what I am doing at the moment! 

Please do get in touch if you would like to attend my class next month. 

Thanks again,

Amanda xoxo

simply stampin' challenge, week 2

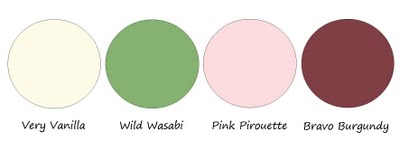
This week's Simply Stampin' Challenge is a colour challenge!


The colours are:


I have to start off by saying that I colour challenges have never really been my strong point, so I struggled a bit with this one! Not to mention that I didn't actually own anything Bravo Burgundy coloured so I just got myself an ink pad, I think I would have liked to use some Bravo Burgundy cardstock too if I had had some! I still think the card turned out ok though! So without further a do, here is this week's project! 


Bouquet

Stamp Set: Every Little Bit, Greenhouse Garden
Ink: Bravo Burgundy, Pink Pirouette
Cardstock: Very Vanilla, Pink Pirouette, Pink Pirouette & Wild Wasabi DSP
Accessories: Whisper White Grosgrain Ribbon
Extras: Sponge, Crystal Effects, Dimensionals

I used used heart and flower stamps from the every little bit stamp set on dsp with Bravo Burgundy ink and then cut them out. I used the stem from the Greenhouse Garden to stamp some stalks for my bouquet on the Very Vanilla cardstock and then layered up the hearts (for leaves) and flowers. I sponged the Whisper White ribbon with the Bravo Burgundy ink and then sponged the edges of the Very Vanilla cardstock with Bravo Burgundy too, just to add some more definition (very important when you have several very pale colours all working together!). I stamped the Pink Pirouette card base with the flower stamp in  Pink Pirouette ink for a tone on tone pattern. Finally I added crystal effects to the centre of the flowers in the bouquet just to add a little more interest! 

I hope you enjoyed this week's offering! Please leave a comment! I love reading them and its so nice to see your opinions! 

It has been so great to see so many of you play along with last week's challenge and I hope even more of you will play along this week...its so fun to see what you all create and how you interpret the challenge! 

Finally, please head on over to the simply stampin' challenge blog to see what the other lovely design team members have created and to enter in for your chance to win lovely goodies! 

Take care! 

Amanda xoxo

Tuesday, 5 April 2011

everyone gets to make a magnet!

As promised, here are the projects I demonstrated last night! 


Congratulations Hearts 

Stamp Set: En Francais, I {Heart} Hearts, Fun & Fast Notes
Cardstock: Crumb Cake, Riding Hood Red, Marina Mist
Ink: Versa Mark, Riding Hood Red, Pacific Point
Pastels: Marina Mist, Riding Hood Red, Pumpkin Pie
Accessories: Pumpkin Pie Button, Linen Thread
Extras: Clear Embossing Powder, Heat Tool, Cotton Balls, Sponge, Dimensionals, Glue Dot

In this first demo I really wanted to highlight the wonderful ways you can use the versa mark ink pad (something I don't think I could live without!). This also included embossing!
I stamped the En Francais background stamp with versa mark on the Crumb Cake cardstock and then used cotton balls to gently rub and blend Stampin' Pastels over it to give some gentle colour and bring out the writing! I then stamped the hearts with versa mark and covered them in clear embossing powder and heated with my heat tool. I used a sponge to rub some Pacific Point ink over the small LOVE heart to show the emboss resist technique. Finally, I adhered everything together, stamped the sentiment from Fun & Fast Notes and added a small button!


Get Well Flowers

Stamp Set: Greenhouse Garden, Fun & Fast Notes
Cardstock: Whisper White, Early Espresso, Old Olive, Crumb Cake, Marina Mist
Ink: Marina Mist, Early Espresso, Old Olive
Accessories: Basic Rhinestones, Whisper White Grosgrain Ribbon (dyed Marina Mist)
Extras: Paper Crimper, Sponge, Dimensionals, Glue Dots, Stamp-a-ma-jig, Modern Label Punch

With this demo, I wanted to show how to use a stamp-a-ma-jig as I think it is an amazing peice of kit and show how perfect it makes stamping and possitioning every single time! I also wanted to show how you can get more out of your ink pad by sponging! 

I used the stamp-a-ma-jig to stamp the medium flower from the Greenhouse Garden. Then I used the sponge to sponge Marina Mist ink around the edge of the Whisper White cardstock, I also dampened a piece of whisper white ribbon and sponged it on both size so it was Marina Mist in colour! A great way to get a piece of white ribbon to match any colour ink you have!! I love it! I layered up the cardstock and then stamped, punched and sponged the sentiment before adhering it to the bottom of the Whisper White cardstock, this just "grounds" the flowers so its not floating. finally I crimped the edge! 


Pie Thanks Magnet


Pie Magnet


Gumball Birthday Magnet


Gumball Magnet

Stamp Set: Every Little Bit, Fun & Fast Notes
Cardstock: Whisper White 
Ink: Basic Black, Pumpkin Pie, Real Red, Marina Mist, Pacific Point, Daffodil Delight, Old Olive
Accessories: Linen Thread
Extras: Bottle Cap, Magnet, small piece of tango can, Blender Pen, Crystal Effects, 1" Circle Punch, 1 3/8" Circle Punch, Dimensionals

If you want to see how to make this way cool magnet, come to my workshop next Friday!!! You get to make one yourself!! 

(CASEd from a swap I received at Coventry Training by Zoe Tant - thanks for the awesome idea!)

Hope you enjoyed seeing a bit from my latest workshops! Please do come along next Friday and bring a friend!! It would be great to see you there! 

Ta ta for now! 

Amanda xoxo

14 people...

It was a bit of a mission tonight at a workshop I did for my husband's aunt Deb, when I had 14 ladies to entertain and try to keep under control! They all seemed to have a great time, they loved watching the cards come together so quickly especially all the embossing I did, and the stamp-a-ma-jig was a hit too! They seemed really excited to make their own magnet...but by golly that was a mission to get everyone organised! I never expected so many to come! We had to do the make and take in two sessions...so it finished a lot later than was expected, but that was always going to be the case when you have that many all trying to do the same thing and needing help and advice along the way! I felt like I needed to be in six different places all at the same time! 


I only got one more booking, with another of Stu's aunts, but hopefully I'm getting some of the ladies hooked on crafty things! (especially ones that have never tried anything like this before! I totally understand that its a lot to take in at once!) I really do think its so nice to be able to come out for an evening and just relax, not have the worry of other things you should be doing, or kids nagging at you and just have fun being creative! And learning how simple it really is! So simple that ANYONE can do it!  


I'll post some photos of the cards and magnet I demonstrated tomorrow....its late now and I'm shattered! 


Also, a couple days ago I promised more on the builder wheel! Its been a massively busy weekend, much more so than I was expecting it to be, and haven't yet finished my entry. I will finish it tomorrow, take a photo of the card we made at training using the builder wheel and post that tomorrow too...two posts in one day, now that can't be a bad thing, can it!?


One last thing, if you're free and in the area, I am holding a workshop on Friday 15th April at 7:30 and all are welcome to come! There will even be a little extra something for anyone who attends as it is the week before Easter! Very exciting!! (I wonder if I am still entitled to an easter egg now I am a grown married woman?!) 


Take care, 


Catch you tomorrow,


Amanda xx