Wednesday, 13 January 2021

Ink Blending

 Happy New Year folks! (Albeit rather late)

I hope you all had as good a Christmas and New Year as could be considering the current circumstances. My parents, brother and his girlfriend came over to ours for Christmas day. I cooked a huge feast and we all had a really lovely time including a video call with the American family. Isn't it such a blessing to live in an age where we can see and speak with people on the other side of the world at the click of a button?

So, its now January and we are back in another lockdown. Things do seem pretty bleak at the moment but to cheer us up Stampin' Up have a new mini catalogue which launched on January 5th. It's also Sale-A-Bration during January and February which just means extra loveliness and freebies!! Woop woop! 

The new mini is full of gorgeous new stamps, dies, accessories and tools! One of my absolute favourite new tools is the blending brushes! Oh my goodness, these are AMAZING! I have spend the last few weeks ink blending practically everything I've made! This tool makes ink blending so super easy and transitioning between colours so seamless! 

I would suggest 1 blending brush per colour group - Blues, Greens, Yellows, Reds, Purples, Browns etc, as this will ensure each of your colours stays bright and fresh. 


Ink: Pacific Point, Gorgeous Grape, Memento Black
Cardstock: Basic Black, Whisper White
Punch: Story Label
Accessories: Black/Pool Party Baker's Twine (retired), Matte Black Dots
Tools: Blender Brushes

This card is pretty simple and really showcases the beautiful ink blending using the new blending brushes. Unlike sponges which can leave harsh marks, these brushes are made up of super soft bristles which gives a really soft, smooth finish. 

Apply the ink in a gentle circular motion overlapping the two colours in the centre of the card. The brush applies thin layers of ink which means it can be blended out very easily to either create an ombre effect or blended with other colours. Applying more layers of ink on top of one another will intensify the colour. Here I blended Pacific Point and Gorgeous Grape together over Whisper White cardstock. I love the additional colours created where these two colours overlap and blend.

After I had finished blending the colours I sprinkled water over the card, left it for a moment then used a tissue to soak up the excess water. This draws some of the colour back out of the cardstock and makes a lighter effect. 

I wrapped some of the retired black/pool party bakers twine I had around blended card and tied it into a bow. 

I stamped my greeting in black on a spare offcut of the blended background. I layered this on a black story label punch. I adhered this with a dimensionals over the twine just below the bow. 

To finish it off I added a spattering of the new matte black dots across the card. I just think these look lovely and have a way of tying everything together. 

I have enjoyed ink blending so much I can't wait to share this new technique with my lovely ladies that attend my virtual Craft Together sessions. This is one of the cards we will be making this month! 

Stay safe, 

Thursday, 25 June 2020

Hey Baby!


Hi! 

Woah hasn't the weather been HOT!? Yesterday amidst the heat I finished a big project that I've been working on for the last few weeks, I can't quite share it yet but its really cool and I had a lot of fun making it! 

Toda I have a really quick little new baby card I created for my friend Vicky who had a little boy a couple weeks ago. We got to know each other through my craft classes. 

I'm afraid the lighting isn't too great on this card, I was wanting to get it in the post with the gift and the light was fading at this point! I used mainly retired products, they're still some of my faves that I haven't been able to let go of! 


Stamp Set: Two by Two
Cardstock: Whisper White, Balmy Blue
Ink: Memento Tuxedo Black
Blends: Pool Party, Balmy Blue, Daffodil Delight, Pumpkin Pie, Basic Gray, Crumb Cake, Soft Suede, Highland Heather
Emboss: Decorative Dots
Dies: Circles

As I said above, most of this, besides the card and blends is all retired products. I stamped and cut out the Two by Two stamp onto some whisper white and coloured it in with the blends- totally my favourite way to colour at the moment! 

I embossed the background with the decorative dots embossing folder and then stuck everything together. It was as simple as that! 

Before I go I thought I might just share the sweet baby gift I made for them. (Vicky is penguin mad!)


Aren't these penguins just the cutest thing? I made it in fun rainbow colours and backed it with a super soft cuddly plush fleece. I had fun making it and hope that Vicky and her little babe get lots of fun and enjoyment out of it too! 

Have a great day, 

Wednesday, 24 June 2020

Forever Vines

Hello! 

It looks like the beautiful weather is back this week which is great! But with that the hayfever! 

I have a quick little card to share with you today, another one I made for the June Craft Together session. 


Stamp Set: Peaceful Moments
Ink: Shaded Spruce
Cardstock: Soft Sea Foam, Just Jade, Shaded Spruce
DSP: Forever Greenery
Emboss: Greenery Mini
Punch: Story Label
Accessories: Champagne Rhinestones

Isn't this watercolour leaf/vine DSP gorgeous? I love how it pairs with the vine embossing in the background. If you remember from previous posts I explained that the Greeney embossing folders were minis so they can only emboss a section up to 8cm wide. I knew that I couldn't emboss the whole card background so decided to use this as a design element in the card. I chose to line it up against the side so that there was a strip of plain card down the side and off set the story label punch with the greeting on it also. 

I think the layers work really well together in this card. 

I was actually going to post this on Monday but when I got home from work I fell asleep on the sofa and forgot, then, I'm not entirely sure what happened on Tuesday...oops! Better late than never though! Enjoy!

Have a great hump day, 

Sunday, 21 June 2020

Join Me: July Jar of Flowers Craft Together Session

Hello! 

What have you been up to this weekend? I have been super busy working on a few sewing projects and planning my inspiration cards for next month's craft together session. Incase anyone wants to join in I thought I'd share details of the session and such. I've tried to include a few options to try and suit all budgets.  

When? Sunday 12th July at 10am
Where? The comfort of your own home. 
How? You'll be invited to join a Facebook messenger group and the video session will run through this. 
Cost? There's a basic cost and then some add ons if you wish. See below. 
Book by? Sat 27th June. I'll be putting the order in for your goodies next weekend! 

Basic kit - Jar of Flowers stamp set and 6 sheets of 6"x6" Flowers for all Seasons DSP = £26
Add the Jar punch to the basic kit = £39
 Add 2 shaker jar domes = £1.20
Add 12 sheets coordinating cardstock (2x Magenta Madness, Cinnamon Cider, Bumble Bee, Just Jade, Misty Moonlight, Poppy Parade)


I have assumed that you have basic crafting supplies - paper cutter, scissors, acrylic blocks for stamping, sentiment stamps, white cardstock, adhesive, ink and colouring medium.

I have used the Stampin' Blends on a lot of my samples - I just love how beautifully they colour and blend but anything you have will work - blender pens, colour pencils, watercolor pencils, markers. 

If you need anything else ordering I'd be happy to add it to the order too! 

Just to finish off today I thought I'd share a tiny sampling of the cards I've been making with the products ready for the craft together session. I'd love to have you join us! 


Have a great week! 


Saturday, 20 June 2020

Greenery Scrap Buster


Hi again! 

Remember a few days ago I shared with you a couple of cards using the watercolour strips from the Forever Greenery DSP from the craft together session last weekend? Well, after making those two cards I was left with some short strips. I toyed with tossing them but I kept thinking that I could probably find a way to use them up - after all I seem to be on a scrap busting binge at the moment. 


Stamp Set: Well Said
Ink: Shaded Spruce
Cardstock: Pear Pizzazz, Whisper White
DSP: Forever Greenery
Accessories: Champagne Rhinestones

This is as simple as it looks, I stuck down the remaining scraps to a piece of Whisper White. I liked the jaunty angles and felt this added a bit more movement to the card. I added a sentiment and some rhinestones over the top. Such a simple card. 

Now if you like this but can't handle the idea of cutting out all the watercolour stripes, here's a second, even easier version!


Stamp Set: Well Said
Ink: Pretty Peacock
Cardstock: Pretty Peacock, Whisper White
DSP: Forever Greenery

Here's how the card looks just using the pattern paper as it is. Simple as that! 

I hope you enjoyed these really quick and easy cards. You could make this with pretty much any pattern paper but I think the stripes in this paper really works nicely. 

Hope you're having a great weekend.

Take care, 

Friday, 19 June 2020

Scrappy Stripes

Hello! 

Yesterday I shared with you a scrap busting weave design. Today I have another scrap buster! This one is perfect for even smaller scraps. I have two cards to show you, one using brights scraps and the other with subtles scraps!  You'll have to let me know which is your favourite! 


Stamp Set: Peaceful Moments
Ink: Bermuda Bay
Carstock: Whisper White, Flirty Flamingo, Granny Apple Green, Coastal Cabana, Daffodil Delight, Gorgeous Grape, Bermuda Bay, Melon Mambo, Pacific Point
Punch: Story Label
Accessories: Brights Candy Dots

This is really simple, I layered up all the little strippy scraps that I had onto a piece of white scrap card. I made it a bit wider than I thought I wanted it and then I was able to trim it down to the size I wanted it. I decided to indent the scrappy stripes with the white card down each side popped up with some dimensionals. I think this makes the card look very polished! 

I added a sentiment on the story label punch and as with yesterday's card, added some candy dots which needed using up. 


Stamp Set: Well Said
Ink: Highland Heather
Cardstock: Whisper White, Highland Heather, Pool Party, Pear Pizzazz, Blushing Bride, Soft Sea Foam, Petal Pink
Accessories: Pearls

As with the previous card, I added little strips of scrap to a piece of white card and then trimmed it down so that the edges looked more polished. I added it straight to the card base and added a sentiment on a thin scrap of white card. I finished the whole thing off with a scattering of pearls. 


Do you like this scrap busting idea? I hope you do! 

Thanks for stopping by,

Take care, 

Thursday, 18 June 2020

Scrap Busting!

Hey!

So yesterday I said I had some fun things on the way using up scraps. Today I'd like to share the first one with you! It also involves some weaving - my new favourite technique. 

This one uses up scraps from the brights collection so its incredibly bright and vibrant and super fun!


Stamp Set: Peaceful Moments
Ink: Bermuda Bay
Cardstock: Whisper White, Melon Mambo, Flirty Flamingo, Granny Apple Green, Bermuda Bay, Mango Melody, Coastal Cabana, Daffodil Delight, Gorgeous Grape
Punch: Story Label
Accessories: Brights Candy Dots (retired)

In sorting out my scraps I found lots of thin strips of card that I thought I could use for something but they gradually accumulate and I don't use them as much as I should, its always so much quicker and easier to cut up a new piece than wade through the scrap box for something that will fit. So, I used a few of these scraps as is, and some I cut much thinner so that I had different widths ranging from about 5mm up to 3cm. 

Once I had a bunch cut up I began to weave. Getting the first couple vertical and horizontal ones in place is the most difficult. After those are in place, the tension created is substantial enough to keep the strips in place as they were woven in. When I was happy with the placement - trying to vary the colours and strip widths so that it looked pretty random - I added tombow to the back of the strips and glued it down to a piece of Whisper White. I then went around all the edges gluing all the ends of the strips down. 

I matted it on some Bermuda Bay card and added it to a white card base. I thought a simple white label punch would be best for the sentiment - to try and act as a balance to the vibrant colours. I stamped in Bermuda Bay because I thought it would tie together the matting, weaving and sentiment layers quite nicely - I think that bit of consistency really works. What do you think?  

In the spirit of using up scraps, I found some candy dots that have been retired a long while but haven't got used up yet, so I popped a few around the sentiment just to add a little more colour to the sentiment layer. 


I hope you've enjoyed this scrap buster! I'm for sure going to be making more of these and I have some other scrap busting ideas up my sleeve to show you over the coming days. Stay tuned. 

Take care, 


Wednesday, 17 June 2020

Woven Watercolor Greenery

Hi there! 

We've had another thunderstorm today -third day in a row! Its definitely an indoor day! I did some work bits and bobs, sorted through and re-organised my card scraps and tried to use up a few of the scraps - I've got some fun things coming this way using up scraps! I'm always happy to find new scrap busting ideas and I'm sure you will too.

Today, however, I have another couple of inspiration cards I made for our craft together session last weekend. The first was copied from a card I saw on Pinterest and instantly loved its creativity. This then lead onto the second card.


Stamp Set: Well Said
Ink: Just Jade
Cardstock: Whisper White, Just Jade
DSP: Forever Greenery

One of the designs on the pattern paper is these water colour stripes in the colours of the paper on a white background. I cut one of each colour out - its fairly straight cutting so if you're worrying about the fussy cutting - its not difficult. I first laid out the three diagonal strips then wove in and slid up the horizontal piece. I then secured everything in place with tombow adhesive. 
Finally added a sentiment following the diagonal line.  

I loved the woven effect and this led to the second one...


Stamp Set: Well Said
Ink: Pretty Peacock
Cardstock: Whisper White
DSP: Forever Greenery

For this woven card I wanted to go with a more straightforward horizontal/vertical weave. I started by laying out the three horizontal strips then wove in the two vertical strips. When I had everything just how I liked it I secured everything in place with tombow again. This time the sentiment followed the horizontal line.

If you like these woven style cards stay tuned - I have some super fun woven cards coming soon!

Hope you've kept dry today.

Take care, 

Tuesday, 16 June 2020

Greenery Embossing


Hi! 

I hope you are well. We had a terrific thunder storm last night! Thankfully my partner was able to rescue the rabbit before it began to bucket with rain! 

Today I thought I'd share with you a couple of inspiration cards that I shared with my ladies using the embossing folders included in their packs. The Greenery mini embossing folders come as a pack of 2 - the first is these little rows of leaves and the other is more organic leaves and berries. They will emboss card up to 8cm x 15cm, so not quite a full card front but certainly enough to layer on top. 


Stamp Set: Well Said
Cardstock: Soft Sea Foam, Just Jade
Ink: Just Jade
DSP: Forever Greenery
Embossing Folders: Greenery
Accessories: Champagne Rhinestones

I originally had intended to have the embossed and layered of the background with the sentiment layered up on top - for something really simple, and I still think it could work like that. However, when I came to laying everything out I began to play with adding a few of the spare leaves I had fussy cut from the DSP and instantly loved it! So, that's exactly what I did, I layered the leaves under the sentiment and finished the whole thing off with a champagne rhinestone. I am so in love with these rhinestones - they add just the right amount of sparkle without being over the top bling-y! 


Stamp Set: Good Greetings
Cardstock: Whisper White, Soft Sea Foam, Garden Green 
Ink: Garden Green
DSP: Forever Greenery
Embossing Folders: Greenery 
Accessories: Linen Thread, Champagne Rhinestones

Before I'd even got my hands on the DSP I had this idea that it had potential for making some Christmas cards! I hope you will forgive me for mentioning the "C" word so early. 

I chose here to only use a matt that showed on the two vertical sides - just playing around with doing something different.  I stuck one of my remaining fussy cut leaves onto a piece of Whisper White and added a linen thread bow and some champagne rhinestones. 

Anyhow, I thought I'd just show the versatility of the paper and inspire you to look for the "C" word in things that aren't blatantly Christmas. 

We're having another thunderstorm tonight, this time it was my time to rescue both the bunnies from torrential rain! 

Take care,


Monday, 15 June 2020

CAS Greenery Wreath


Hello! 

Happy Monday! It's the first day back to school for some of our Year 10 kids today. It seems to have gone really well and the kids have enjoyed it. 

I thought today I might share another of the cards I made using the Forever Greenery DSP for my class at the weekend. This one was a little more labour intensive that the previous too but has absolutely beautiful effects!  


Stamp Set: Well Said
Ink: Shaded Spruce
Cardstock: Whisper White
DSP: Forever Greenery
Die: Circles
Accessories: Linen Thread, Champagne Rhinestones

If you've followed this blog from way back you know I'm a CAS (clean and simple) card girl at heart and I think this one is just that clean and simple. Having said that often the CAS cards are a bit more labour intensive and take longer. 

I got into my zen headspace and sat fussy cutting the leaves out if the pattern paper - you know I love a bit of fussy cutting - because I'm a bit nuts like that! I assembled the leaves around the circle die (roughly about 6cm diameter). I'd like to add that you can purchase dies that will cut out a lot of the leaves from the stamp set and the DSP for you but I haven't got them - I'm sure this card would have been a lot more straightforward with the dies! 

I stamped a sentiment in the bottom corner and added all the layers together with some dimensionals which adds a little height and shadow - I think that really adds to the CAS effect. 

Finally I added a linen thread bow and some champagne rhinestones to add some sparkle. 


I will admit this card turned out differently than I had initially intended it to. I had wanted to use the gold hoops and trim that co-ordinated with the Forever Greenery bundle, unfortunately it was on back order and would arrive in time for the class. With this in mind I had to switch it up a bit - still think this turned out gorgeous! 

The weather is gorgeous today - really warm and sunny! Have a wonderful afternoon! 


Sunday, 14 June 2020

Forever Greenery Virtual Class

Hello! 

So, this morning I held my first virtual crafting session. We all had a lot of fun - we did a lot of chatting and catching up and created some beautiful cards. 

I thought today I might share another of the inspiration cards that I shared with them:


Stamp set: Well Said
DSP: Forever Greenery
Cardstock: Just Jade, Whisper White, Pear Pizzazz
Ink: Just Jade
Punch: Leaf

Yesterday you might remember I shared a simple card using thin 2cm strips of  the DSP. Well, I had a lot of leftover strips, some long and others quite short. I really didn't want to go in the bin. I thought doing a crazy paving type of design with the strips might be a good idea. I started with the spotty strip on a diagonal and then worked up towards the top left hand corner. I think began filling in using smaller strips to work in different directions to fill in the space. I kept all the strips a little longer than the card I was mounting them on  and then trimmed it down to fit. 

I chose to use White as the matting and a coloured card base - normally I would have been drawn towards a white base and coloured matting. I think this is just a bit different and perhaps more dramatic, what do you think?

I used a small leftover strip of Whisper White to stamp the sentiment. Just goes to show you don't always have to have a fancy punch or die to make a sentiment pop! I layered a few punched leaves behind the sentiment. 

I have thoroughly enjoyed my first virtual crafting session today and honestly cannot wait until next month's session now. I have some gorgeous things lined up! We will be using the Jar of Flowers stamp set and the co-ordinating Flowers for Every Season DSP. 

I hope you've had a great weekend! 

Take care, 


Saturday, 13 June 2020

My First Virtual Class

Hey guys!

Its been a while hasn't it? What a year 2020 is turning out to be! As with everything else my monthly classes have been put on hold since March. I've finally decided to delve into the world of doing virtual classes, we'll see how this goes! My first one is tomorrow morning. So I thought I'd just share a little sneak peek of what I have to share.

Earlier this week I dropped off packages at each of my ladies' houses. In their packs they got 6 12"x12" sheets of the Forever Greenery designer series paper. This paper is absolutely gorgeous, I just haven't been able to stop using it since it arrived in my craft room! Also in their pack was 12 sheets of co-ordinating cardstock, a sheet of vellum, the 2 pack of mini Greenery embossing folders and a pack of the champagne rhinestones. I hope they love these new products as much as I am! I went a little nuts with all the samples and have so many to share with them and you also.

Today I thought I'd just share one of my favourites, and it's pretty simple too:


Stamp Set: Well Said
Cardstock: Soft Sea Foam, Garden Green, Whisper White
Ink: Garden Green
DSP: Forever Greenery
Punch: Story Label
Accessories: Champagne Rhinestones

This is a great sampler card using lots of the delightful pattern papers. Its also a fab way to use up think extra strips you have laying around which otherwise may just get binned. My card has each strip being the same width but it would work well using strips of different widths too. 


So, wish me luck as I venture into virtual classes and share the huge stack of loveliness with them! 

Meanwhile, stay safe and take care, 


Tuesday, 26 March 2019

Ink Blending Video Tutorial

Hi there! 

As promised at the weekend, today I have a youtube video to share with you showing how to create the rainbow ink blending technique that I shared at my card class this past Saturday. Its been a long time since making a video and I am reminded what a slow and difficult process it can be. What I had hoped to be quite a quick process ended up sucking up an entire evening...but now I have some video software downloaded and am learning to slowly edit my videos which is kinda cool. Fingers crossed I'll get faster as I create more. Here's hoping anyway! I've also learnt that I need to invest in some better lighting as the shadows are really bothering me, but hey, everyone has to start out somewhere, right? And often done is much better than perfect!

So, before I jump into the video, I thought I'd quickly remind you of the technique on a finished card...


And now onto the video... 


It would mean a lot if you could leave a comment or a thumbs up over at my youtube channel. 

I hope you enjoyed this technique and I loo forward to seeing some of your creations using the ink blending technique. I'll be sharing more ideas using the ink blending technique over the coming few weeks, so be sure to stay tuned!

Thanks for stopping by,


Sunday, 24 March 2019

Lighthearted Leaves

Hey!

I had so many ideas this week for the Freshly Made Sketches challenge. 

I decided I wanted to make it really clean and simple again, just like last week's. Hmm, I'm feeling that there's a bit of a theme going on with my card designs at the moment - clean and simple is certainly my current aesthetic of choice. 

I originally thought I'd just cut or punch 9 scraps of pattern paper to form the 9 patch. Then I got to browsing my stamp collection and found the Lighthearted Leaves stamp set. Its retired now but I got to thinking how pretty the leaves were and how springlike they were in design too so then I decided that I just had to use that stamp set. 


Stamp Set: Lighthearted Leaves
Ink: Coastal Cabana, Daffodil Delight, Pear Pizzazz, Mint Macaron, Old Olive, Bermuda Bay, Crushed Curry, Rich Razzleberry, Pool Party
Cardstock: Whisper White


I used the smallest leaf and then rotated it to create a more natural, less structured look. I stamped the leaves in a variety of springlike colours directly onto the cardbase. I'd intended on cutting out the floral motif in the centre of the leaf to add a bit more detail to the card however in the end decided I really enjoyed the one layer simplicity of it and kept it as it was. 
This card literally took a few minutes to put together and couldn't have been easier.  

I'll leave you with a photo of a sleepy bunny to end this Sunday post...


Have a great week! 


Saturday, 23 March 2019

March Card Class

Hey there!

This morning I jumped back into my first card class. It was a weird mixture of immense excitement to be able to craft with my friends again and fear that everything might go wrong. In the end though we all had a thoroughly enjoyable morning and they all left very happy with their beautiful creations. It always amazes me how each person's cards look so different from the same starting off point! Here's a sneaky peek at my room all ready and waiting for their arrivals this morning...


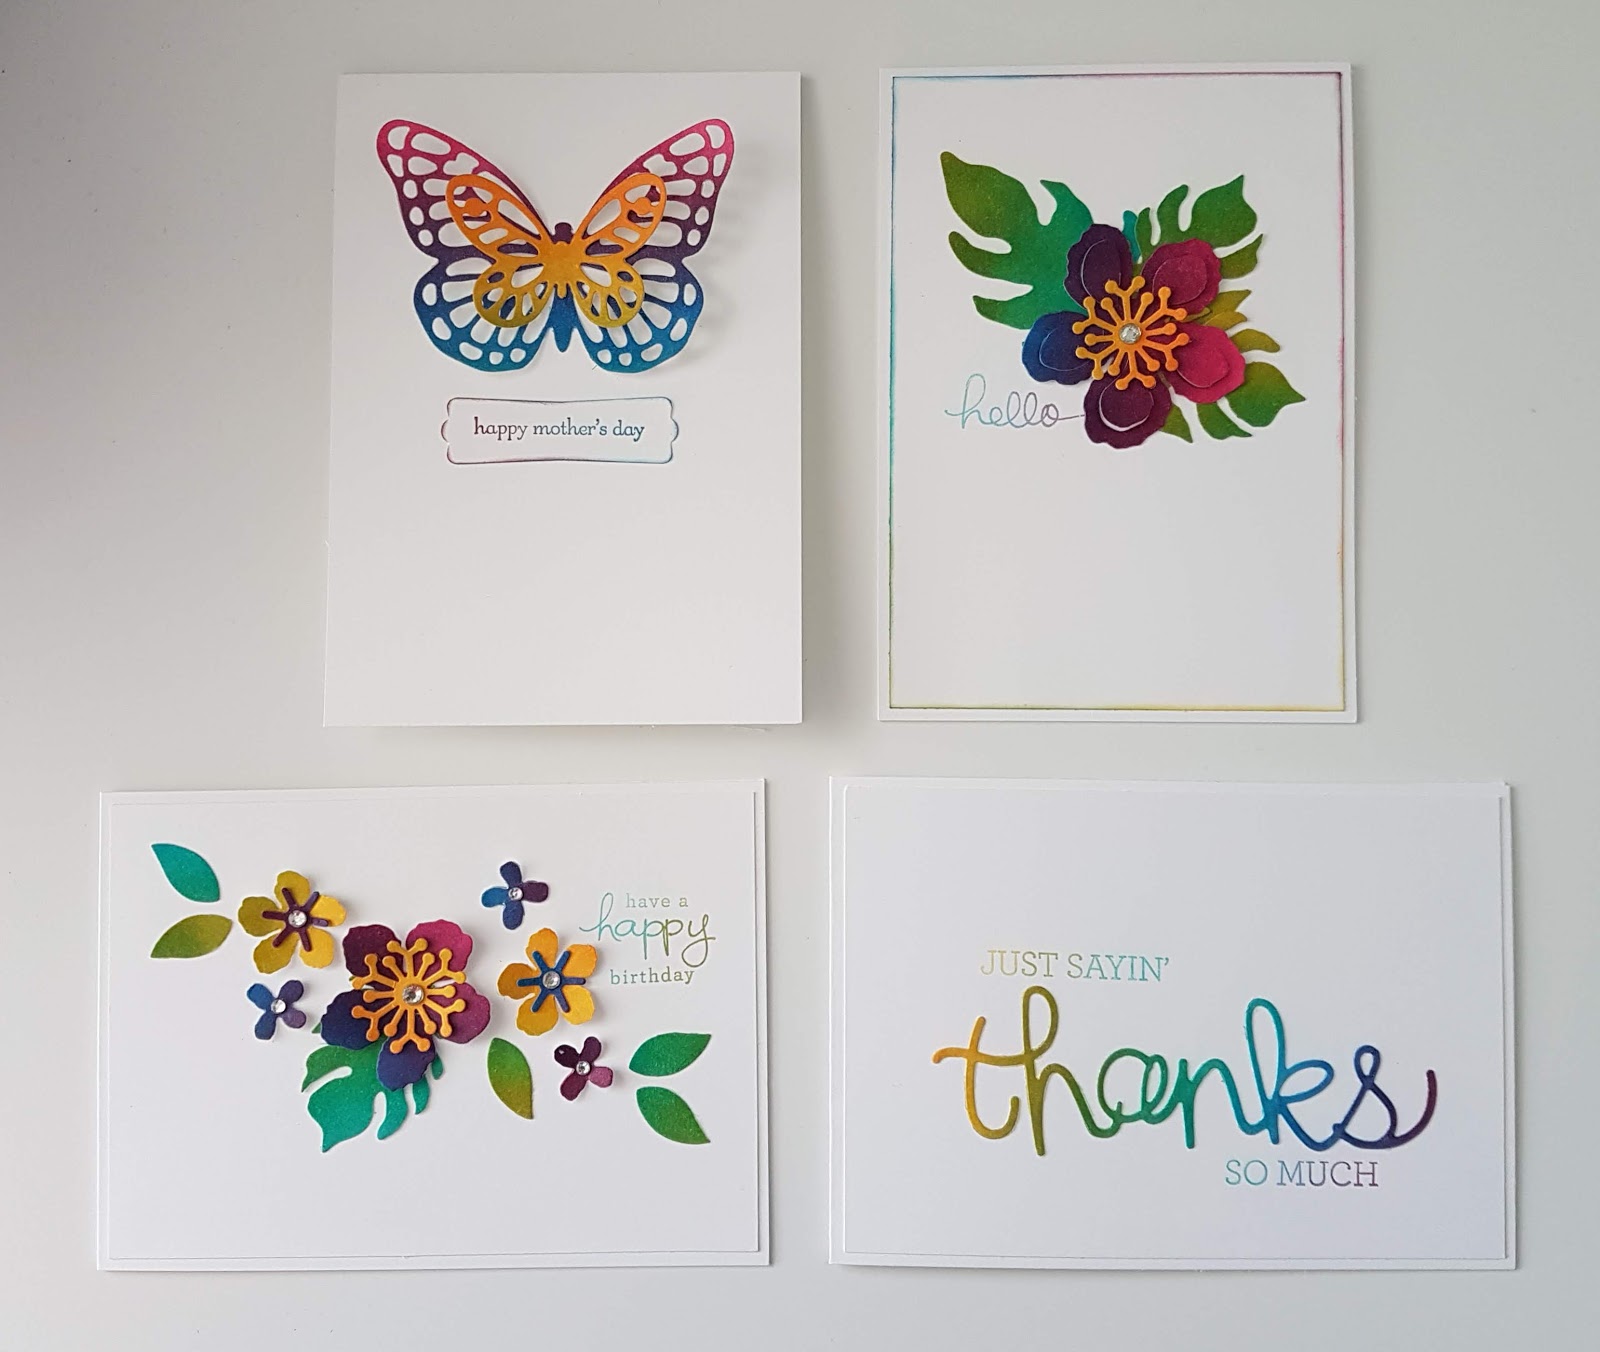
My plan is that each month's class results in 4 cards focusing on a technique/product or sometimes a theme. This month we did an ink blending technique using sponge daubers. And here are the 4 cards we all had a go at making using the ink blending technique. I love how fresh and clean and happy they all are! 


Over the next few weeks I'll be sharing each of these cards and the technique in more detail. I'm also intending to make some videos to share on my youtube channel, the first of which will be of this ink blending technique. 

Have a great Saturday,

Sunday, 17 March 2019

Flourishing Phrases

Happy Sunday folks!

I thought I'd jump back into the world of sketch challenges and take part in this week's Freshly Made Sketches challenge.  I like the FMS are really simple and great for a clean and simple look. For my first sketch challenge in several years I knew I wanted to keep this card easy and clean. No point complicating things, right? So, here it goes, sketch challenge 379...


Stamp Set: Flourishing Phrases
Cardstock: Whisper White
Ink: Tranquil Tide, Berry Burst, Lemon Lime Twist
Adhesive: Snail, Dimensionals

I used the Stampin' write markers to colour in the flourishing floral stamp and then stamped this onto the Whisper White card. I then stamped the thanks sentiment in Tranquil Tide on a thin strip of white card. I then ran the side of the berry burst marker along the edge of the white card. This is a great way to add a extra little pop of colour without adding more layers. This then got added to the card with some dimensionals for a little height. I then used my markers to colour in the large flower and leaves stamps, stamped them on Whisper White card and cut them out. These then got stuck onto the card over the strip with the sentiment on it. 

I hope you enjoyed this really quick and simple card today. 

I look forward to more challenges as I get back into the routine of blogging again.

Thanks for stopping by,