Thursday, 25 October 2012

use up your scraps!

I wanted to show you a card using the holiday ornaments framelits today. It actually uses the negative space cut out so you can use the ornament shape for another project! Behind the ornament I laid down strips of ribbon (great for using up scraps that aren't big enough for tying into knots or bows but too precious to throw away!) I just love all the different textures and colours you can achieve doing this tecinque with very little ribbon too! I added a bow too and red stitched outline around the ornament to give it a little more definition. I added some more of the ruffled ribbon to the top and bottom of the sentiment, the ruffled ribbon gives a lovely border! 


Ribbon Ornament

Stamp Set: Curly Cute
Ink: Real Red
Cardstock: Whisper White
Big Shot: Holiday Ornaments Framelits
Ribbon: Old Olive Taffeta, Real Red Taffeta, Gumball Green Stitched Satin, Lucky Limeade Ruffle, Gumball Green Sweater Trim

Have a great day! 

Happy Stampin',

Amanda x

Wednesday, 24 October 2012

gradient resist some more

Remember a few weeks ago I did a gradient emboss resist card with the snowflake soiree stamp set. So here is another card with the same gradient emboss resist technique. 

This would be a lovely wintery card but not necessarily a Christmas card! Not all winter cards have to be Christmas cards! 


Wintery Trees 

Stamp Set: Lovely As A Tree, Curly Cute
Ink: Pool Party, Marina Mist, Island Indigo, Midnight Muse
Cardstock: Whisper White, Island Indigo 
Ribbon: Whisper White Organza 
Extra: White Emboss Powder

So this was the same as the last card, I embossed the trees and then sponged over the card gradually getting the colour darker. On the lighter side I tied some organza ribbon. 

What do you think? Hope you like it! 

Thanks for stopping by! 

Amanda xo


Tuesday, 23 October 2012

flurries of snow are coming!

Just a quick and fun Christmas card for you today! This is another one that would be great for mass producing and relatively inexpensive too! 


Christmas Snowflake

Stamp Set: For My Family
Ink: Gumball Green, Crumb Cake
Cardstock: Crumb Cake, Gunball Green, Very Vanilla
DSP: Be of Good Cheer
Big Shot: Snow Flurry
Punch: Boho Blossoms 
Accessories: Linen Thread

 The snowflake was cut with the gorgeous new big shot die and then sponged a little with crumb cake ink to soften it a little. I added a couple of the flowers from the boho blossoms to the centre of the snowflake to fill it out a little more - without using a button or anything bulky! I added some DSP to the card, wrapped some linen thread around it and a sentiment too. 

What I love most about this card is that its super flat so is excellent for posting!! If you did want to jazz it up a bit more you could definately add a button or brad to the card. Or for a post frindly version with a little more sparkle try spritzing with some shimmer mist or adding dazzling details!

Hope you enjoyed this snowy card - did you know we might be getting a little snow this weekend?! I like snow but I'm not ready!! Its far far too early to be donning chunky winter coats, hats, scarves, gloves etc. Ugh, I am so not a winter person! 

Happy Stampin',

Amanda xx


Wednesday, 17 October 2012

have a break, take a sip!

This month's card club was Tea and Cake theme. I've got the cards we made to show you another day but today I thought I'd show you a couple simple little cards I made with the Take A Sip wheel that I made while I was thinking of what cards to do for card club (we did another card with take a sip).


Stamp Set: Take a Sip wheel, Tea Shoppe
Ink: Basic Black, Baja Breeze, Pretty in Pink, Perfect Plum, So Saffron, Rose Red, Crumb Cake
Cardstock: Baja Breeze, Perfect Plum. Whisper White
Punch: Dotted Scallop Ribbon Border, Modern Label
Other: Simply Scored


Stamp Set: Take a Sip
Ink: Basic Black, Perfect Plum, Pretty in Pink
Cardstock: Pretty in Pink, Perfect Plum, Whisper White
Punches: Scallop Circle, 1" Circle, Dotted Scallop Ribbon Border

So some really simple cards, just using the wheel to add tea cups and mugs to the background, one I coloured in all of them and the second was just one of the cups that I coloured on a separate scrap of paper and layered it over top with some punches. The dotted scallop ribbon border is great for adding a little extra detail and border to the wheeled image! 

Thanks for stopping by and checking out today's brief little post! 

Happy Stampin',

Amanda xox

Tuesday, 16 October 2012

snow flurries?

I wanted to introduce you to a new die Stampin' Up! has today. Its called Snow Flurry, and on it are 3 different sized snow flakes! They all look great individually but also layer beautifully on top of one another! Below is a car only using the 2 smaller snowflakes.


Glittery Snow Flurry

Stamp Set: Perfect Pennants
Ink: Early Espresso
Cardstock: Crumb Cake, Very Vanilla, Champagne Glitter Paper 
DSP: Festival of Prints
Big Shot: Snow Flurry, Lacy Brocade
Accessories: Button
Baker's Twine: Whisper White 

Where do I start?! This card has so many things on it that I am loving! I love the lacy brocade embossed background, I adore the patterns from the Festival of Prints (for more information about how awesome this paper stack is see Sunday's post!), the cute little "merry" just inconspicuously stapled on. An then what about the gorgeous snowflake?! It was cut out with the beautiful glitter paper - its basically paper coated in glitter (it comes in Champagne, Silver and Red) - so you get all the dazzle and fun of glitter with no mess! You just have to see it for the full wow factor! 

I hope you enjoyed this card - its another quick one and by embossing the folded card front you cut out on more layering. The thin banner strips are a great way to show off patterns without using lots of the paper! 

Happy Stampin',

Amanda xox

Monday, 15 October 2012

winter wonderland

Good morning! Its Monday again...I hope you all had a good weekend?! 

Well I thought what better way to start off a Monday than to introduce you to another new stamp set which is in the Autumn-Winter catalogue at the moment! My friend Emma, bought this set, its such a cute set with ducklings, bunnies drinking cocoa, kids in puffer suits making snow angels and lots more... so I cheekily asked her if I could borrow it. To make samples to show her what she could do with it for Christmas of course!! She kindly let me so I have lots of sweet cards to show you over the coming weeks using Winter Wonderland. (Thanks so much Emma!!)


Christmas Ducklings

Stamp Set: Winter Wonderland, Come to Bethlehem
Ink: Summer Starfruit, Raspberry Ripple, Pool Party, Pumpkin Pie, Basic Black
Cardstock: Whisper White, Raspberry Ripple, Pool Party
Accessories: Mini Brads, Silver Dazzling Details 

This card is post friendly, cheap and very simple. the longest bit will be colouring in the ducks and waiting for the dazzling details to dry! The dazzling details was thinly applied to he edge of the white banner potion of the card for glitz - its really inexpensive at £2.25 a bottle and will go a long way! Its really glittery, I added a little bit to the snow and ground ad well for added shine! 
The brads work out at less than 2p each so they are a bargain also! but if you didn't want to use them I think this card would look cute without them too. Or if you wanted an alternative embellishment why not try adding faux brads with the silver dazzling details seeing as you'll already have it out! I stamped the snow in the background of the Pool Party too for a little added depth and texture, its subtle but a nice, quick and easy touch. 
I used the Merry Christmas from Come to Bethlehem because its the one I own but if you had another sentiment in a similar size I think that would work well also! 

Have a great week! 

Amanda x

Sunday, 14 October 2012

what a festival of prints!

I'm back with a very clean and simple Christmas card for you today.


Merry Holly

Stamp Set: Pennant Parade
Ink: Cherry Cobbler
Cardstock: Very Vanilla, Lucky Limeade, Crumb Cake
DSP: Festival of Prints
Punch: Jewellery Tag, Decorative Label, Corner Rounder
Big Shot: Little Leaves
Baker's Twine: Early Espresso
Accessories: Pearls
Extras: Red Permanent Marker

The Festival of Prints paper stack is lovely, its a small stack of designer papers sized just slightly larger than your standard 6x4" photo. This makes it perfect for matting behind holiday photos for speedy scrapbooking but also perfect for card making! You get a HUGE range of designs, not all are overtly Christmassy, some in fact would be perfect for masculine cards!! Right, so this car only uses a little bit - very economical. I punched a decorative label punch out and then laid a strip of another paper that I felt co-ordinated nicely with it over top. The leaves were cut with the big shot and then baker's twine bow, sentiment on a tiny tag and pearls added for embellishment! The red pearls are just Stampin' Up! pearls coloured with a permanent marker for colour! Its such a great little tip to make your pearls go further and match with whatever project you might be working on! 
I rounded the bottom corner just to break up all the sharp lines in the card and just add a little quirky twist!

I feel like I've babbled way too much this morning...

Happy Stampin',

Amanda x

Saturday, 13 October 2012

create your own fancy edge...

Do you just love the fancy edges that everyone seems to be making with punches these days but can't afford one or just haven't got around to getting one yet? Maybe you have lots of edge punches and just want to find a new way of making a fancy edge! Well then I have a card you'll love! 

And it showcases more of what Betsy's Blossoms has to offer! 


Betsy Fancy Edge

Stamp Set: Betsy's Blossoms, Tiny Tags 
Ink: Primrose Petals, Summer Starfruit, Old Olive, Rich Razzleberry 
Cardstock: Whisper White
DSP: Brights Paper Stack
Buttons: Itty Bitty
Punch: Jewellery Tag

The key to this is to stamp all the flowers close together and roughly following the edge of the cardstock, obviously you want a little bit of wave but not so much that you loose most of the card! Once the flowers were all stamped up the side I carefully cut out the negative space - yes it takes a little time but is well worth it. I layered some more cut out flowers and leaves and some tiny tag punches on to to fill in gaps and make it a little more fancy but its the knid of card you can do as much or as little as you like to it! Inside the card I added a strip of striped Old Olive paper from the Brights Paper Stack to give it more colour and show off the edge even more! 

This technique would definitely work with other flower stamp sets too. So why not grab a stamp set today and give this technique a go?! I would love to see your creation so why not send me a link to your creation and I'll come have a nosey! I can't wait! 

Thanks for stopping by this Saturday afternoon!

Amanda xx

Friday, 12 October 2012

snowflake soiree

Yes, I'm back with another Christmas creation and more snowflakes! This has got to be my favourite Christmas set at the moment....


Believe Jack Frost

Stamp Set: Snowflake Soiree
Ink: Midnight Muse, Versa Mark
Cardstock: Whisper White, Midnight Muse
Embossing: White Emboss Powder
Accessories: Button, Pearls

Just to show that you don't need lots of snowflakes etc to make a beautiful winter wonderland card! I embossed 2 snowflakes and stamped a sentiment. I finished it off with a button and pearls but they really aren't neccessary if you want to make the card post friendly! I just love the clean simple elegance of this card! 

I'm off to get prepped for card club tonight! Theme is Tea and Cake this month - super cute cards, its not too late to join us! Drop me a message! 

Happy Stampin', 
Have a awesome weekend! 

Amanda x

Thursday, 11 October 2012

hello baby!

I am so excited, I'm currently on my way to the Knitting & Stitching Show at Alexandria Palace in London. It's my annual show I always try to get to - filled with textile art and crafty things. Its my day of crafty fun SU free! I'd sure I will come back full of inspiration for creating things and adding what I saw to cards! Watch this space!!

One of my best friends had a baby back in July. He was 6 weeks early and arrived just before I left for holiday. Its been a busy and difficult time for them so it wasn't until this past week that I have finally got around to meeting Euan! 

Obviously I had to make a card for this occassion - what kind of paper crafter would I be if I didn't!?! Anyway I thought I'd make a boy and girl version just to show you and because I had fun making them! 


Baby Tootsies

Stamp Set: Baby Prints
Ink: Baja Breeze/Pretty in Pink, Midnight Muse/Primrose Petals
Cardstock: Whisper White, Midnight Muse/Primrose Petals
DSP: Patio Party
Accessories: Buttons, Itty Bitty Buttons
Baker's Twine: Whisper White 

I just fell in love with the cute papers and thought the baby feet would match in perfectly! 
I don' think I need to do much describing of this card - its very simple but super adorable! I love the button embellishments on this card - sweet way to use buttons and hey its not in the middle of a flower or anything for once!

To get more use out of my clear mount Baby Prints stamp set I decided to doctor it a bit. I cut the words apart because while I'd use "baby" on a card I don't have much use for "baby firsts" at the moment and sometimes masking can just get a little tedious! I also cut apart the hands and feet because I thought it would be fun to do walking feet across a page (watch this space!) or just do one hand/foot print! As long as you're careful with doctoring and cutting, there is absolutely NO reason why you shouldn't cut up your stamps. If you're going to get more use out of the stamps because of it I say by all means go for it! 

Hope you enjoyed today's share and quick tip! 

Thanks for stopping by! 

Amanda xx

Wednesday, 10 October 2012

take comfort

I thought I'd give you a break from Christmas today. 

I don't know if you remember a little Twitterpated creation I made back in the Spring. I enjoyed its "quilted" look so much that when I saw the new Comfort Cafe paper I just knew I had to make a card showcasing the gorgeous patterns and buttons in this suite! 


Comfort Cafe Quilt

Stamp Set: Itty Bitty Banners
Ink: Midnight Muse
Cardstock: Crumb Cake
DSP: Comfort Cafe
Punch: Postage Stamp
Accessories: Naturals Buttons
Baker's Twine: Pool Party

It was just so much fun punching the different patterns and so quick and easy too! I added a little strip of paper to the bottom middle patch - it breaks up the blue and just makes it look a little different! Some buttons, baker's twine bow and little banner sentiment were added to finish it off! 

What do you think? 

Happy Stampin',

Amanda xx

Tuesday, 9 October 2012

evergreen christmas

Yesterday I introduced you to the Apothecary Accents framelits. Today I have another creation using the framelits and yes, its Christmassy! 


Silent Night Accents

Stamp Set: Evergreen
Ink: Gumball Green, Early Espresso
Cardstock: Early Espresso, Very Vanilla, Crumb Cake, Champagne Glitter Paper
DSP: Candlelight Christmas
Punch: 3/4" Circle, Itty Bitty
Big Shot: Apothecary Accents

While this card is more complicated than yesterday Its still not hugely difficult and I used lots of left over scraps. I used the circle punch to make the scallop trim so if you don't have and edge punch this is a great way to make a fancy edge! I added some small strips of glitter paper which gives a great sparkle but why not substitute for scraps of DSP instead?! I saved on cardstock by sponging Espresso around the edge of the accent to add that colour and depth without adding more expense and weight! (its a great trick which I use all the time! And you get more use out of the ink pad too!)

There are so many great Christmas stamp sets in both the new Annual catalogue and the Autumn/Winter catalogue there's plenty of choice, whatever your style! Evergreen has got to be one of my faves! And the tree can be used for non Christmas cards too! I love it when I find a Christmas stamp set I can use at other times of the year too!!
What's your favourite Christmas stamp set? 

Happy Stampin',

Amanda xx

Monday, 8 October 2012

is your life manic?

Well, is it? I know everyone is super busy these days so you're probably thinking, I just don't have time to make card, in particular Christmas cards...because I need a lot. Well I'm here with another nice, quick and easy Christmas card for you! 

And don't forget, everyone needs a little bit of relaxation away from busy days and life. Why not let a spot of crafting be your "escape" zone?! If you'd like a more social activity, invite a couple friends over, have a glass of wine or cuppa (it'll be cheaper than a take away, meal out or night on the town!). Or if you have kids why not get them involved - they'll love it and it will create a great bonding session and activity for you to do together away from video games, computer or the tv!


Christmas Accents

Stamp Set: Come to Bethlehem
Ink: Early Espresso,
Cardstock: Cherry Cobbler, Lucky Limeade
DSP: Festival of Prints
Big Shot: Apothecary Accents Framelits
Accessories: Brushed Bronze Button
Baker's Twine: Cherry Cobbler

I'm really liking these Apothecary Accent framelits at the moment, They are perfectly designed to use individually but equally work well by layering them up! They easily cut up to 3 pieces of DSP/cardstock at one time which means making cards in bulk is super easy and simple! I've used a button here as an embelishment but why not use a small stamped image, ribbon strip or a few rhinestones/pearls for a more postal friendly embellishment?! 

If you like the look of this card and would like to give it a go why not drop me a message and I would be glad to help you with all that you'll need to make as many as you need! Seeing as these framelits aren't Christmassy they will get used throughout the year making them an excellent purchase!!

Happy Stampin',

Amanda xo

Sunday, 7 October 2012

whirlwind weekend take 2

I'm back as promised with another darling little project that I demo'd this weekend for a couple of parties. It was World Card Making Day yesterday so in honour of it I focused on some card making techniques and tools! 

This project is another Betsy creation. I'm sorry but you're probably going to see a lot of Betsy Blossoms creations in the coming days as I am just crazy for the sweet bird, flowers and leaves!


Rainbow Blooms

Stamp Set: Betsy Blossoms, Betsy Blooms (wheel), Itty Bitty Banners
Ink: Melon Mambo, Pumpkin Pie, Daffodil Delight, Gumball Green
Cardstock: Whisper White 
Big Shot: Labels Framelits 
Extras: Festive Paper Piercing Pack
Ribbon: Daffodil Delight Stitched Grosgrain
Accessories: Rhinestones

This card is showing off the beautiful co-ordination that Stampin' Up! has! See how the flowers in the wheel stamp match so perfectly wit the flower from Betsy's Blossoms?! I love that! So I inked and wheeled the Betsy's Blooms in 3 colours - like a rainbow! In all honesty, I haven't used wheels in a while, they got a little forgotten about but recently I have regained my love or wheels and how easy they make patterned backgrounds! They are really quite inexpensive and so easy! If you haven't tried wheels yet you have to give it a go, they're so much fun! 

I was also showing off the new piercing packs that Stampin' Up! have. Its so neat that they co-ordinate with framelits and punches that SU! carry. Yes, there's that word again, co-ordination. It really is at the heart of what Stampin' Up! is all about and one of the reasons I love them as a company so much!! 

Its definitely got a good pop of colour! A cheery card as we head towards the coldness of winter! I'm not a fan of the cold so hanging on to summery cards and colours as long as possible is a must for me! 

Have a great Sunday,

Amanda x

betsy's birds

Good morning! 

I've got another Betsy's Blossoms creation for you today! 


Stamp Set: Betsy's Blossoms, Itty Bitty Banners
Ink: Certainly Celery, So Saffron, Rich Razzleberry
Cardstock: Whisper White, Rich Razzleberry
Punch: Itty Bitty Punch Pack
Big Shot: Vintage Wallpaper
Accessories: Rhinestones

Quite a simple card. The leaves and bird were stamped and cut out. The background was embossed and then leaves and bird adhered over top. I punched the sweet little flowers and added them to the leaves and finally the sentiment. 

Isn't this bird darling? I just love it! I actually stamped the bird several times, cut out the wings and body separately so I could layer them up with dimentionals for a 3D effect! 

Is Betsy's Blossoms on your wish list?! I'm sure glad I got mine! 

Thanks for stopping by! 

Amanda xx

whirlwind weekend!

Man oh man! Its been one of those weekends!! I have had a lovely but tiring weekend filled with LOTS of crafting with LOTS of lovely people! 

Last night my lovely friend Emma hosted a party for a few friends, it was a nice relaxed evening and her cute little boy kept us all highly amused! 

Today was Wendy's turn to host! It makes me so happy to see someone get so excited about hosting and inviting so many people! She truly had a house full, everyone seemed to have a great time! I don't feel like I stopped talking (and listening to questions and stories) ALL afternoon and still didn't get to talk to people half as much as I would have wished to! But we had fun, that's the main thing!!

So I thought I'd share with you one of the cute little projects I shared with them all! Seeing as its World Card Making Day today it seemed appropriate that I focus on showing some cards and different techniques! Here's what we did!


Believe Snowflake Gradient

Stamp Set: Snowflake Gradient
Ink: VersaMark, Wisteria Wonder, Island Indigo, Midnight Muse
Cardstock: Whisper White, Wisteria Wonder
Punch: Decorative Label
Ribbon: Whisper White Organza
Emboss: White Embossing Powder

This is an emboss resist technique I've show before - but with a twist! To begin I embossed the snowflakes. Next step is to sponge over the snowflakes with ink, before I've just used one colour but here I did a gradient look using 3 colours. Begin with lightest colour and work darker! Sponge the colour on in nice smooth strokes leaving a white gap of "light" down the centre; as you apply the different colours, over lapping slightly as you go, the colours will blend together to form a smooth transition between ink colours. After you've finished sponging the ink use a paper towel or tissue to wipe off any ink that will have pooled over the embossed snowflakes to bring them back to a lovely clean glossy white! 
I stamped and punched the sentiment, added some ribbon and matted on some more card to finish it off. Another card perfect for mass producing in time for Christmas! 

This card was inspired by a card I found somewhere on the internet - she had brayered hers which looked lovely but sponging give a lot smoother look in my opinion.

I think this has got to be one of my favourite creations of late - the snowflakes are so elegant and classy and I've fallen head over heels for this gradient emboss resist technique! (look out for another emboss resist card coming soon!)

I'll have a double post for you tomorrow as I already had a project all lined up for you but I'd love to show you another card I showed at this weekend's parties in honour of World Card Making Day!

Have a wonderful weekend! 

Happy Stampin',

Amanda xx


Friday, 5 October 2012

betsy's blossoms

One of the new stamp sets in the new annual catalogue is called Betsy's Blossoms. Its full of flowers, leaves, and a bird too!! So here's a cute card using some of the darling images from this fabulous new set!


Birthday Blossoms

Stamp Set: Betsy's Blossoms, Curly Cute
Ink: Rich Razzleberry, Daffodil Delight, Gumball Green
Cardstock: Whisper White
DSP: Floral District
Big Shot: Apothecary Accents Framelits
Ribbon Stitched Grosgrain
Accessories: Rhinestones

Okay, I know what you're going to say, that's a lot of cutting out! Well, yes, I can't deny that, there is a fair amount of cutting but its not hard cutting and everything layered on top just looks so clean and cute! I stuck a strip of the new Floral Distict DSP to some white cardstock, I laid the Apothecary Accents framelit down so it would cut half white and half DSP, then ran it through the Big Shot. To hide the join I stuck down some of the beautiful new stitched grosgrain! 

Right, I have a busy day of prepping for 2 workshops, one tonight and on tomorrow afternoon, I am looking forward to some crafty fun with some lovely ladies!! 

Happy Stampin',

Amanda xx


Thursday, 4 October 2012

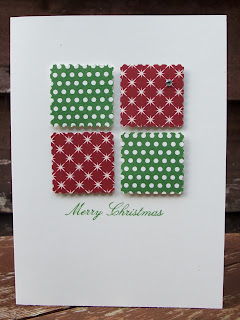
simple and elegant christmas cards?

So I've been thinking about Christmas a lot lately and in particular Christmas cards! So some of you will be thinking, I can't make 60 (or more!!) Christmas cards by hand. Well, I've come up with a couple simple designs that are totally do-able on mass production! 


Stamp Set: Come to Bethlehem (It was the Merry Christmas I had on hand - a different one would do!!)
Ink: Lucky Limeade/Real Red
Cardstock: Real Red/Lucky Limeade, Very Vanilla
DSP: Candlelight Christmas
Punch: Postage Stamp


Stamp Set: Come to Bethlehem
Carstock: Very Vanilla
DSP: Be of Good Cheer
Punch: Postage Stamp
Accessories: Rhinestone

I chose these designs because they look really cute but I promise you are so, so simple to do!! 

Literally they are punched with the postage stamp punch (although the scallop square punch would look really cute too). Then they were popped onto the card with a dimensional and a sentiment was stamped below! 

Of course if you wanted to you could further embellish these designs with buttons, brads, ribbon... make them your own with whatever extra bits you have lying around!

If you like the look of a super cute and simple card like this why not get in touch and I would be happy to help you pick out a few things to help you on your way to making elegant, quick and inexpensive Christmas cards for all your friends and family! 

Have a great day! 

Amanda xo

Wednesday, 3 October 2012

stitched owl

A couple weeks ago Simply Stampin' Challenge was a stitched challenge - it could be faux or proper sewing. Well, you know I love my faux stitching! I wasn't very organised in taking a photo and therefore just missed that week completely with is gutting because I'd created this sweet little card for the challenge.


Birthday Stitched Owl

Stamp Set: Curly Cute, Betsy's Blossoms
Ink: Early Espresso, Gumball Green
Cardstock: Crumb Cake, Primrose Petals, Very Vanilla, More Mustard
DSP: Patio Party
Punch: Owl Builder, Boho Blossoms, Itty Bitty Punch Pack
Accessories: White Embossing Powder, Rhinestones

This is a pretty simple card actually, the owl was punched and assembled it. I stamped the leaves and branch stamp in white cardstock for the owl to sit on and embellished with some little blossoms. I stamped and embossed the sentiment with white embossing powder. Everything got faux stitched with a espresso marker. 

I hope you enjoyed this slightly delayed creation!

Happy Stampin',

Amanda x


Tuesday, 2 October 2012

snowflakes...

I am a hot weather person. I hate being cold, having to wrap up in lots of layers but there are a few things I just LOVE about winter. One of those things is Christmas - its just such an exciting and magical time of the year! Another of those thrilling things about winter is snow! I just LOVE snow! 
So here today I've got a snow flakey creation for you! 


Believe Snowy Window

Stamp Set: Snowflake Soiree
Ink: Pool Party, Island Indigo, Midnight Muse
Carstock: Whisper White, Watercolor Paper, Island Indigo, Midnight Muse
Accessories: White Embossing Powder, White Gel Pen

So this piece of watercolour paper started off as one piece with I heat embossed with snowflakes and then spritzed it all over with water. Then using an aqua painter I picked up ink and touched it to the paper, because the paper was wet the ink spread. I started off with the lightest colour and worked to the darkest. If the colour wasn't dark enough I'd add another drop of ink and if the paper dried out too much I just spritzed it with a little more water! When I was happy with it and it was dry I cut it into squares - it makes for a window-like effect. The believe sentiment is also part of the Snowflake Soiree stamp set which I stamped and embossed with white embossing powder and white stitching lines around the edge. 

This snowflake stamp set is just gorgeous! I love it and have created loads of projects to show you all - check back soon for another project!! 

Happy Stampin',

Amanda x