Tuesday, 26 July 2011

for rhoda

A couple weeks ago it was my upline, Rhoda's, 30th birthday, so she obviously needed a special card! Unfortunately I didn't have anything with numbers on it, so I improvised and it actually worked even better than I was expecting! Here we go...


30th Birthday

Stamp Set: Slice of Life (Hostess Only), Basic Phrases, Candle Crazy Builder, So Many Stars Builder
Ink: Crumb Cake, Baja Breeze, Rose Red, Regal Rose, Perfect Plum, Basic Black
Cardstock: Regal Rose Texture, Perfect Plum, Rose Red, Crumb Cake, Very Vanilla
Punches: Modern Label
Accessories: Very Vanilla Satin Ribbon, Basic Pearls, Crystal Effects, Dazzling Diamonds
Extras: Blender Pen, Jumbo Wheel Handle, Wheel Guide, Builder Spindle and Spacer, Dimensionals, Tombo, Pencil, Black Pen

So I stamped my cake in some Very Vanilla cardstock and the coloured it in with a blender pen. I drew in pencil the 30 on top of the cake so I could get it exactly how I wanted it before tracing over in pen. I added a spot of glitter to the top of the 30 to make it look like burning candles. I ran the builder wheel across some Perfect Plum cardstock, added some satin ribbon in the centre and adhered it to the Crumb Cake base card. I mounted the cake on some Regal Rose and Rose Red cardstock, and adhered to the card with dimensionals. I then stamped and punched out the sentiment, adhered with dimensionals and added a few pearls. I also decided to add crystal effects to the cake stand to give it a little extra glossy shine. I Rhoda liked it! 

Please leave me a comment and let me know what you thought, I love reading them! 

Come back tomorrow for another card! 

Hugs,

Amanda 

Monday, 25 July 2011

gorgeous foliage...

I am just completely in love with the French Foliage stamp set. The more I play with it the more I like using it. Again this card is another one showcasing the wheel. I think I really am going through a wheel phase at the moment.


French Foliage Birthday

Stamp Set: Basic Phrases, French Foliage, Texture
Ink: Old Olive, More Mustard, Bravo Burgundy, Early Espresso
Cardstock: Very Vanilla, Early Espresso, Old Olive
Accessories: Early Espresso Satin Ribbon
Extras: Clear C Block, Dimensionals, Jumbo Handle, Copy Paper

I just LOVE this card. I wheeled out the texture wheel on the Old Olive card base. I then inked up a clear block (the kind you use for clinging your clear stamps to) in More Mustard ink and stamped it on Very Vanilla cardstock. It actually was just an experiment but worked so well, I was dead impressed! And the texture that the clear block picked up from the ink pad was great, fitted in with the texture wheel. I laid thin copy paper over the edges of the clear block stamp and stamped the leaves so that they over hang the edges. I added the ribbon and stamped the sentiment to finish. 

So, what do you think? Please leave a comment and let me know! 

Thanks for stopping by.

Amanda x

Sunday, 24 July 2011

i couldn't resist

A really fun card I created the other day using some fun woodland paper that I bought in the States last month. It was just so cute I couldn't resist. It would be so cool if Stampin' Up came out with some cool woodland dsp collection! 


Birthday Mushrooms

Stamp Set: Basic Phrases
Ink: Not Quite Navy
Cardstock: Baja Breeze, Not Quite Navy, Old Olive
DSP: Woodland (non-SU)
Accessories: Tangerine Tango Big Designer Button, Cherry Cobbler Baker's Twine
Extras: Glue Dots

Hope you enjoyed this cute little card today. See you again tomorrow.

Hugs,

Amanda x

Saturday, 23 July 2011

simply stampin' challenge, week 17

This week's Simply Stampin' Challenge is a colour challenge. And here they are...


Celebrate Swirly Flowers

Stamp Set: Basic Phrases, Season of Joy, So Swirly
Ink: Real Red, Certainly Celery 
Cardstock: Whisper White, Certainly Celery, Real Red
DSP: Poppy Parade (Hostess Only Pack)
Punches: Modern Label, Itty Bitty, Boho Blossoms
Accessories: Basic Pearls
Extras: Sponges, Dimensionals, Jumbo Handle

y This is a little bit of a Christmassy card but by changing the colour combo this card works well at any time of the year! I think this is a card layout that I will be turning back to again and again! I wheeled out the So Swirly wheel in Certainly Celery on Certainly Celery cardstock. I tore the edge and inked it up with Certainly Celery ink to add some definition and adhered it to the Whisper White card base. To blend the Whisper White and Certainly Celery together I inked around the edge of the cardstock to soften the look. I stamped the flowers from the Season of Joy set on Real Red cardstock and layered some punched flowers using Poppy Parade dsp in the centres and on top of that some pearls. Finally I stamped the sentiment on some Poppy Parade dsp and punche out with the Modern Label punch, inked around the edge to finish!

Please head over to the Simply Stampin' Challenge, check out the other fab design team entries and then enter yourself! 

Hugs,

Amanda 

xx

Friday, 22 July 2011

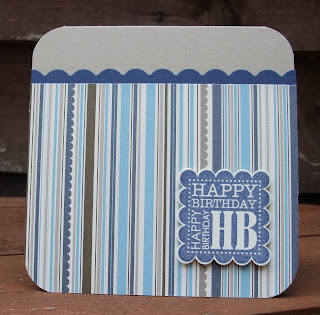
more masculine?

Just thought I would share with you a really quick and simple little masculine card I made for a friend's birthday a couple of weeks ago.


Elegant HB

Stamp Set: Punch Bunch (Retired)
Ink: Night of Navy
Cardstock: Crumb Cake, Very Vanilla
DSP: Elegant Soiree
Punches: Scallop Square, Scallop Trim, Corner Rounder
Extras: Dimensionals

So really nothing taxing to be honest, but its a fab quick masculine card with can literally be whacked out in minutes (which was the case with this card, I got about 5 minutes notice to make a card for this friend of Stu's - oh dear!). Anyhows I just thought I'd post this little gem up and let you have a little looksie! Hope you enjoyed it!

Thanks for visiting today,

Hugs,

Amanda 

x

Thursday, 21 July 2011

sail away...

Well I finally got around to purchasing the Sail Away stamp recently. Haven't regretted it for a second! I love it so much, if for no other fact than it makes a really quick and simple masculine card! 


Atmospheric Sail Away

Stamp Set: Sail Away, Fun and Fast Notes
Ink: Crumb Cake, Not Quite Navy, Night of Navy, Basic Black
Cardstock: Very Vanilla, Not Quite Navy, Night of Navy
Punches: Modern Label
Extras: Sponges, Dimensionals, Blender Pen

So this card is actually pretty simple, just requires a LOT of inking and getting rather messy hands! I don't think I could consider myself a crafter without getting messy every once in a while though!! Haha, and with me that seems to be more often that not! So I stamped the sail boat of some Very Vanilla cardstock and the sails on a separate piece and cut them out. I then began inking the edges of the cardstock, being quite vicious with the inking and not at all careful working futher and further in. I layered the Not Quite Navy and the Night of Navy inks on to of one another to create the atmospheric sky and sea. I shaded the cut out sails with a little bit of Crumb Cake and a blender pen and then adhered the sails to the inked up cardstock. I layered it up on some Not Quite Navy and Night of Navy cardstock and finished it off with stamping the sentiment from Fun and Fast Notes on some Very Vanilla cardstock, punching with the modern label and then inking the edges before adhering below. 


I think this has got to be one of my favourite cards I've made recently! What do you think? Please comment.

Til next time,

Amanda x

Wednesday, 20 July 2011

oh sew swirly

Following in the theme of Saturday's class. Here is one of my samples I made to show at class on Saturday using the wheel. I really love the So Swirly wheel and while it is advertised as a Christmas product I think it is so versatile. 


Oh Sew Swirly

Stamp Set: Basic Phrases, So Swirly Wheel
Ink: Regal Rose
Cardstock: Pretty in Pink
DSP: Oh Sew
Punches: Modern Label, Scallop Circle, 1 3/8" Circle, Boho Blossoms, Itty Bitty Pack, Corner Rounder
Accessories: Brights Buttons, Brights Brads
Extras: Paper Piercer, Tombo Multi Glue, Jumbo Wheel Handle

I used a variety of punches to make several flowers using dsp paper and then applied them to the So Swirly wheel. I stamped the sentiment on some more dsp and punched it out using the Modern Label punch. All the flowers and modern label punch were very rounded so I decided round all the corners of the card. I think it makes a very sweet and cute girly birthday card! 

Please leave me a comment and let me know what you think. I look forward to reading your comments! 

Hugs,

Amanda x


Tuesday, 19 July 2011

fuelling my addiction

Well, I said I was into a wreath theme at the moment, and here is yet another one for you to enjoy. 


For You Summer Wreath

Stamp Set: Basic Phrases
Ink: Rose Red
Cardstock: Very Vanilla, Old Olive Texture
DSP: So Saffron, Rose Red
Punches: Modern Label, Itty Bitty Pack, 1 3/4" Circle, Boho Blossoms
Accessories: Rhinestones 
Extras: Tombo, Dimensionals

Very simple really, just like the Two Step Bird wreath I used the circle punch as a template and stuck the Itty Bitty Punch Pack flower shapes to it to fill it out. Stamped my sentiment on the Modern Label punch and assembled! Voilà!

I think this is probably my least favourite of my wreaths to date. Look forward to reading what you think! Thanks.

Amanda x

Monday, 18 July 2011

happy surprises

I had a lovely little surprise in the post on Friday! It was really sweet so I thought I would just share it with you all! It was from my Stampin' Up grandma, Amanda.

She sent me this sweet little bracelet. She sends every demo one when they get their first downline and promote to Bronze 3! It comes with 3 beads on it, one is a dragonfly, her trademark and one that says love on it and the third one is for the first member of the downline. Then whenever you get a new member in your downline she sends you another bead for your bracelet! Its really sweet of her, and here it is, complete with packaging and card...


I hope you enjoyed seeing today's little share! The card is just gorgeous and so cheerful! Love it! 

Catch you again tomorrow! 

Amanda 

x

Saturday, 16 July 2011

so swirly in july with class

Today was my July class. I had four lovely ladies and we all had such a great time together! I have to say I really love my classes, not only do I get to wow my attendees with fab projects and products from Stampin' Up but I get to have a really good time crafting with some lovely people. It is such a pleasure getting to know so many new people and a joy to see how every one's projects turn out so differently and so fabulously! 

Now onto this month's class. This month we used the Jumbo wheel. We were also going to use the builder wheel but we just ran out of time and to really get into it, it needs some more time so it will be added into a future class instead! This is the card we made using the So Swirly jumbo wheel!


So Swirly Flowers

The other techniques we focused on this month was decorating chip board! We all decorated our chip board using two techniques, covering with designer paper and inking! Its amazing how easy it is to bring chip board to life and how professional it looks! And by decorating it yourself you can  make them co-ordinate perfectly with whatever project you are working on! We added our chip board to the 3D project we made with was a baking sheet message board! 

This is one that I did a few weeks ago for a Simply Stampin' Challenge, I did another today during my class using the Oh Sew paper... GORGEOUS!!!! I will upload photos of that message board later this week! 

The message board makes a great home accessory - personalise to fit in with your home/office/kitchen décor. It also makes an extremely affordable but gorgeous little gift! In the current economical climate everyone is looking for ways to save and with a project like this, they cost next to nothing!


Baking Tray Message Board & Bottle Cap Magnets

If you like the look of these projects and you would like to have a go yourself please do get in touch and we will schedule a catch up class! I would love to show you how to do these projects, they are just so much fun and easy to do too! Email me on amanda_burditt@hotmail.co.uk to book your catch up class now! 

Look forward to hearing from you soon! 

Amanda x

simply stampin' challenge, week 16

This week's Simply Stampin' Challenge challenge is a sketch! I got on a lot better with it this week than the last one. So without further waffling, here is the sketch and my entry...


Playdate Flowers

Stamp Set: Basic Phrases
Ink: Real Red
Cardstock: Whisper White 
DSP: Playdate
Punches: 1" Circle, 1 3/8" Circle, 1 3/4" Circle, Corner Rounder
Extras: Dimensionals

I happened to have the Playdate paper out when I was doing this card and thought  the colours and patterns would work well for this sketch. I originally punched out the circles to add around in a scallop fashion around the larger circles but it just looked too flat. Then I had the idea to pinch one end of the circle up to add some creases and folds in the petal, and wow, it really worked! What an easy and effective way to create dimension and punch to a simple punched up flower! When all the layers were put together, something just wasn't sitting right, it needed some curved corners to mirror the curves in the flowers. I rounded one then thought it would look cool and a little different to round the opposite one! I'm really pleased with this card, what a cute child's card and so simple to make! 

Let me know what you think, I love reading your comments. 

Now head on over to the Simply Stampin' Challenge blog to see the other design team's entries and enter your sketch interpretation! I love seeing how one sketch can look so different from one card to the next! 

Thanks for visiting today,

Amanda xx


Friday, 15 July 2011

roll on some texture!

Happy Friday everyone! Hope you are all looking forward to the weekend! I am looking forward to a weekend full of crafting! Tonight I have a workshop at one of my friend's houses which I am really looking forward to, and then tomorrow I have a class with some lovely ladies followed by a catch up class on Monday evening for a few people who couldn't make it on Saturday! So much fun! Woohoo! 


So today I just have a little card to wet your appetite for my classes this weekend and show you one of the cards I have been demonstrating a lot at workshops recently! Its actually a slightly CASEd version of a card Rhoda made a little while back, click here to go and see her card. 


This card uses the wheel, a product we shall be getting stuck into this weekend at class! It is so much fun, so easy and a great way of adding texture and pattern to the background! And if you would like to have a go at using the wheel yourself there is just enough time to get in touch and attend my class! Either Saturday 11-2 or Monday 7:30-10. Cost is £12.50 which covers the cost of materials used. I guarantee it will be a lot of fun, so get in touch, email me on amanda_burditt@hotmail.co.uk now to book your place!


French Foliage (Texture Galore!)


Stamp Set: French Foliage

Wheels: Texture (Jumbo)

Ink: Crumb Cake, Early Espresso, Old Olive, Riding Hood Red
Cardstock: Old Olive, Crumb Cake
Accessories: Early Espresso Satin Ribbon, Linen Thread
Extras: Dimensionals, Jumbo Wheel Handle

I wheeled the texture wheel across the entire background in Crumb Cake to give it a subtle tone on tone texture. I then stamped the french script, postmark and water drops in Early Espresso on top of one another. They all work wonderfully together! I slipped a piece of ribbon through the card and instead of tying it in a know or bow, I tied a piece of linen thread around the ends as they hung off the card. This uses less ribbon (great for the economical crafter) and also makes it a much less bulk, post friendly card! Finally, I stamped the leaves using the rock and roll technique to make them look more realistic and adhered then with dimensionals to give more depth to the card. 

Don't forget to get in touch and book your place now if you would like to come along on Saturday or Monday and make some cards like this, plus the message board from the Simply Stampin' Challenge last week also!!

Look forward to reading your comments,

Hugs,

Amanda xx

Thursday, 14 July 2011

celebrate the summer with blossoms....

Well, I wasn't lying, I am having a little bit of an obsession with wreathes at the moment! This is just the second, and there are more to come over the following days! Actually I think this one is very sweet!


Baby Blossoms Wreath

Stamp Set: Because I Care (Hostess Only), Baby Blossoms 
Ink: Real Red, Riding Hood Red, Old Olive, Pretty in Pink, Regal Rose
Cardstock: Very Vanilla, Crumb Cake, Old Olive
Punches: 1 3/4" Circle
Accessories: Linen Thread
Extras: Tombo Multi Glue

So I started off by lightly drawing around a circle punch to get the basic outline of the wreath before beginning to fill it out! Then I went all around with the itty bitty flowers to fill it out, and went back over the top with the rose buds in a darker colour! Finally, I stamped the small leaf spray all around filling it gaps stamping twice before re-inking to give more variation to the leaf colour. I tied a small bow and adhered it in a gap at the bottom just off centre because its a casual summer wreath, nothing is perfect and putting it in the centre just didn't look right for the style of card. I finished it off by mounting it on some cardstock and stamping the because I care sentiment underneath with a few rose buds on either side. I love it because its such a elegant little summer card! And very cheerful too! 

Let me know what you think! Your comments make my day! 

'til next time, 

happy crafting! 

Amanda 

xx

Wednesday, 13 July 2011

give it some texture!

The third of the cards I made for women leaving a women's Bible Committee. This one was for a woman who is moving to Norfolk!


So Sorry You're Leaving 

Stamp Set: Basic Phrases
Ink: Baja Breeze, Chocolate Chip
Cardstock: Whisper White, Crumb Cake
DSP: Playdate
Punches: Corner Rounder
Extras: Brown Pen, Sponge, Crimper

I chose a couple green patterns out of the Playdate paper which I layered up to look like hills (I know Norfolk is really flat but the hills worked for the card). I sponged the background to look like a sky with clouds. Then made the house with some red dsp from the Playdate collection again and also some Crumb Cake. When I started putting it together I just couldn't get the house to work, I think because everything was so textured and patterned the flat cardstock stuck out like a sore thumb, so I decided to give it a go and crimp it...seemed to work! Finally to tie everything together and give it a slightly more country feel I drew brown stitching lines around everything. I finished it off with the sentiment, half stamped and half handwritten. I really love the half and half style, it ties together the geometric patterns and the hand made quality together nicely! 

Hope you enjoyed seeing today's card, I love doing cards on commission. Especially for an occassion that isn't an everyday one as it really stretches my creative brain! 

Hugs,

Amanda 

Tuesday, 12 July 2011

give it some love!

The second of my 3 farewell cards for women leaving a women's Bible Committee. This one is for a lady who is getting married in August. She is from the Caribbean and will be moving back to the Caribbean with her new husband. 


Best Wishes Hearts

Stamp Set: I {Heart} Hearts
Ink: Regal Rose, Early Espresso
Cardstock: Crumb Cake, Regal Rose Textured
Punches: Modern Label
Accessories: Early Espresso Satin Ribbon, Pink Button (non-SU), Linen Thread
Extras: Sponge, Brown Pen, Dimensionals

Another really simple card, a bunch of hearts stamped and layered up on top of one another. I added a torn piece of textured Regal Rose cardstock and Early Espresso ribbon to the top. In the bottom right hand corner I hand wrote the sentiment on a modern label punch and then sponged the edges with Regal Rose to help it blend in with the rest of the card! 

Hope you like it! I think its definitely very cute! 

Hugs, 

Amanda 

xx

Monday, 11 July 2011

give it some shimmer!

I've had several commission cards of late, this is just the first. I had 3 for people that were leaving a Christian women's organisation and the others in the group wanted some nice "goodbye" cards for them. The other stipulation was that they wanted them to reflect the reason why they were leaving. 

The first, today's, was for a lady leaving due to a new job and generally being extremely busy! 
  

Best Wishes Hydrangea

Stamp Set: Because I Care (Hostess Only), Silhouette Sentiments (Hostess Only)
Ink: Pretty in Pink, Regal Rose, Pear Pizzazz, Old Olive, Basic Black
Cardstock: Very Vanilla, Pink Pirouette, Old Olive
Accessories: Shimmer Mist (Shimmer Paint and Rubbing Alcohol)
Extras: Blender Pen, Dimensionals

A very simple card. I coloured in the hydrangea with a blender pen, stamped Best Wishes and layered onto some coloured cardstock. Finally to make it look that extra bit special, I gave the card a spritz with my homemade shimmer mist! So pretty! 

Hope you enjoyed this simple card today! 

Hugs, 

Amanda 

Sunday, 10 July 2011

vintage loving

Hello friends! 

Just a quick little post for you today...


Vintage Love

Stamp Set: Punch Potpourri (Hostess Only), I {Heart} Hearts, Basic Phrases
Ink: Basic Black, Rose Red, Old Olive, Crumb Cake
Cardstock: Very Vanilla, Rose Red, Crumb Cake
Extras: Sponge, Dimensionals, Blender Pen

I stamped the heart from Punch Potpourri on some Very Vanilla cardstock and coloured in the flowers using the blender pen and finally cut it out. I then stamped some hearts from the I {Heart} Hearts stamp set on another piece of Very Vanilla cardstock. I then sponged the Very Vanilla cardstock and the Vanilla heart with Crumb Cake ink to give it a vintage aged feel. Finally I adhered all the elements together and stamped the sentiment at the bottom of the Vanilla cardstock. This would make a very cute little wedding card for someone or indeed an anniversary card!


I hope you enjoyed this sweet and simple card today! Come back tomorrow for another one!

Look forward to reading all your comments!

Hugs,

Amanda x

Saturday, 9 July 2011

simply stampin' challenge, week 15

Week 15 already?! Wow, how time is flying! Well, we are back around to a themed challenge again at the Simply Stampin' Challenge blog once again. This time the theme is

ANYTHING BUT A CARD

I love any excuse for making something but sometimes it can seem too easy to just stick to making cards. Cards are great, they bring lots of joy and happiness to a lot of people but its fun to make other things with paper crafting too, right? Right! Well this week's entry is actually something I saw on a TV show when I was in the States a month ago and what we shall be making as our 3D item at my class next Saturday. Its not too late to book your place on my class so if you're totally loving this project and would love to make your own, book your place now by emailing amanda_burditt@hotmail.co.uk. It only cost £12.50 for a whole load of crafting fun for 3 whole hours! 


Baking Tray Message Board

Stamp Set: Just Perfect Alphabet
Ink: early Espresso
DSP: Springtime Vintage
Accessories: Early Espresso Satin, Early Espresso Striped Grosgrain, Mix&Match Chipboard

Yes, that's right! This is a message board! If you would like to know how to make one of these yourself, you'll have to come along to my class! 

Let me know what you think! I think its such a fun and cool idea! I think every home should have at least one!! Now, hop on over to the Simply Stampin' Challenge blog and check out the other talented design team member's entries and then enter you not a card project!

Hugs, 

Amanda x


Friday, 8 July 2011

welcome sue

As promised, today I would like to show the little card I made for Sue to welcome her into my team!

One thing I seem to be seeing a lot at the moment are wreaths. I saw a lot of them when I was in the States and I thought they all looked so pretty! I think its a common misconception that they're a winter and Christmas item, but by doing a few simple alterations they can be made into a simple image to be used at any time of the year. I must admit, I am on a bit of a wreath craze at the moment!


Friend Summer Wreath 

Stamp Set: Basic Phrases
Ink: Old Olive
Cardstock: Very Vanilla, Old Olive Textured, Regal Rose Textured
DSP: So Saffron
Punches: Modern Label, Two Step Bird, Itty Bitty Punch Pack, 1 3/4" Circle
Accessories: Pearls, Linen Thread
Extras: Dimensionals, Tombo Multi Glue

The light bright airy colours really make this card summery and cheerful! Its so simple to do, simply punch out the circle punch and put a line of tombo around the edge and lay branches from the Two Step Bird punch and snip off the extra bits of branch hanging over. When the circle is complete with branches add flowers from the Itty Bitty punch pack to fill in the gaps, add a few pearls and a linen thread bow. I stamped the sentiment on So Saffron dsp and  punched it out with the Modern Label punch. To tie in the sentiment with the wreath I added a few more pieces of branch and a couple more flowers! 

I hope you enjoyed today's little share! For more projects I've been working on come back each day next week for a new card! 

Also, don't forget to come back tomorrow for the new Simply Stampin' Challenge. 

Look forward to reading your comments, 

'til next time, 

Amanda 

xx


Thursday, 7 July 2011

plus one

I have a piece of rather exciting news, last week I got my first downline member! I'm just a tad excited! I remember how exciting a time it was when I joined the Stampin' Up! family as a demo and how sweet Rhoda was to send me buttons and rhinestones to help me along. So, with my first downline member, I felt it only natural to share that same joy in giving! Its great to give, it always makes me feel so happy to see someone getting joy out of something you have done or given to them. So, as a thank you and a welcome for joining the Stampin' Up! family I made a little gift for Sue.


Butterfly Box

Stamp Set: Punch Potpourri (Hostess Only)
Ink: Marina Mist, Rich Razzleberry, Pacific Point, Elegant Eggplant
Cardstock: Rich Razzleberry Texture, Garden Green, Crumb Cake
DSP: Rose Red, So Saffron, Wild Wasabi 
Punches: Butterfly, Boho Blossoms, Two Step Bird
Accessories: Rhinestones, Crystal Effects, Dazzling Diamonds
Extras: Sticky Strip, Tombo Multi Glue

I bought this little paper mache box very cheaply and decorated it with strips of dsp. I punched out a variety of colours using the Boho Blossoms punch and layered them on top of one another adding a rhinestone to the centre and a few branches from the two step bird punch! For the butterflies I got inspiration from a video on Michelle Last's blog, click here to see her lovely little video! I changed it slightly as I couldn't really find a flower stamp in my collection that was suitable. I originally intended on curling the edge of the butterflies but after trying one decided it just didn't look good! So basically I did the rock and roll technique, punched out the butterflies and covered then with crystal effects and finished them off with a dusting of dazzling diamonds glitter and some rhinestones. when they were dry I bent up the wings, and adhered them in the centre of the lid as if they are sitting on the flowers. The box was just the perfect size for the small box of flower brads that I bought for Sue to help her get going with crafting! When she saw the box she was stunned and when she heard the rattled she was shocked that there was a little something inside. I love seeing people's excited reactions to gifts, especially when they aren't expecting them! 

I hope you liked today's little share. Come back tomorrow to see the little card I made to welcome Sue into my team. 

Hugs, 

Amanda xx

seriously neglected!

Hello lovely blog readers!

Wow I have SERIOUSLY neglected my blog. It hasn't been for a lack of crafting by any means! I have a huge pile of goodies I can't wait to show you all, they just haven't quite made it to photo format! 

If any of you were reading last week about the state of my craft room, well I would like to say, it got finished! Just in time for Steve to come visit us so while he slept on the sofa downstairs I now had a lovely craft room to use. Well, it was my first proper full day working in there. I was just sitting minding my own business crafting away and then all of a sudden crash, bang, whollop! I turned around to see one of my shelves had come off the wall and everything was a mess. Drawers with office supplies and pencils etc were lying in broken pieces on the floor, there was DSP everywhere!! ugh! And then just to top it off, when I started clearing up a few thing, I failed to se that my glass tealight holder had been smashed and I got glass in my foot! Oh what a day! I felt bad seeing as it woke Steve up too! 

On Monday my friend Handyman Hugh came over to fix my shelves. He added more brackets to spread the weight so hopefully something like that won't happen again! 

My room isn't quite how it was before...yet. To be honest I've had too much fun crafting in my proper craft room to want to tidy things up! 

So, I will charge my camera battery and be back this afternoon with project for you to see! 

'til next time, 

Amanda x

Saturday, 2 July 2011

simply stampin' challenge, week 14

Colour Combo week at the Simply Stampin' Challenge blog once more! This week's colour combo is

Its not a colour combination I would have readily put together myself, and when I saw it I must admit I was a little sceptical! However, I have been converted! This just goes to prove, you must always keep an open mind!!


Celebrate Circles

Stamp Set: Basic Phrases
Cardstock: Whisper White, Rich Razzleberry, Night of Navy
DSP: Peach Parfait (Hostess Only)
Ink: Rich Razzleberry
Punches: 1 3/4" Circle, 1 3/8" Circle, 1" Circle
Accessories: Whisper White
Extras: White Gel Pen

A really simple card, I layered up different sized circles of the 3 main colours using the whisper white as a background. I added a white stitching line around the edges to tie them all together and blend better with the background. I thought they looked really nice as a row along the bottom but the top of the card was then too unbalanced so I filled that with some Whisper White ribbon, very subtle tone on tone effect but really helps to balance out the card. Finally I was looking for a suitable place to stamp a sentiment and thought, why not stamp on the ribbon...its worth a go! Well, it bled a little, which wouldn't have happened if I had used stazon ink but it doesn't look too bad, and does the job! 

Well, I hope you enjoyed this little colour combo card and now please head over to the Simply Stampin' Challenge blog and enter in! It doesn't matter if you haven't got the exact colours, just use the closest ones that you do have! 

'Til next time, 

Amanda xx